HaaS506传感器数据上云和继电器控制
1. 前言
本实验将向大家介绍如何使用Python语言在HaaS 506上实现读取传感信息,上报到阿里云物联网平台,并实现云端下发控制继电器
2. 开发环境
- 硬件环境:
HaaS 506开发板 Usb转uart模块,Hy转杜邦线4pin 6pin线材,购买链接:https://item.szlcsc.com/2794903.html
继电器,购买链接:https://item.taobao.com/item.htm?spm=a1z09.2.0.0.17d92e8d3T5rbF&id=596058726555&_u=5msb3vr09cb
空气传感器,购买链接:https://item.szlcsc.com/2794903.html
- 软件环境:
HaaS 506固件,下载链接:https://hli.aliyuncs.com/o/config/haas506/haas506.zip
HaaS 506固件烧录方式,烧录方式链接:https://g.alicdn.com/HaaSAI/PythonDoc/quickstart/quickstart_haas506.html#i
Vs code版本应大于1.57,下载链接o:https://code.visualstudio.com/
HaaS studio Vs code插件,安装方法:https://blog.csdn.net/HaaSTech/article/details/118997742
HaaS 506快速开始,查看链接:https://blog.csdn.net/HaaSTech/article/details/119379840
HaaS 506 Python api手册,查看链接:https://g.alicdn.com/HaaSAI/PythonDoc/library/index.html
- 接线方法
空气传感器连接4pin HY线材对接HaaS506 开发板TTL接口(J8)。 注意事项:空气传感器接收接HaaS506开发板发送(TX),空气传感器发送接HaaS506开发板接收(RX),空气传感器地接HaaS506开发板GND,空气传感器VCC接HaaS506开发板3.3V
将6pin HY线材插入SPI接口(J9)。 注意事项:继电器VCC接 HaaS 506开发板3.3V,继电器Gnd接HaaS506开发板GND,继电器In1接HaaS506开发板MOSI。HaaS506开发板CS接HaaS506开发板GND。
3. 涉及知识点
- uart通讯原理
A串口全称叫做串行接口,通常也叫做 COM 接口,串行接口指的是数 据一个一个的顺序传输,通信线路简单。使用两条线即可实现双向通信,一条用于发送,一条用于接收。串口通信距离远,但是速度相对会低,串口是一种很常用的工业接口。
- 空气传感器,TB600B
TB600B 系列 SMELL异味检测模组汇集了诸多来自德国的高精度检测技术,以及德国团队的设计理念,核心传感器采用全球电化学领域体积最小的德国 EC Sense 固态聚合物传感器。可以替代我们的鼻子夫精准嗅出气体浓度,实现精准监测。UART数字式信号输出,省去了客户对传感器应用的了解,以及校准的繁琐工作。应用领域:家居装修材料释放异味检测、养殖场环境恶臭检测、空气新鲜测量评估、办公楼宇及公共空间异味检测、污水恶臭,垃圾恶臭检测、厕所环境异味检测、口腔异味检测、汽车装饰材料异味检测、纺织品异味检测。
- 阿里云物联网平台
阿里云物联网平台为设备提供安全可靠的连接通信能力,向下连接海量设备,支撑设备数据采集上云;向上提供云端API,服务端通过调用云端API将指令下发至设备端,实现远程控制。
4. 代码实现
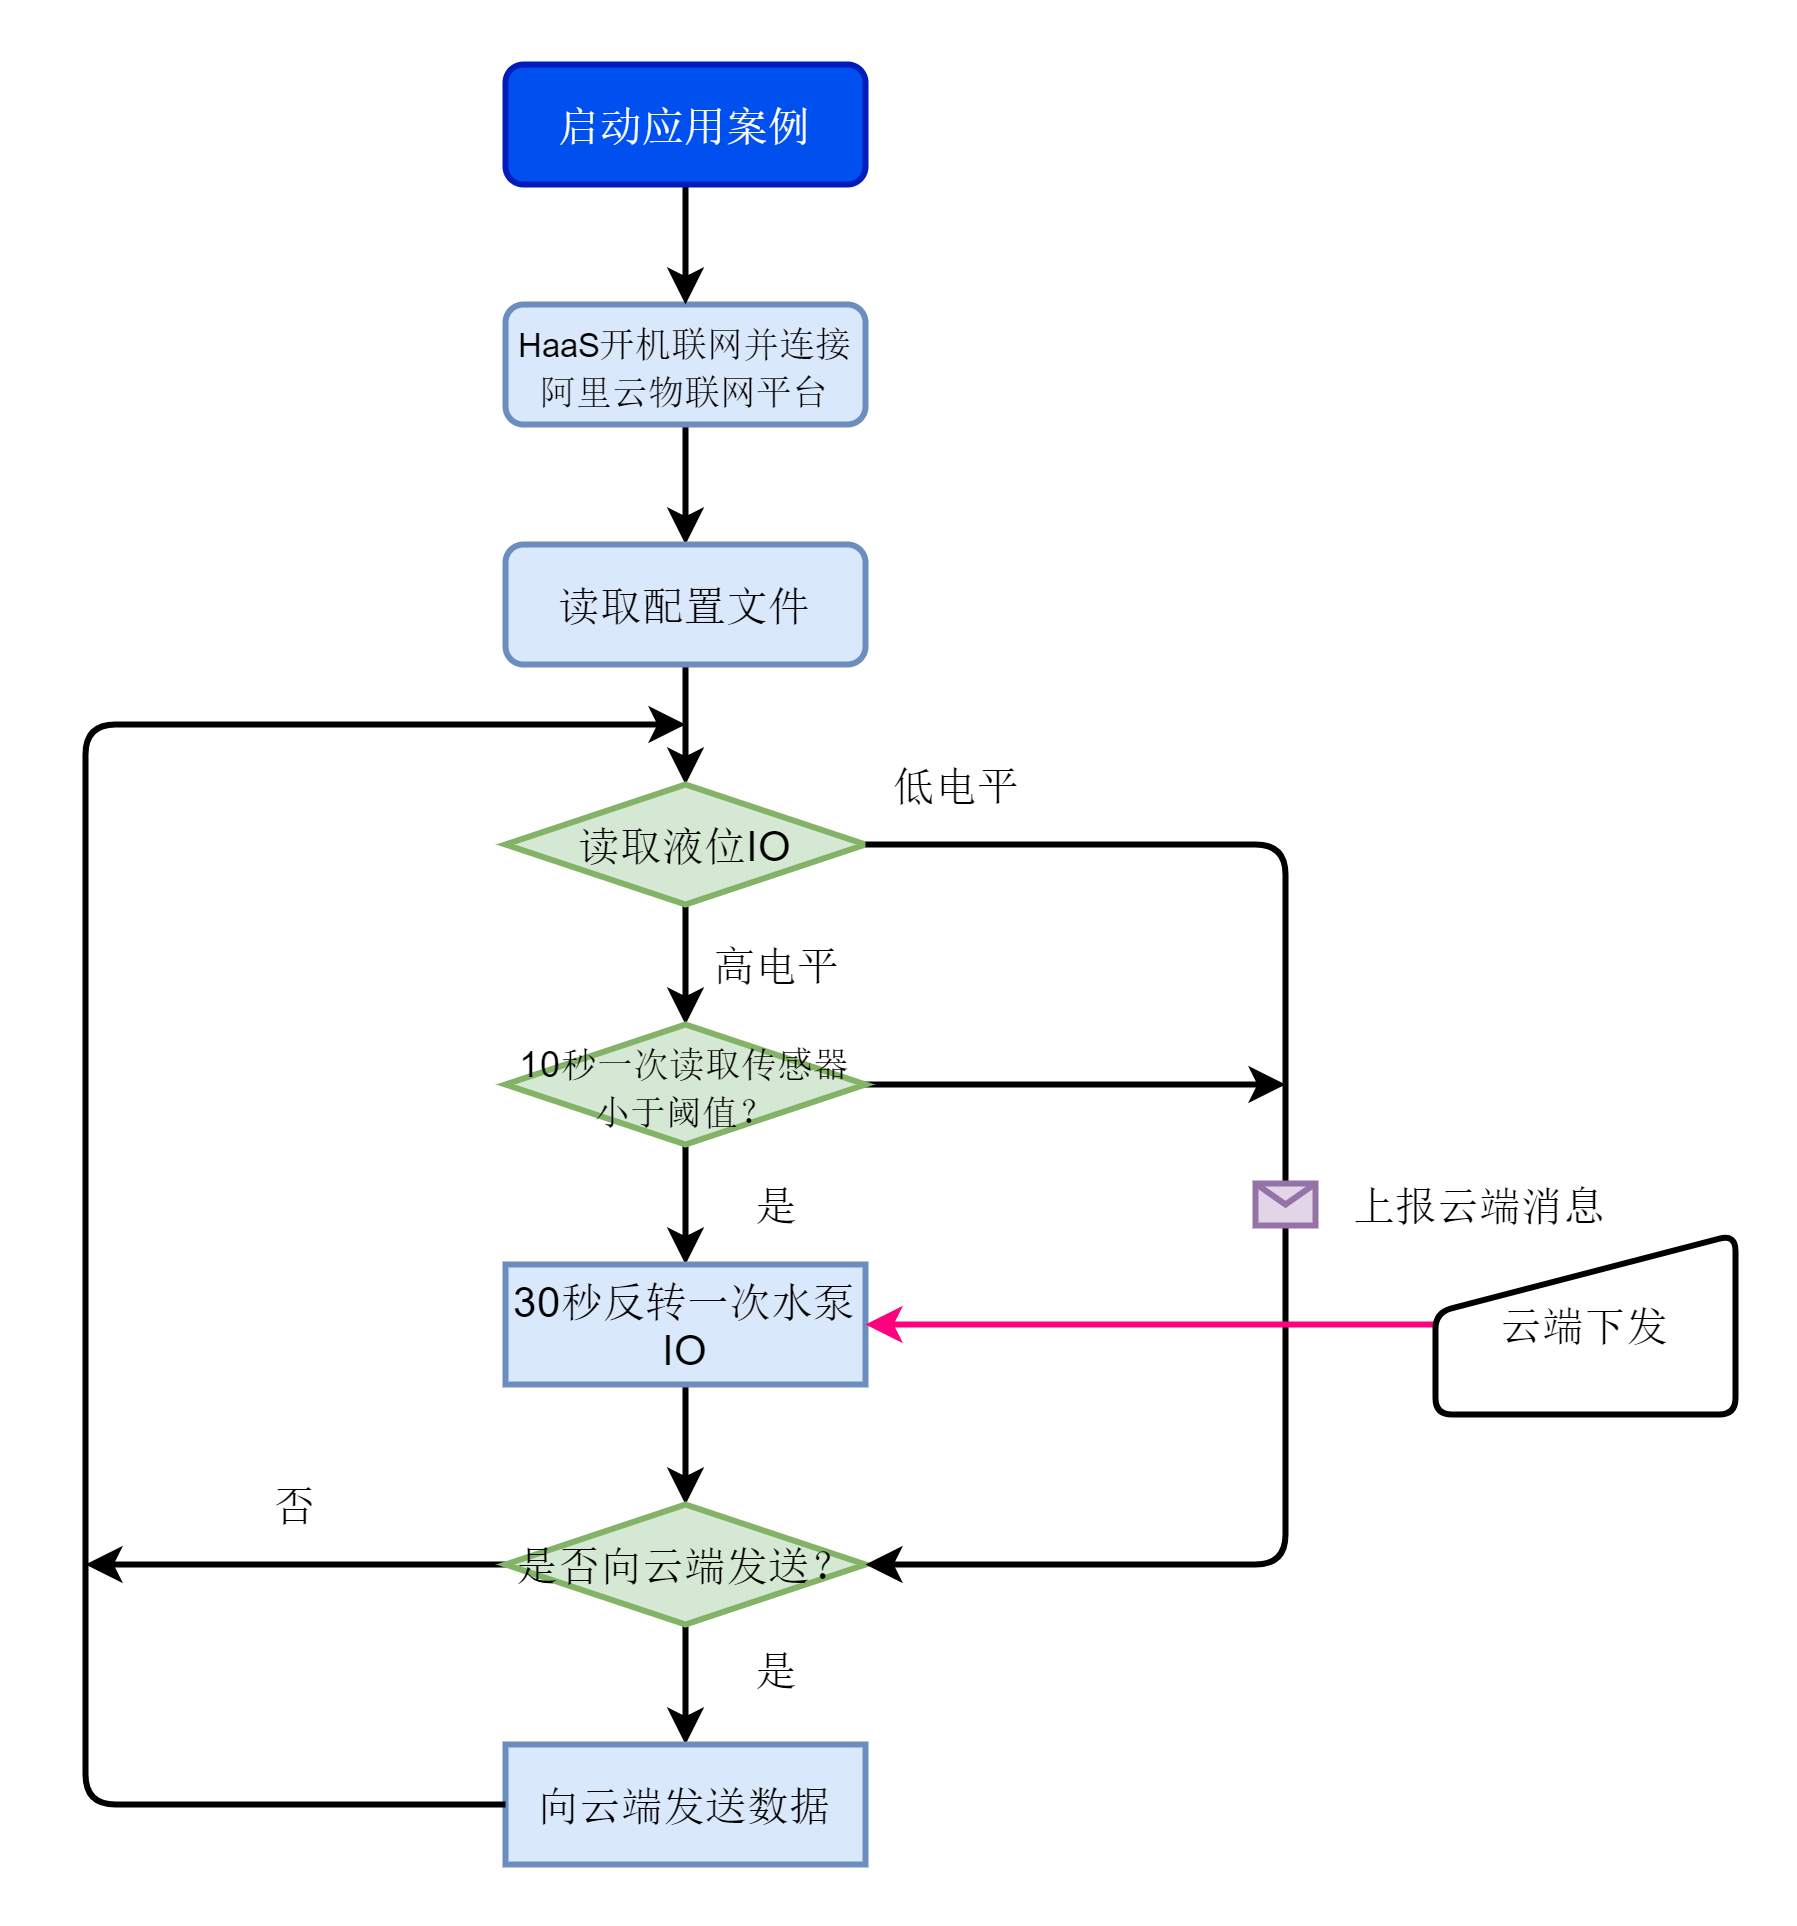
1 2 3 4 5 6 7 8 9 10 11 12 13 14 15 16 17 18 19 20 21 22 23 24 25 26 27 28 29 30 31 32 33 34 35 36 37 38 39 40 41 42 43 44 45 46 47 48 49 50 51 52 53 54 55 56 57 58 59 60 61 62 63 64 65 66 67 68 69 70 71 72 73 74 75 76 77 78 79 80 81 82 83 84 85 86 87 88 89 90 91 92 93 94 95 96 97 98 99 100 101 102 103 104 105 106 107 108 109 110 111 112 113 114 115 116 117 118 119 120 121 122 123 124 125 126 127 128 129 130 131 132 133 134 135 136 137 138 139 140 141 142 143 144 145 146 147 148 149 150 151 152 153 154 155 156 157 158 159 160 161 162 163 164 165 166 167 168 169 170 171 172 173 174 175 176 177 178 179 180 181 182 183 184 185 186 187 188 189 190 191 192 193 194 195 196 197 198 199 200 201 202 203 204 205 206 207 208 209 210 211 212 213 214 215 216 217 218 219 220 221 222 223 224 225 226 227 228 229 230 231 232 233 234 235 236 237 238 239 240 241 242 243 244 245 246 247 248 249 250 251 252 253 254 255 256 257 258 259 260 261 262 263 264 265 266 267 268 269 270 271 272 273 274 275 276 277 278 279 280 281 282 283 284 285 286 287 288 289 290 291 292 293 294 295 296 297 298 299 300 301 302 303 304 305 306 307 308 309 310 311 312 313 314 315 316 317 318 319 320 321 322 323 324 325 326 327 328 329 330 331 332 333 334 335 336 337 338 339 340 341 342 343 344 345 346 347 348 | # coding=utf-8
# This is a sample Python script.
import iot
import ujson
import network
import utime as time
from driver import GPIO
from driver import UART
t1 = 30
gas_threshold = 5.0
liq_mdcn_alarm = False
gas_alarm = False
version = 'v0.0.1'
uart1 = UART('serail1')
liq_level = GPIO()
gpio = GPIO()
'''0 1 means cloud ctrl,2 local ctrl'''
cloud_ctrl = 2
g_connect_status = False
ini_file_name = '/user/cfg.txt'
def on_4g_cb(args):
global g_connect_status
pdp = args[0]
netwk_sta = args[1]
if netwk_sta == 1:
g_connect_status = True
else:
g_connect_status = False
def connect_network():
global on_4g_cb,g_connect_status
net = network.NetWorkClient()
g_register_network = False
if net._stagecode is not None and net._stagecode == 3 and net._subcode == 1:
g_register_network = True
else:
g_register_network = False
if g_register_network:
net.on(1,on_4g_cb)
net.connect(None)
else:
print('connect network failed')
for i in range(30):
if g_connect_status:
print('connect network success')
return True
time.sleep(1)
return False
def read_cfg_file():
global t1,gas_threshold,ini_file_name
try:
f = open(ini_file_name,'r')
except OSError:
cfg_dict = {'gasstr':1.0,'t1':60}
print('write',cfg_dict)
f = open(ini_file_name,'w+')
print(f)
f.write(ujson.dumps(cfg_dict))
else:
cfg_txt = f.read()
cfg_dict = ujson.loads(cfg_txt)
if isinstance(cfg_dict,dict) == False:
print('cfg_dict not a dict')
return
print('read',cfg_dict)
gas_threshold = cfg_dict['gasstr']
t1 = cfg_dict['t1']
print('gas',gas_threshold,'t1',t1)
finally:
f.close()
print('close')
return 0
def write_cfg_file(cloudstr):
global t1,gas_threshold,ini_file_name
if isinstance(cloudstr,str) == False:
return
try:
f = open(ini_file_name,'r')
except OSError:
pass
else:
cfg_txt = f.read()
f.close()
finally:
pass
try:
f = open(ini_file_name,'w+')
except OSError:
pass
else:
cfg_dict = ujson.loads(cfg_txt)
cloud_dict = ujson.loads(cloudstr)
if isinstance(cfg_dict,dict) == False:
print('cfg_dict not a dict')
return
if isinstance(cloud_dict,dict) == False:
print('cloud_dict not a dict')
return
for key in cloud_dict.keys():
if cfg_dict.get(key) != None:
cfg_dict[key] = cloud_dict[key]
if key == 'gasstr':
gas_threshold = cfg_dict[key]
if key == 't1':
t1 = cfg_dict[key]
f.seek(0)
f.write(ujson.dumps(cfg_dict))
print(cfg_dict)
pass
finally:
f.close()
print('cloud cfg file close')
return
def on_connect():
print('linkkit is connected')
def on_disconnect():
print('linkkit is disconnected')
def on_props(request):
print('clound req data is {}'.format(request))
global gpio
global cloud_ctrl
cloudmsg = ujson.loads(request)
if 'powerstate' in cloudmsg:
if cloudmsg['powerstate'] == 0:
gpio.write(0)
#pass
cloud_ctrl = 0
print('led state {}'.format(cloudmsg['powerstate']))
else:
cloud_ctrl = 1
gpio.write(1)
#pass
print('led state {}'.format(cloudmsg['powerstate']))
else:
write_cfg_file(request)
def on_service(id,request):
print('clound req id is {} , req is {}'.format(id,request))
def on_error(err):
print('err msg is {} '.format(err))
def gas_detec():
gas_val = 0.0
dotnum = 0
global uart1
len1 = 0
#sign = 0
uart1.open('serial1')
readbuf1 = bytearray(9)
writebuf1 = bytearray([0xd7])
readbuf2 = bytearray(13)
writebuf2 = bytearray([0xff,0x01,0x87,0x00,0x00,0x00,0x00,0x00,0x78])
uart1.write(writebuf1)
len1 = uart1.read(readbuf1)
print(readbuf1)
if len1 != len(readbuf1):
print('read dotnum err')
uart1.close()
return gas_val
uart1.write(writebuf2)
len1 = uart1.read(readbuf2)
print(readbuf2)
if len1 != len(readbuf2):
print('read gas err')
uart1.close()
return gas_val
uart1.close()
dotnum = (readbuf1[6]&0xf0)>> 4
#sign = readbuf1[6]&0x0f
gas_val = (readbuf2[2]*256.000 + readbuf2[3])*1.000/10**dotnum
print('gasvalue:',end='')
print(gas_val)
return gas_val
def liquid_level_detec():
lowval = liq_level.read()
print('lowval',lowval)
liq_meicn_remain = False
if lowval == 1:
liq_meicn_remain = True
else:
liq_meicn_remain = False
return liq_meicn_remain
def main():
global liq_level,cloud_ctrl,t1,liq_mdcn_alarm,gas_alarm
ret = connect_network()
print('network register sta {}'.format(ret))
productKey = 'xxxx'
productSecret = ''
deviceName = 'xxxx'
deviceSecret = 'xxxxx'
key_info = {
'region' : 'cn-shanghai',
'productKey' : productKey,
'deviceName' : deviceName,
'deviceSecret' : deviceSecret,
'productSecret' : productSecret
}
device = iot.Device(key_info)
device.on('connect',on_connect)
device.on('disconnect',on_disconnect)
device.on('props',on_props)
device.on('service',on_service)
device.on('error',on_error)
device.connect()
post_data = {'params':{'ver':version,'name':key_info['deviceName']}}
device.postProps(post_data)
read_cfg_file()
time.sleep(2)
led1 = GPIO()
pump = GPIO()
'''liqid level detec prompt led'''
led1.open('led1')
'''liquid level detec io'''
liq_level.open('liq_level')
'''control pump relay'''
pump.open('pump')
pump.write(1)
'''cloud_flg is cloud down data led'''
gpio.open('cloud_flg')
time_cnt = 0
gas_value = 0.00
liq_mdcn_re_flg_chg = False
need_send = False
while True:
time.sleep_ms(1000)
time_cnt += 1
liq_mdcn_re_flg = liquid_level_detec()
if liq_mdcn_re_flg == False:
led1.write(0)
if liq_mdcn_re_flg_chg == True:
liq_mdcn_re_flg_chg = False
need_send = True
pass
else:
led1.write(1)
need_send = True
liq_mdcn_re_flg_chg = True
print('need send')
'''need send data to cloud'''
pass
if time_cnt%10 == 0:
gas_value = gas_detec()
if gas_value > gas_threshold:
'''need send data to cloud'''
gas_alarm = True
need_send = True
print('need send')
else:
gas_alarm = False
pass
if liq_mdcn_re_flg == True:
need_send = False
pump.write(1)
cloud_ctrl = 2
print('close pump')
post_data = {'params':{'liq_mdcn_re':0,'gasval':100,'gasalarm':0,'powerstate':0}}
post_data['params']['liq_mdcn_re'] = 0
gas_value = gas_detec()
post_data['params']['gasval'] = int(gas_value*100)
if gas_alarm == True:
post_data['params']['gasalarm'] = 1
post_data['params']['powerstate'] = gpio.read()
device.postProps(post_data)
continue
if gas_alarm == False:
if time_cnt%t1 == 0:
if pump.read() == 1 :
pump.write(0)
print('open pump')
else:
pump.write(1)
print('close pump')
else:
pass
if cloud_ctrl == 0:
pump.write(1)
cloud_ctrl = 2
time_cnt = 0
print('cloud close pump')
elif cloud_ctrl == 1:
pump.write(0)
cloud_ctrl = 2
time_cnt = 0
print('cloud open pump')
elif gas_alarm == True:
pump.write(1)
print('gas alarm close pump')
if need_send == True:
need_send = False
post_data1 = {'params':{'liq_mdcn_re':0,'gasval':100,'gasalarm':0,'powerstate':0}}
if liq_mdcn_re_flg == True:
post_data1['params']['liq_mdcn_re'] = 0
else:
post_data1['params']['liq_mdcn_re'] = 1
post_data1['params']['gasval'] = int(gas_value*100)
if gas_alarm == True:
post_data1['params']['gasalarm'] = 1
post_data['params']['powerstate'] = gpio.read()
device.postProps(post_data1)
if __name__ == '__main__':
main()
|
由于本案例中涉及到硬件端口的配置,因此需要修改默认的board.json .修改后的json 文件中内容如下:
{
    "version": "1.0.0",
    "io": {
        "ADC0": {
            "type": "ADC",
            "port": 0,
            "sampling": 12000000
        },
        "pca9544": {
        "type": "I2C",
        "port": 1,
        "addrWidth": 8,
        "freq": 100000,
        "mode": "master",
        "devAddr": 112
        },
        "qma8981": {
        "type": "I2C",
        "port": 1,
        "addrWidth": 7,
        "freq": 400000,
        "mode": "master",
        "devAddr": 18
        },
        "GPIO23": {
            "type": "GPIO",
            "port": 23,
            "dir": "irq",
            "pull": "pullup",
            "intMode": "rising"
        },
        "led1": {
            "type": "GPIO",
            "port": 0,
            "dir": "output",
            "pull": "pullup"
        },
        "pump": {
            "type": "GPIO",
            "port": 16,
            "dir": "output",
            "pull": "pullup"
        },
        "cloud_flg": {
            "type": "GPIO",
            "port": 7,
            "dir": "output",
            "pull": "pullup"
        },
        "liq_level": {
            "type": "GPIO",
            "port": 15,
            "dir": "input",
            "pull": "pullup"
        },
        "SPI0": {
        "type": "SPI",
        "port": 0,
        "mode": "master",
        "freq": 2000000
        },
    "serial1":{
        "type":"UART",
        "port":0,
        "dataWidth":8,
        "baudRate":9600,
        "stopBits":1,
        "flowControl":"disable",
        "parity":"none"
    },
    "serial2":{
        "type":"UART",
        "port":1,
        "dataWidth":8,
        "baudRate":115200,
        "stopBits":1,
        "flowControl":"disable",
        "parity":"none"
    },
    "serial3":{
        "type":"UART",
        "port":2,
        "dataWidth":8,
        "baudRate":115200,
        "stopBits":1,
        "flowControl":"disable",
        "parity":"none"
    }
    },
    "debugLevel": "DEBUG",
    "repl":"disable"
}
5. 阿里云物模型
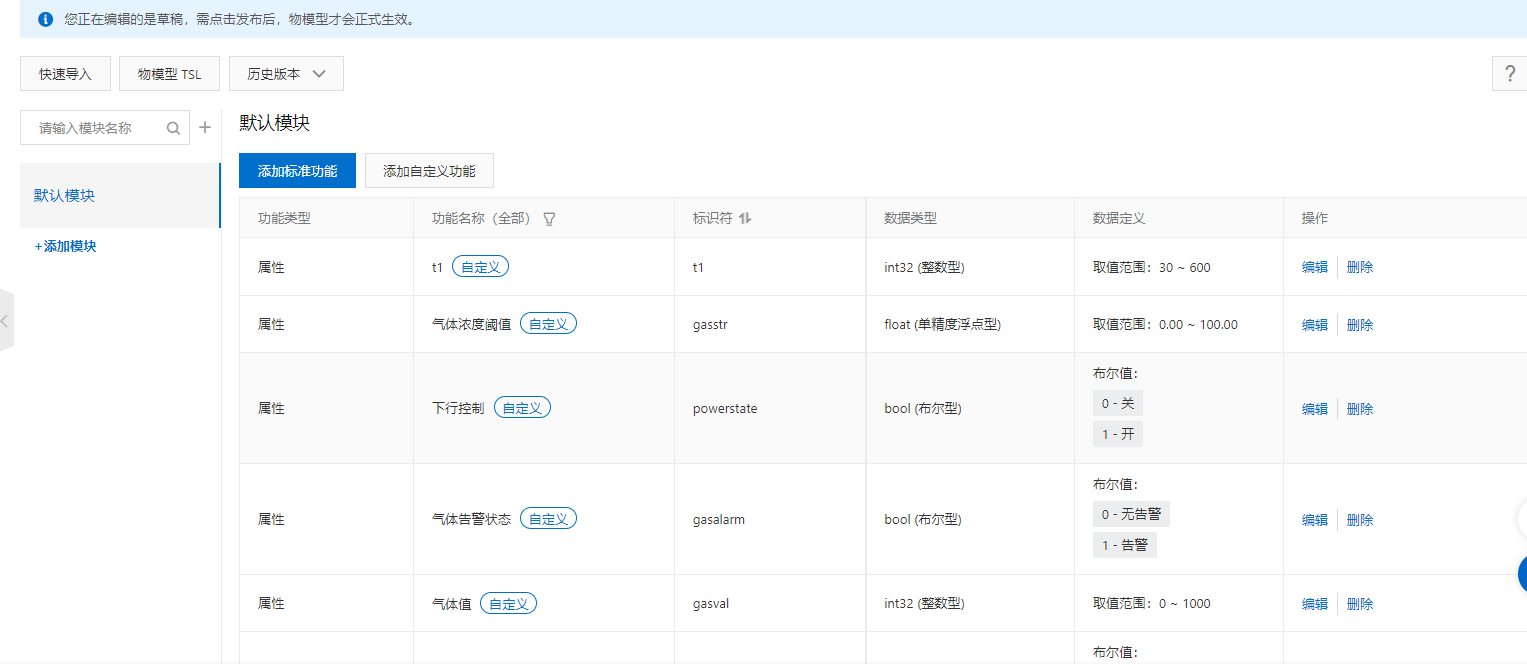
以下是阿里云物模型的json配置文件
{
    "schema": "https://iotx-tsl.oss-ap-southeast-1.aliyuncs.com/schema.json",
    "profile": {
    "version": "1.0",
    "productKey": "a1iJzDtH0Hy"
    },
    "properties": [
    {
        "identifier": "ver",
        "name": "设备版本",
        "accessMode": "r",
        "required": false,
        "dataType": {
        "type": "text",
        "specs": {
            "length": "64"
        }
        }
    },
    {
        "identifier": "liq_mdcn_re",
        "name": "液位",
        "accessMode": "r",
        "required": false,
        "dataType": {
        "type": "bool",
        "specs": {
            "0": "低",
            "1": "高"
        }
        }
    },
    {
        "identifier": "gasval",
        "name": "气体值",
        "accessMode": "r",
        "required": false,
        "dataType": {
        "type": "int",
        "specs": {
            "min": "0",
            "max": "1000",
            "step": "1"
        }
        }
    },
    {
        "identifier": "gasalarm",
        "name": "气体告警状态",
        "accessMode": "r",
        "required": false,
        "dataType": {
        "type": "bool",
        "specs": {
            "0": "无告警",
            "1": "告警"
        }
        }
    },
    {
        "identifier": "powerstate",
        "name": "下行控制",
        "accessMode": "rw",
        "required": false,
        "dataType": {
        "type": "bool",
        "specs": {
            "0": "关",
            "1": "开"
        }
        }
    },
    {
        "identifier": "gasstr",
        "name": "气体浓度阈值",
        "accessMode": "rw",
        "required": false,
        "dataType": {
        "type": "float",
        "specs": {
            "min": "0.00",
            "max": "100.00",
            "unit": "mg/L",
            "unitName": "毫克每升",
            "step": "0.01"
        }
        }
    },
    {
        "identifier": "t1",
        "name": "t1",
        "accessMode": "rw",
        "required": false,
        "dataType": {
        "type": "int",
        "specs": {
            "min": "30",
            "max": "600",
            "step": "1"
        }
        }
    }
    ],
    "events": [
    {
        "identifier": "post",
        "name": "post",
        "type": "info",
        "required": true,
        "desc": "属性上报",
        "method": "thing.event.property.post",
        "outputData": [
        {
            "identifier": "ver",
            "name": "设备版本",
            "dataType": {
            "type": "text",
            "specs": {
                "length": "64"
            }
            }
        },
        {
            "identifier": "liq_mdcn_re",
            "name": "液位",
            "dataType": {
            "type": "bool",
            "specs": {
                "0": "低",
                "1": "高"
            }
            }
        },
        {
            "identifier": "gasval",
            "name": "气体值",
            "dataType": {
            "type": "int",
            "specs": {
                "min": "0",
                "max": "1000",
                "step": "1"
            }
            }
        },
        {
            "identifier": "gasalarm",
            "name": "气体告警状态",
            "dataType": {
            "type": "bool",
            "specs": {
                "0": "无告警",
                "1": "告警"
            }
            }
        },
        {
            "identifier": "powerstate",
            "name": "下行控制",
            "dataType": {
            "type": "bool",
            "specs": {
                "0": "关",
                "1": "开"
            }
            }
        },
        {
            "identifier": "gasstr",
            "name": "气体浓度阈值",
            "dataType": {
            "type": "float",
            "specs": {
                "min": "0.00",
                "max": "100.00",
                "unit": "mg/L",
                "unitName": "毫克每升",
                "step": "0.01"
            }
            }
        },
        {
            "identifier": "t1",
            "name": "t1",
            "dataType": {
            "type": "int",
            "specs": {
                "min": "30",
                "max": "600",
                "step": "1"
            }
            }
        }
        ]
    }
    ],
    "services": [
    {
        "identifier": "set",
        "name": "set",
        "required": true,
        "callType": "async",
        "desc": "属性设置",
        "method": "thing.service.property.set",
        "inputData": [
        {
            "identifier": "powerstate",
            "name": "下行控制",
            "dataType": {
            "type": "bool",
            "specs": {
                "0": "关",
                "1": "开"
            }
            }
        },
        {
            "identifier": "gasstr",
            "name": "气体浓度阈值",
            "dataType": {
            "type": "float",
            "specs": {
                "min": "0.00",
                "max": "100.00",
                "unit": "mg/L",
                "unitName": "毫克每升",
                "step": "0.01"
            }
            }
        },
        {
            "identifier": "t1",
            "name": "t1",
            "dataType": {
            "type": "int",
            "specs": {
                "min": "30",
                "max": "600",
                "step": "1"
            }
            }
        }
        ],
        "outputData": []
    },
    {
        "identifier": "get",
        "name": "get",
        "required": true,
        "callType": "async",
        "desc": "属性获取",
        "method": "thing.service.property.get",
        "inputData": [
        "ver",
        "liq_mdcn_re",
        "gasval",
        "gasalarm",
        "powerstate",
        "gasstr",
        "t1"
        ],
        "outputData": [
        {
            "identifier": "ver",
            "name": "设备版本",
            "dataType": {
            "type": "text",
            "specs": {
                "length": "64"
            }
            }
        },
        {
            "identifier": "liq_mdcn_re",
            "name": "液位",
            "dataType": {
            "type": "bool",
            "specs": {
                "0": "低",
                "1": "高"
            }
            }
        },
        {
            "identifier": "gasval",
            "name": "气体值",
            "dataType": {
            "type": "int",
            "specs": {
                "min": "0",
                "max": "1000",
                "step": "1"
            }
            }
        },
        {
            "identifier": "gasalarm",
            "name": "气体告警状态",
            "dataType": {
            "type": "bool",
            "specs": {
                "0": "无告警",
                "1": "告警"
            }
            }
        },
        {
            "identifier": "powerstate",
            "name": "下行控制",
            "dataType": {
            "type": "bool",
            "specs": {
                "0": "关",
                "1": "开"
            }
            }
        },
        {
            "identifier": "gasstr",
            "name": "气体浓度阈值",
            "dataType": {
            "type": "float",
            "specs": {
                "min": "0.00",
                "max": "100.00",
                "unit": "mg/L",
                "unitName": "毫克每升",
                "step": "0.01"
            }
            }
        },
        {
            "identifier": "t1",
            "name": "t1",
            "dataType": {
            "type": "int",
            "specs": {
                "min": "30",
                "max": "600",
                "step": "1"
            }
            }
        }
        ]
    }
    ]
}
6. 测试验证
6.1 阿里云物联网产品创建
6.2 创建IOT Studio移动端应用
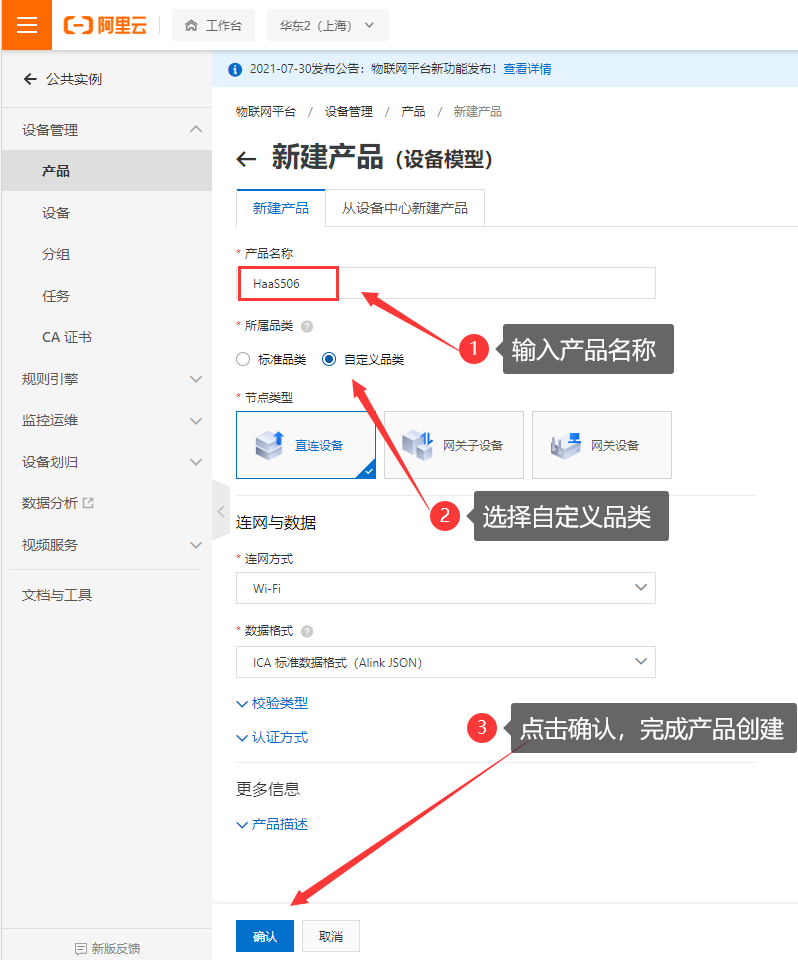
- 6.2.1 创建阿里云物联网产品
在公共实例中,根据项目需求创建产品:

注意: 1. 在选择联网方式时,请选择蜂窝(2G / 3G / 4G / 5G)。
创建设备时建议使用模块镭雕上的15-17位IMEI号作为设备DeviceName,后期产品可以使用模块唯一识别号IMEI进行动态注册。
导入物模型数据


导入完成后如下所示:

添加设备

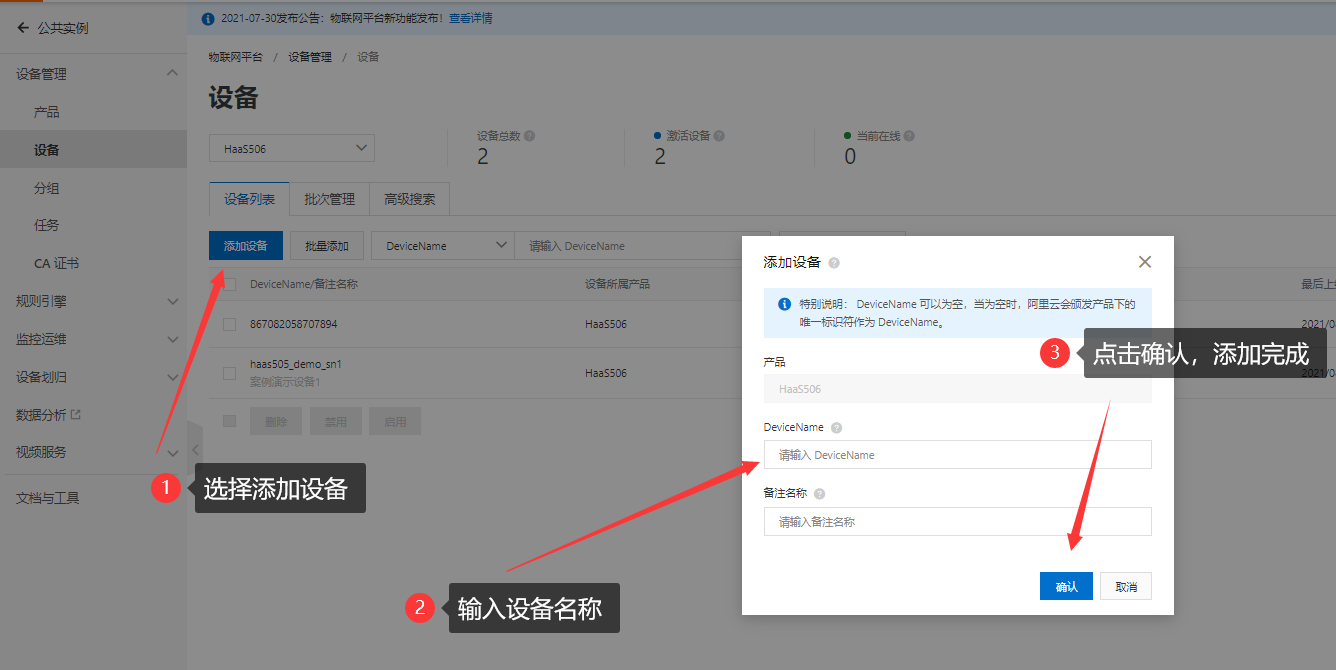
选择刚创建好的设备,点击查看设备物模型(此处为案例演示设备,显示的为测试数据,需自行上报数据)

- 6.2.2 创建移动端应用
A. 打开Iot Studio开发界面 产品和设备创建完成后,在控制台选择增值服务,进入Iot Studio开发界面。

B. 新建移动端应用 如下图所示,新建一个移动端的应用(此处的项目为事先创建好的,如有所需 也可以新建项目)。新建移动端应用。

C. 创建移动端应用 点击确定以后会自动进入创建好的移动端应用中,选择创建空白页面。

完成创建后进入正式页面编辑界面。
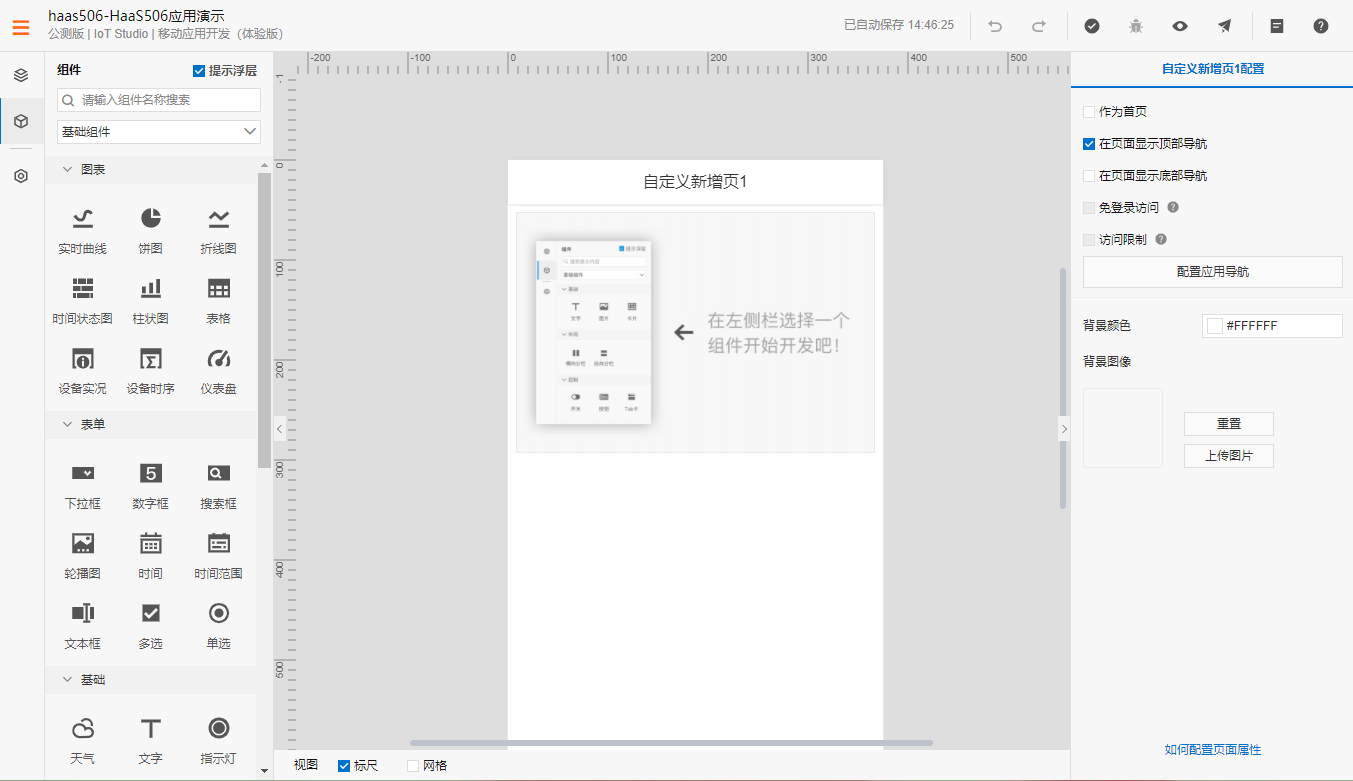
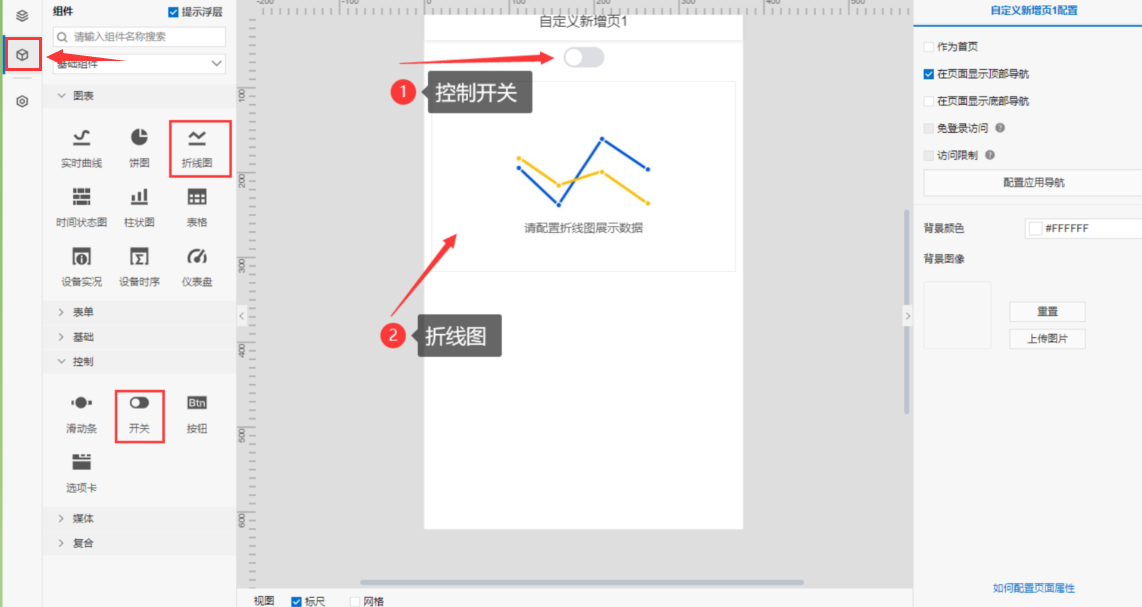
D. 选择组件 在组件中选择想要的基础组件,将拖拽至页面中,进行相应的布局设置。(本案例中只用到折线图和开关控制组件)
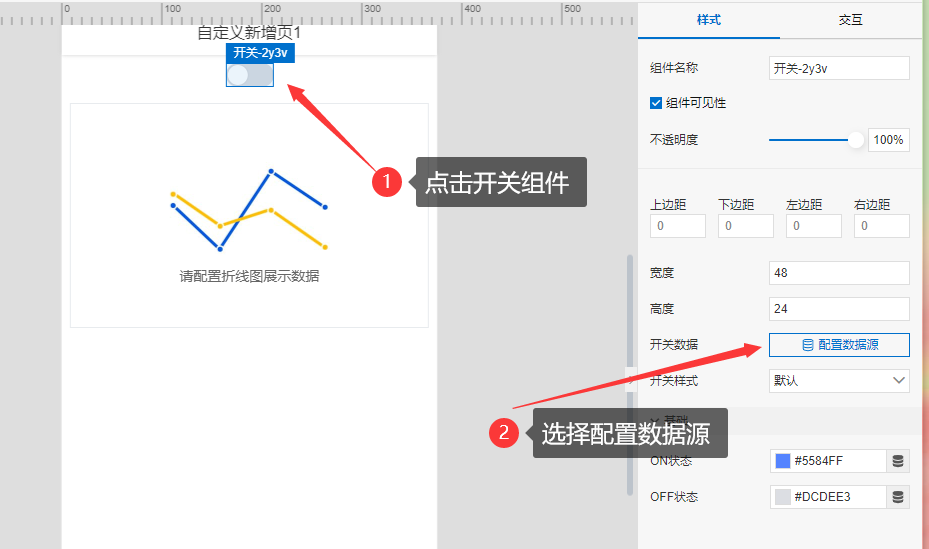
E. 组件配置 选择好对应的组件后,还需要对其进行数据源的配置。
点击组件,在右侧样式中选择配置数据源
数据源配置选择
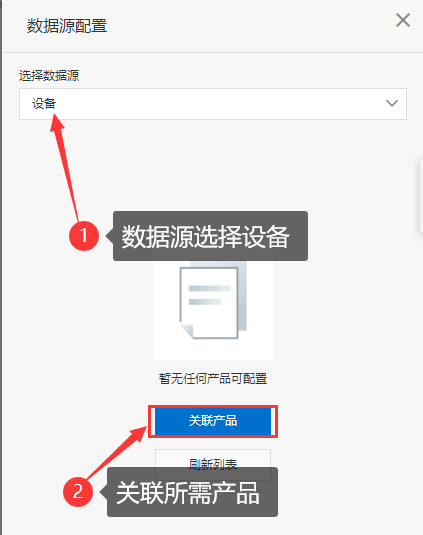
选择关联产品,关联刚刚创建的产品HaaS506

选择关联设备


5. 控制开关组件数据源配置 返回移动端开发界面,刷新列表即可进入选择界面。
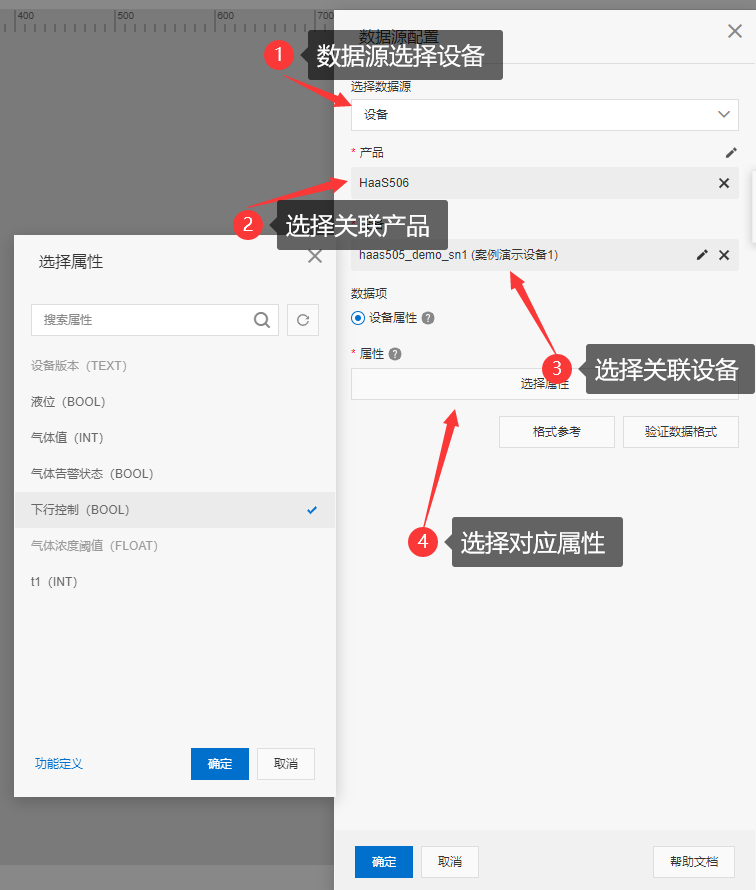
设置完成后,可以看到右侧样式栏显示开关数据已配置数据源,即为配置完成。 6. 折线图组件数据源配置 折线图组件需要创建一个SQL分析的API接口。
Iot Studio控制台中选择数据任务,新建一个SQL分析,如下图所示:
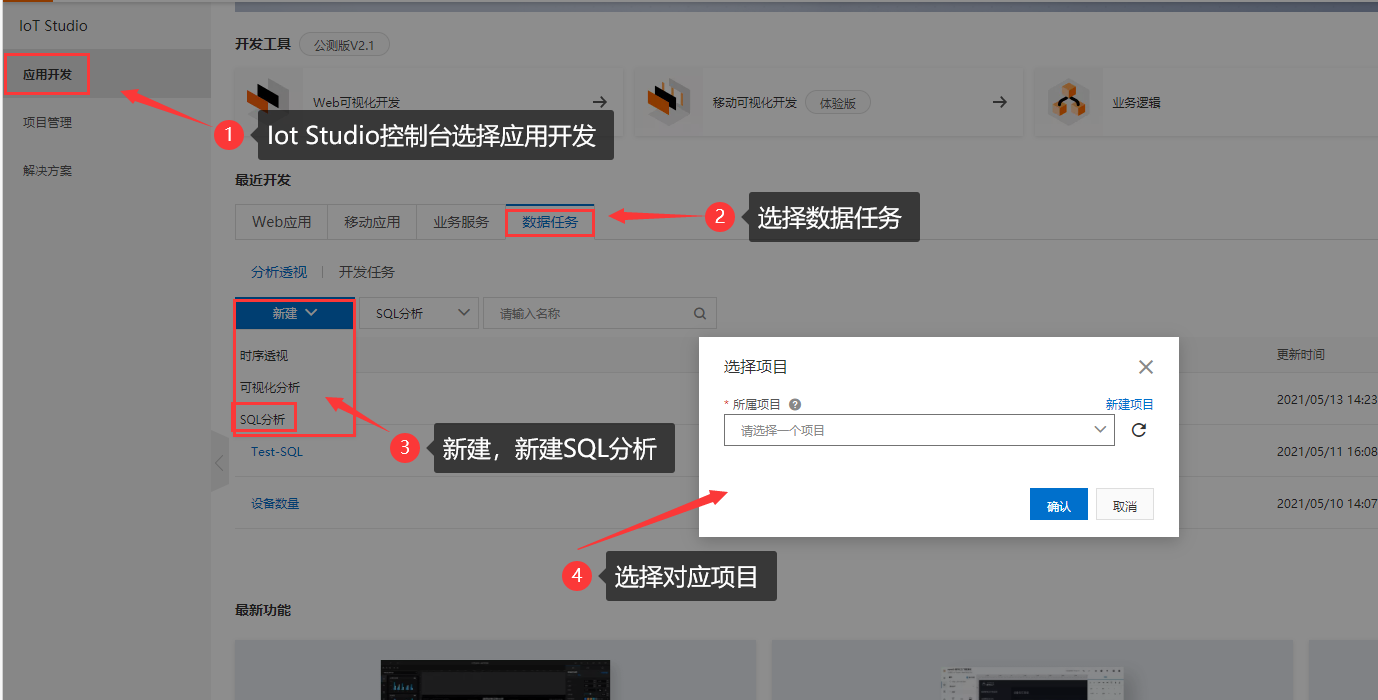
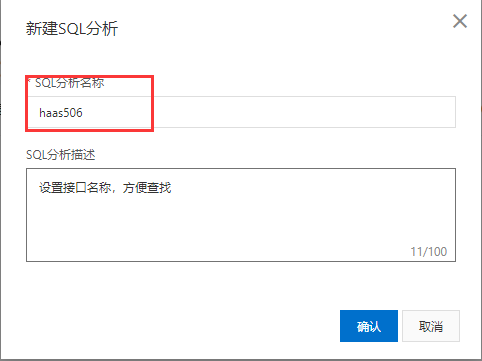
进入数据分析界面,配置数据源。
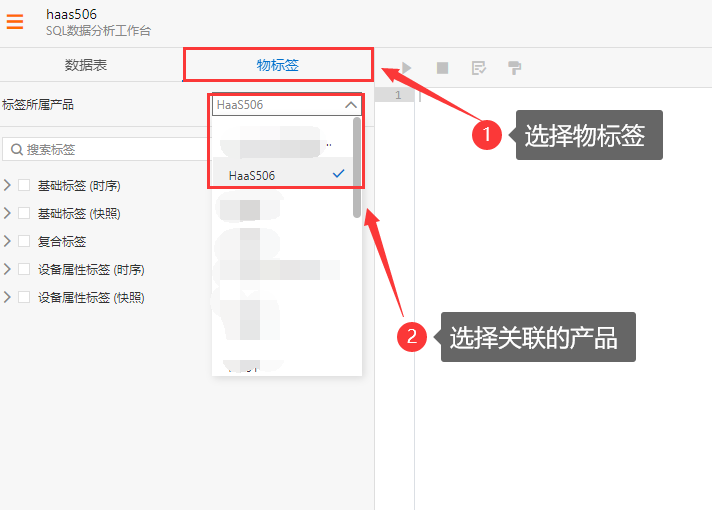
如下图所示,选择设备名称和气体值,并点击生成SQL查询语句:
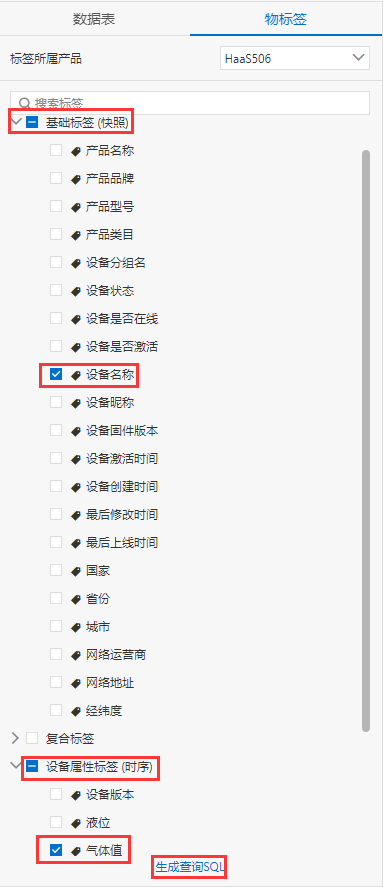
SQL语句生成后,点击运行即可查询所选数据内容,分别点击配置、 测试以及发布。如下图所示:

点击配置后,设置对应的参数类型:
点击测试,测试数据是否正常,显示测试成功,即可点击发布。
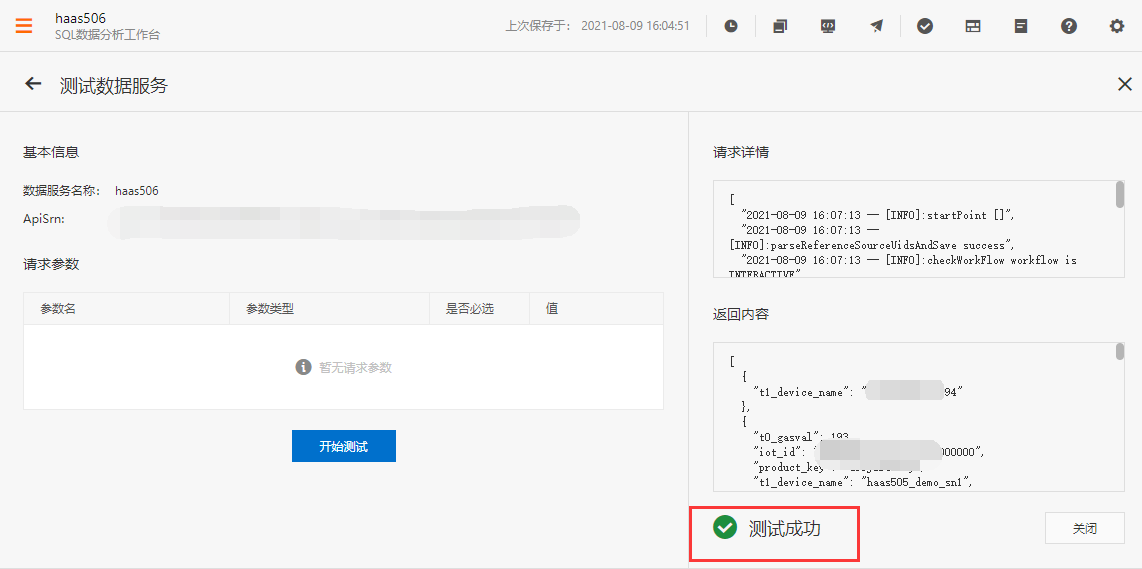
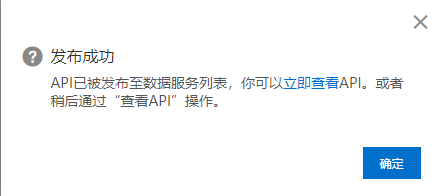
发布后就可以返回移动端应用开发界面。
返回开发界面后点击折线图,在右侧样式中将刚发布的API接口作为折线图的数据源,如下图所示:
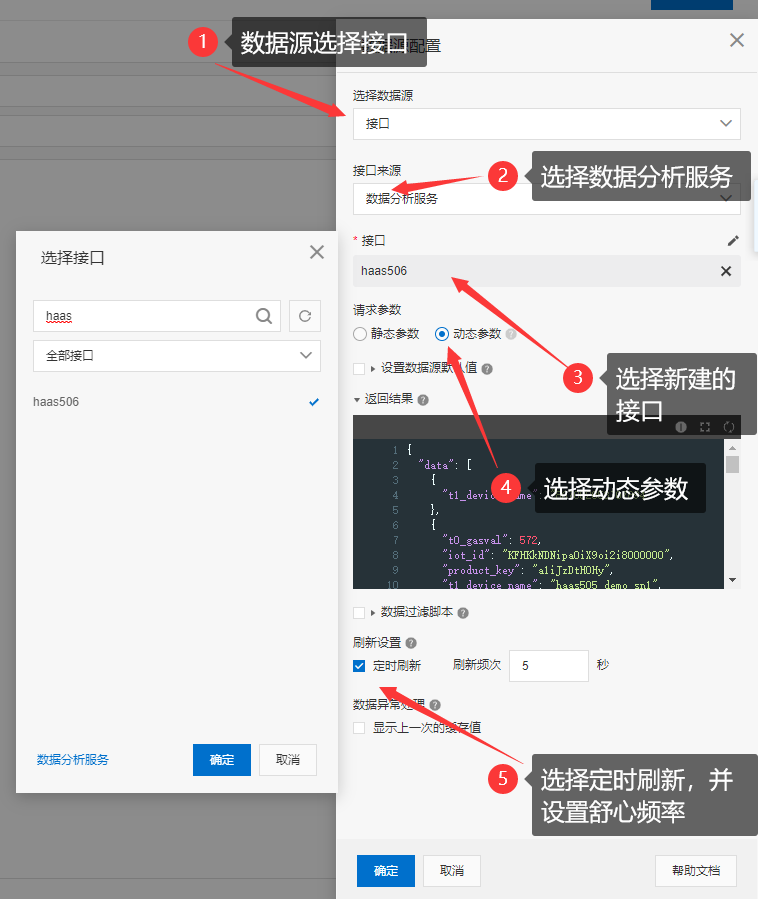
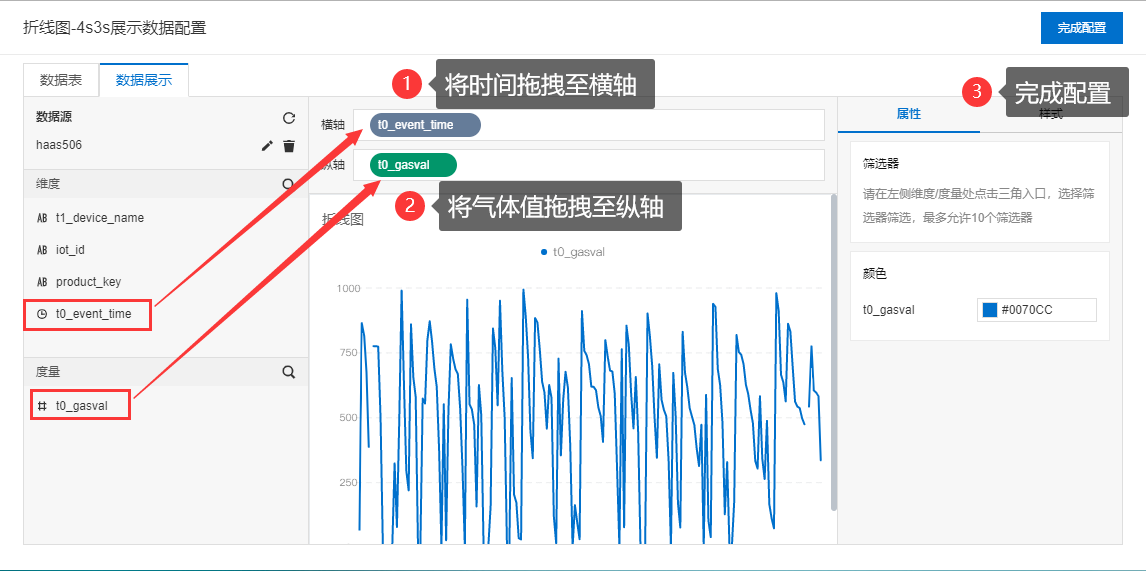
进入折线图配置界面,将所需维度拖拽至横纵轴,完成配置。
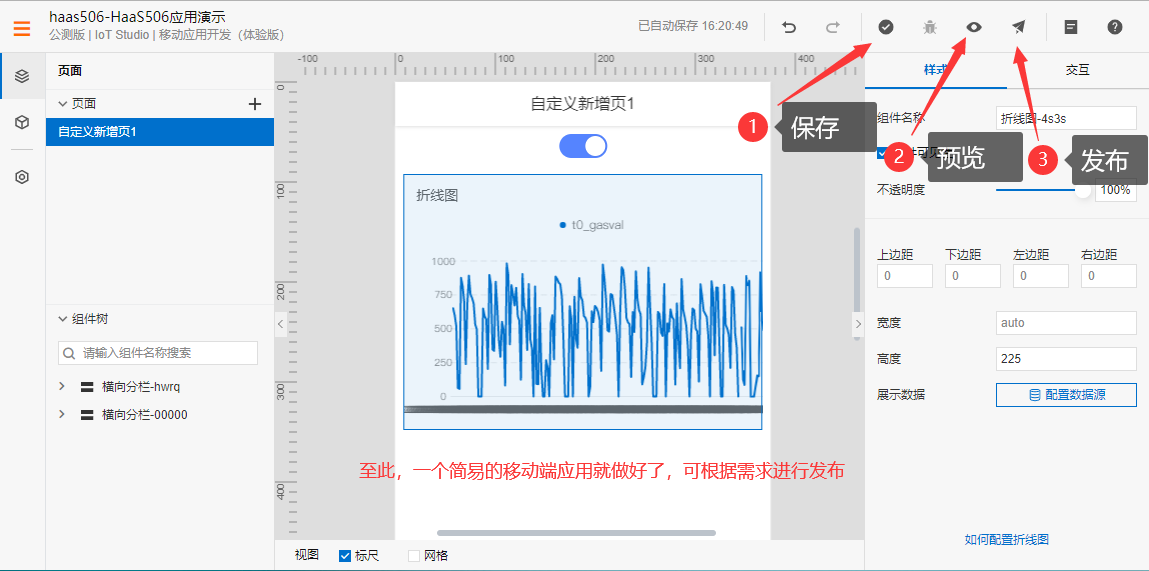
配置完成后,如下图所示,可以保存、预览以及发布
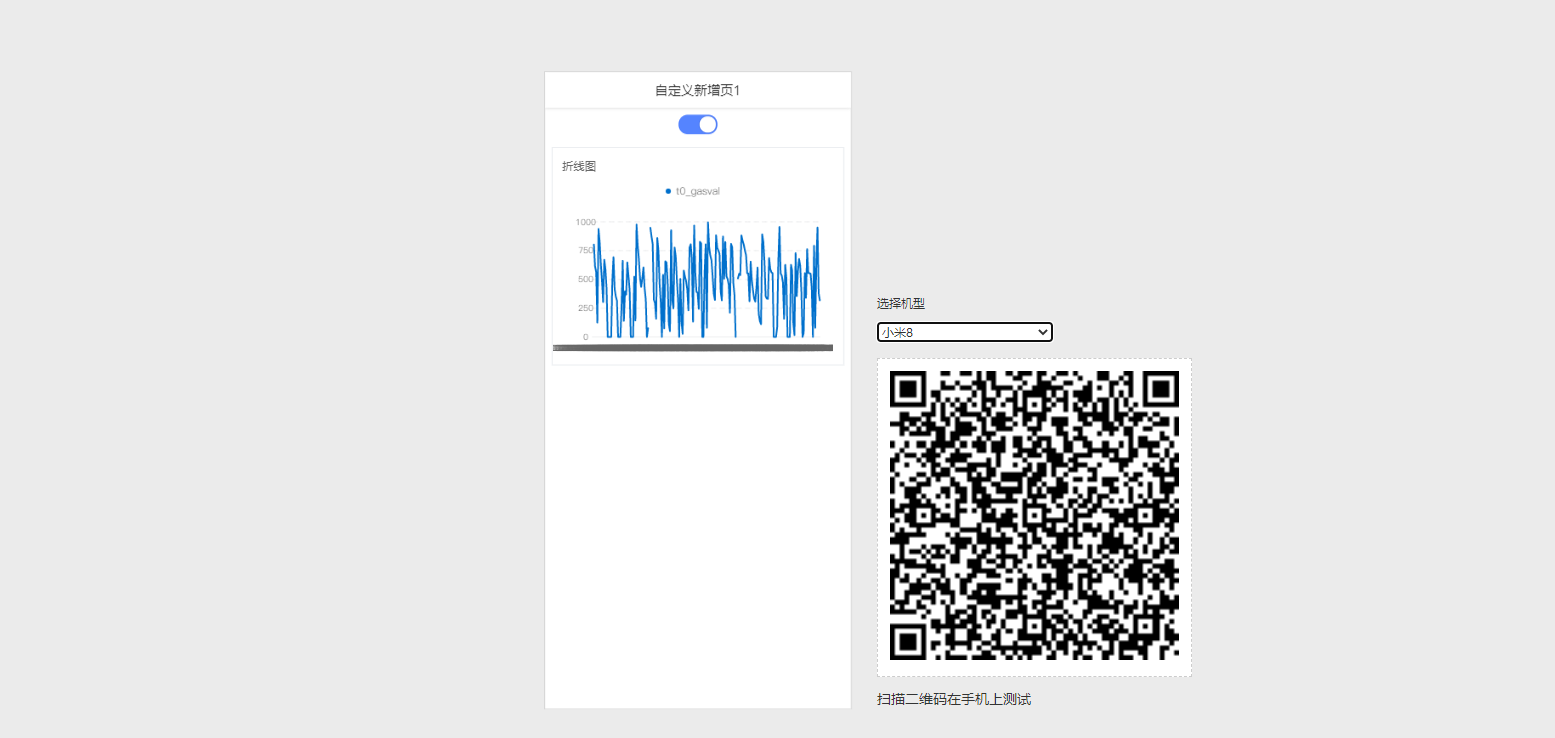
点击预览后会生成一个预览二维码,手机扫描二维码进行预览控制操作。
6.3 开发验证
- 准备硬件:
请参考上述准备 硬件环境。
HaaS506 连接usb typeC 到pc,此时在pc端会生成8组usb serail port
其中port5即Unisoc Usb Serial Port 5对应的COM口为板子日志输出以及python命令行交互口
HaaS506 使用HY转杜邦线4pin线材连接uart1 即板子丝印J8 TTL接口,杜邦线连接usb转uart模块,请参考上述接线方式。
- 软件准备:
HaaS506最新固件,一般拿到开发板,厂家烧录最新的固件,无需重新烧录。下载地址以及烧录方式: HaaS 506
VScode(大于1.57),HaaS studio VScode插件。
代码实现保存为main.py,board.json(HaaS506硬件驱动配置文件)
新建python轻应用工程`HaaS506IDE开发 <https://blog.csdn.net/HaaSTech/article/details/119379840>`_
将示例文件main.py以及硬件驱动配置文件board.json,一起放置到创建haas轻应用时的工作区路径下solution/test_demo(test_demo为项目名字)下,按照步骤4文档进行烧录验证。
扫描iot studio 预览二维码进行预览以及控制操作。