Python轻应用实现动态注册和Ota升级
前言
本实验将向大家介绍如何使用Python语言在HaaS506 上面实现动态注册和轻应用在线Ota升级
硬件环境
HaaS506 开发板一个,sim卡一张
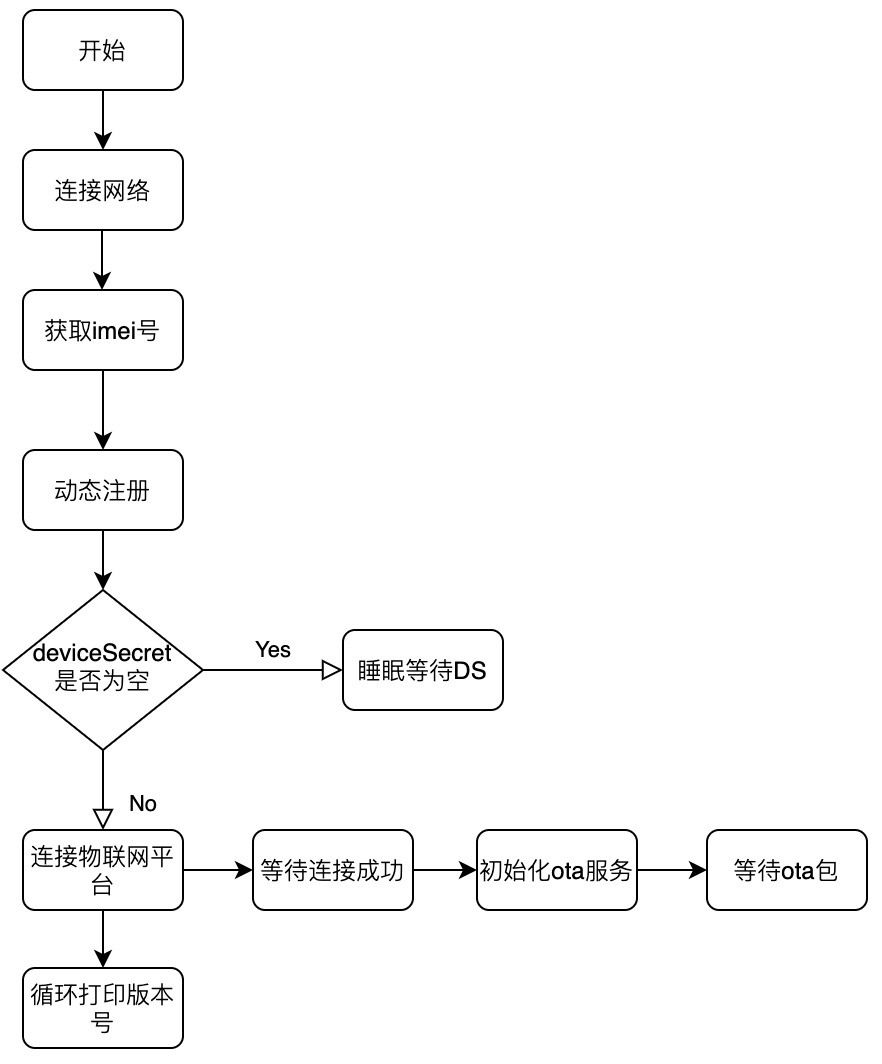
实现原理
代码实现
1 2 3 4 5 6 7 8 9 10 11 12 13 14 15 16 17 18 19 20 21 22 23 24 25 26 27 28 29 30 31 32 33 34 35 36 37 38 39 40 41 42 43 44 45 46 47 48 49 50 51 52 53 54 55 56 57 58 59 60 61 62 63 64 65 66 67 68 69 70 71 72 73 74 75 76 77 78 79 80 81 82 83 84 85 86 87 88 89 90 91 92 93 94 95 96 97 98 99 100 101 102 103 104 105 106 107 108 109 110 111 112 113 114 115 116 117 118 119 120 121 122 123 124 125 126 127 128 129 130 131 132 133 134 135 136 137 138 139 140 141 142 143 144 145 146 147 148 149 150 151 152 153 154 155 156 157 158 159 160 161 162 163 164 165 166 167 168 169 170 171 172 173 174 175 176 177 178 179 180 181 182 183 184 185 186 187 188 189 190 191 192 193 194 | # -*- coding: UTF-8 -*-
import network
import utime as time
import modem
from linksdk import Device
import ota
from driver import KV
def on_4g_cb(args):
global g_connect_status
pdp = args[0]
netwk_sta = args[1]
if netwk_sta == 1:
g_connect_status = True
else:
g_connect_status = False
def connect_network():
global net,on_4g_cb,g_connect_status
net = network.NetWorkClient()
g_register_network = False
if net._stagecode is not None and net._stagecode == 3 and net._subcode == 1:
g_register_network = True
else:
g_register_network = False
if g_register_network:
net.on(1,on_4g_cb)
net.connect(None)
else:
print('网络注册失败')
while True:
if g_connect_status:
print('网络连接成功')
break
time.sleep_ms(20)
def on_dynreg_cb(data):
global deviceSecret,device_dyn_resigter_succed
deviceSecret = data
device_dyn_resigter_succed = True
# 连接物联网平台
def dyn_register_device(productKey,productSecret,deviceName):
global on_dynreg_cb,device,deviceSecret
kv = KV()
key = '_amp_customer_devicesecret'
deviceSecret = kv.getStorageSync(key)[key]
if deviceSecret is not None:
pass
else:
key_info = {
'productKey': productKey ,
'productSecret': productSecret ,
'deviceName': deviceName
}
# 动态注册一个设备,获取设备的deviceSecret
device.register(key_info,on_dynreg_cb)
# 物联网平台连接成功的回调
def on_connect_lk(data):
global module_name,default_ver,productKey,deviceName,deviceSecret,on_trigger,on_download,on_verify,on_upgrade
print('***** connect lp succeed****')
data_handle = {}
data_handle['device_handle'] = data['handle']
# 初始化ota服务
ota.init(data_handle)
# ota 回调函数注册
ota.on(1,on_trigger)
ota.on(2,on_download)
ota.on(3,on_verify)
ota.on(4,on_upgrade)
report_info = {
"device_handle": data['handle'] ,
"product_key": productKey ,
"device_name": deviceName ,
"module_name": module_name ,
"version": default_ver
}
# 上报本机ota相关信息,上报版本信息返回以后程序返回,知道后台推送ota升级包,才会调用on_trigger函数
ota.report(report_info)
# 连接物联网平台
def connect_lk(productKey,deviceName,deviceSecret):
global on_connect_lk,device
key_info = {
'region' : 'cn-shanghai' ,
'productKey': productKey ,
'deviceName': deviceName ,
'deviceSecret': deviceSecret ,
'keepaliveSec': 60
}
print(key_info)
device.on(Device.ON_CONNECT,on_connect_lk)
# 连接物联网平台, 等待回调函数on_conect 被调用
device.connect(key_info)
# ota 消息推送的接受函数
def on_trigger(data):
global info
# 保存服务端推送的ota信息
info['url'] = data['url']
info['length'] = data['length']
info['module_name'] = data['module_name']
info['version'] = data['version']
info['hash'] = data['hash']
info['hash_type'] = data['hash_type']
# 开始ota 包下载
dl_data = {}
dl_data['url'] = info['url']
dl_data['store_path'] = info['store_path']
ota.download(dl_data)
# ota 升级包下载结果回调函数
def on_download(data):
global info
if data >= 0:
print('Ota download succeed')
# 开始ota包校验
param = {}
param['length'] = info['length']
param['store_path'] = info['store_path']
param['hash_type'] = info['hash_type']
param['hash'] = info['hash']
ota.verify(param)
# ota 升级包校验结果回调函数
def on_verify(data):
global info
print(data)
if data >= 0 :
print('Ota verify succeed')
print('Start Upgrade')
# 开始ota升级
param = {}
param['length'] = info['length']
param['store_path'] = info['store_path']
param['install_path'] = info['install_path']
ota.upgrade(param)
# ota 升级包结果回调函数
def on_upgrade(data):
if data >= 0 :
print('Ota succeed')
if __name__ == '__main__':
g_connect_status = False
net = None
device = None
deviceSecret = None
deviceName = None
productKey = "xxxx"
productSecret = "xxxx"
device_dyn_resigter_succed = False
# 定义需要升级的模块和版本号
module_name = 'default'
default_ver = '1.2.0'
# 定义升级包的下载和安装路径,其中url,hash_type和hash 会通过服务端推送被保存下来
info = {
'url': '',
'store_path': '/data/pyamp/app.zip',
'install_path': '/data/pyamp/',
'length': 0,
'hash_type': '',
'hash': ''
}
# 连接网络
connect_network()
# 获取设备的IMEI 作为deviceName 进行动态注册
deviceName = modem.getDevImei()
device = Device()
if deviceName is not None and len(deviceName) > 0 :
dyn_register_device(productKey,productSecret,deviceName)
else:
print("获取设备IMEI失败,无法进行动态注册")
while deviceSecret is None:
time.sleep(0.2)
print('动态注册成功:' + deviceSecret)
connect_lk(productKey,deviceName,deviceSecret)
while True:
print('当前App版本号:' + default_ver)
print('等待Ota升级包.....')
time.sleep(5)
|
升级包推送
修改以上代码中的productKey和productSecret 替换 ,然后通过IDE推送到设备中运行
修改代码中default_ver 版本号为1.3.0并保存
拔掉串口和pc 的连接
点击IDE的烧录按钮进行打包操作(打包的文件为upgrade/pyamp.zip)
使用物联网平台上传并且推送pyamp.zip 的升级包,具体操作如下
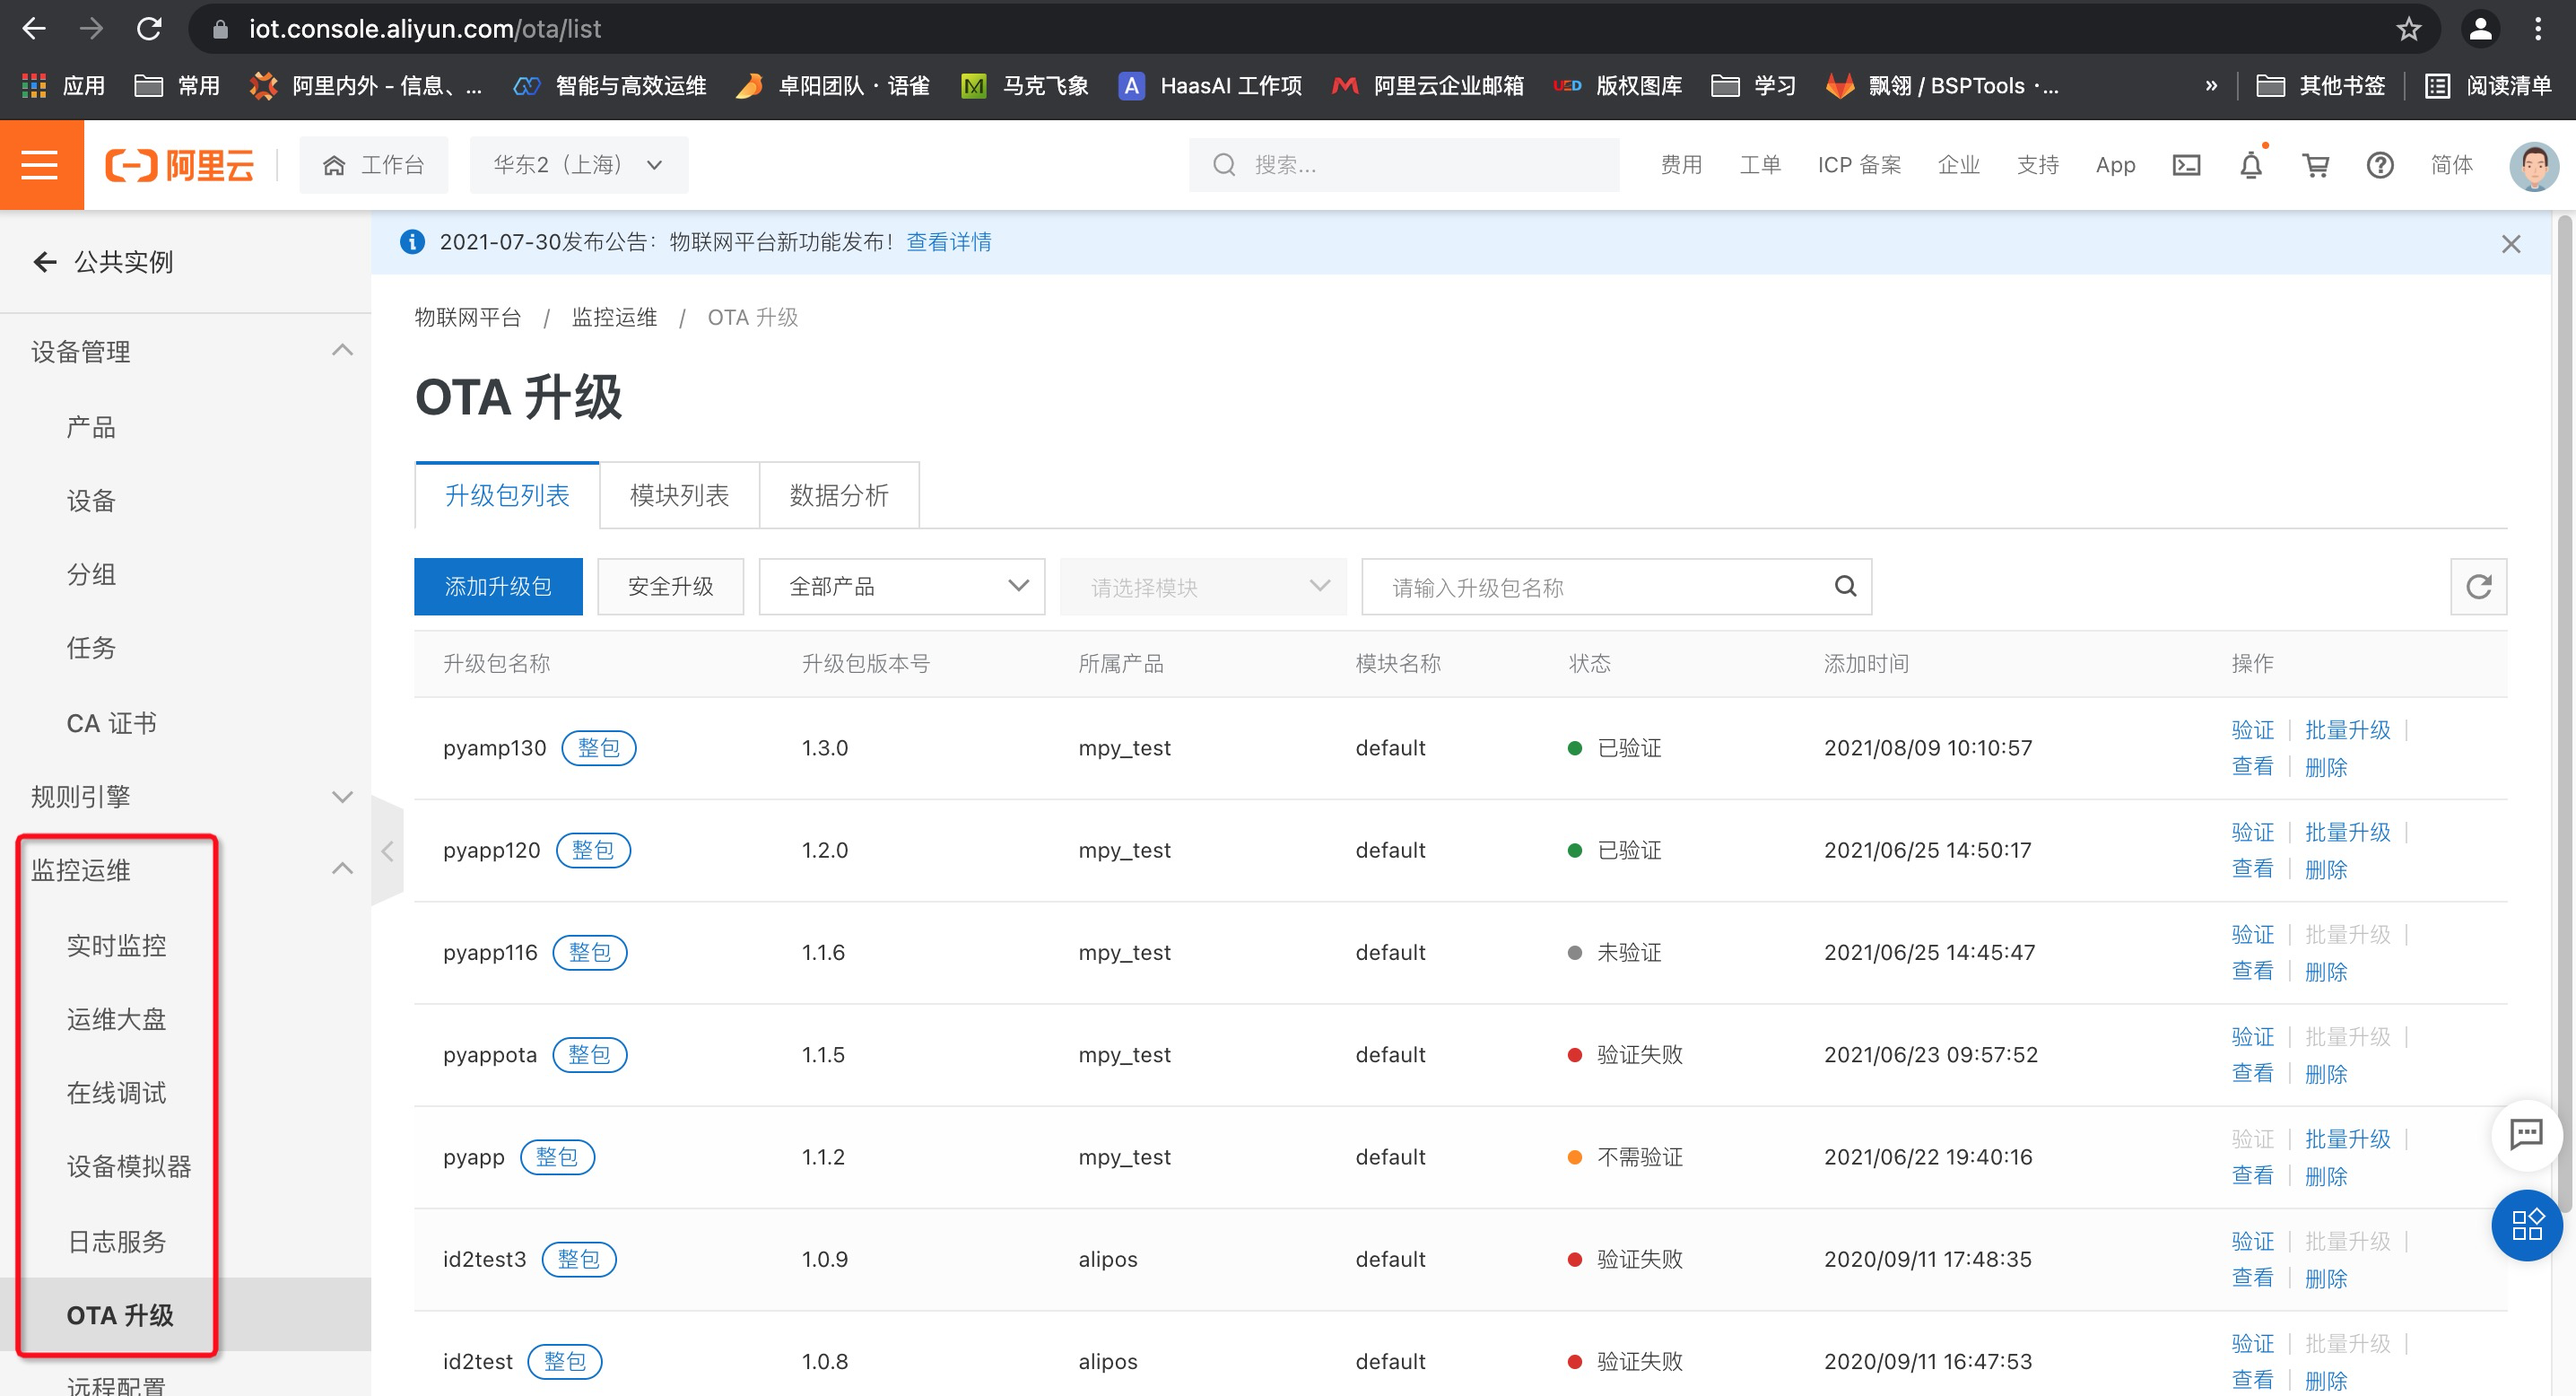
登录阿里云官网,选择产品阿里云IoT平台->企业物联网平台->控制台->实例概览->公共实例,如下如所知,打开监控运维中的OTA升级服务
点击升级包列表,选择添加升级包
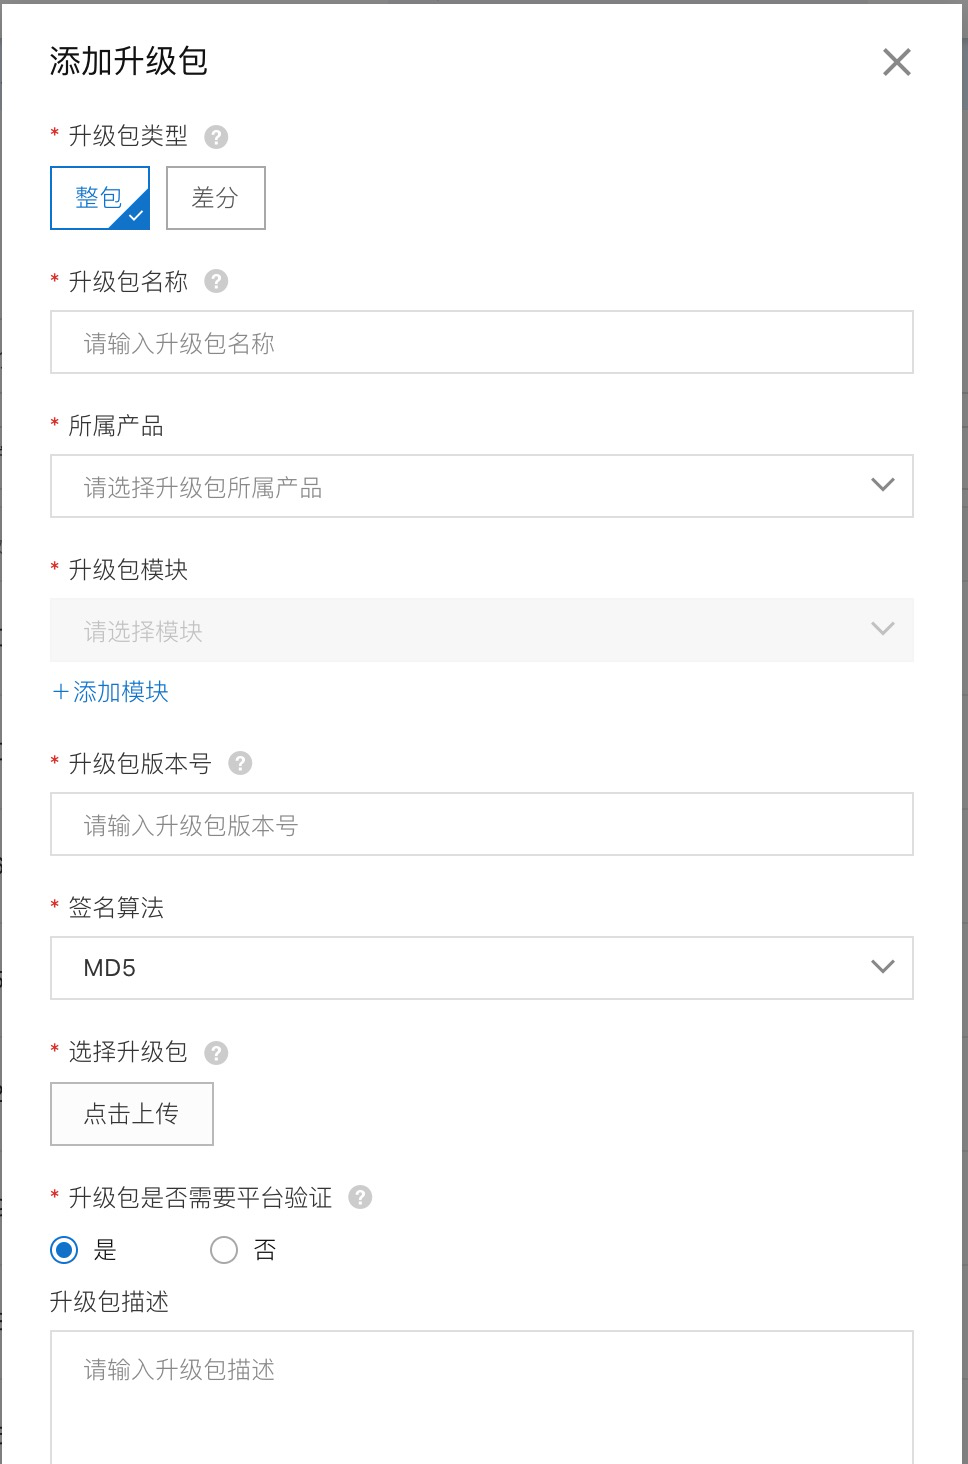
选择整包升级,输入升级包名称,选择锁需要的升级的产品名称
升级包模块选择 default
升级包版本号轻填写 Python轻应用代码中的版本号: 1.3.0
选择签名算法,点击上传升级包(IDE 工作目录 upgrade 目录下的 pyamp.zip)
选择需要平台验证,并填写升级包描述并确认
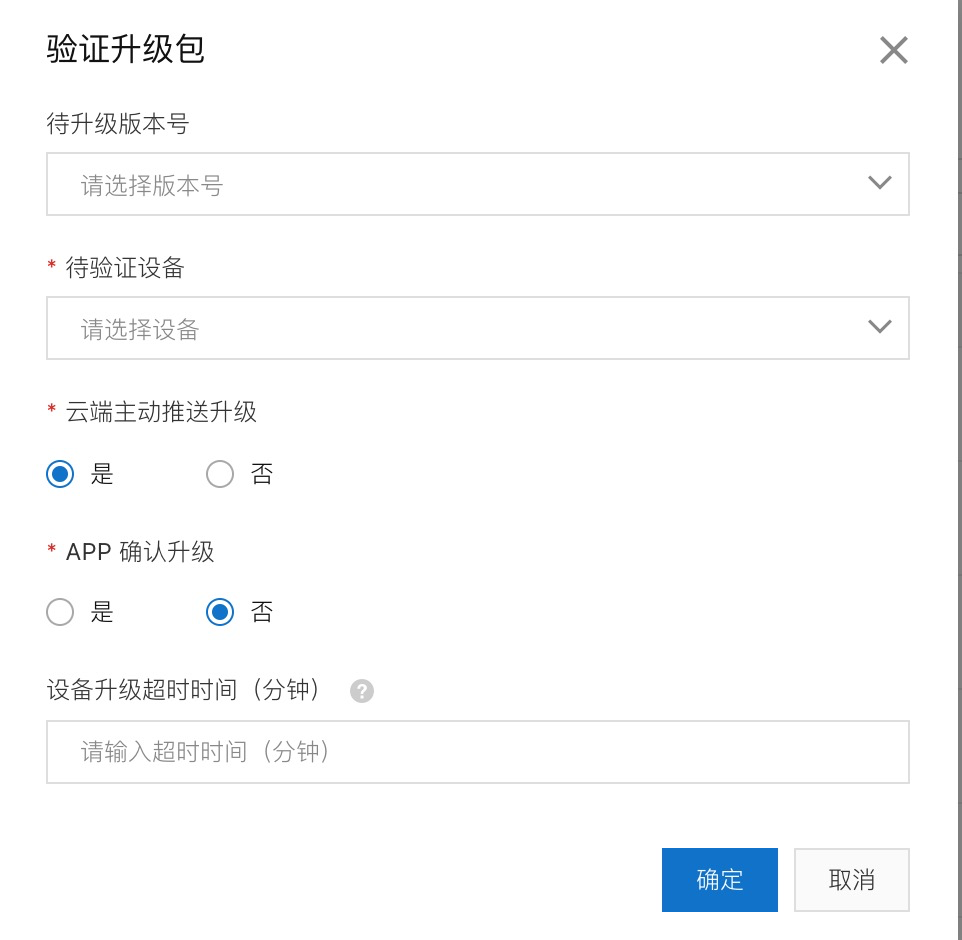
验证升级包
等待设备升级成功以后,手动重启设备,新版本的app 执行成功,打印新的版本号: 1.3.0


