Web 前端应用开发
更新时间:2018-07-03 23:58:06
本文将以开发一个 RGB智能灯的控制面板为例,介绍 Web 托管的开发过程,方案基于 Node.js 和 Bone Web 开发框架。
前期准备
软件安装
安装 Node.js LTS 版本(>=8.9):https://nodejs.org/zh-cn/
安装 Ruff SDK:https://ruff.io/zh-cn/docs/download.html
安装 Web 应用开发工具 Bone Cli:https://bone.aliyun.com/bone-web/bonewebsdk.html?name=zm1rpl
文本编辑器:VSCode / Sublime / Vim...
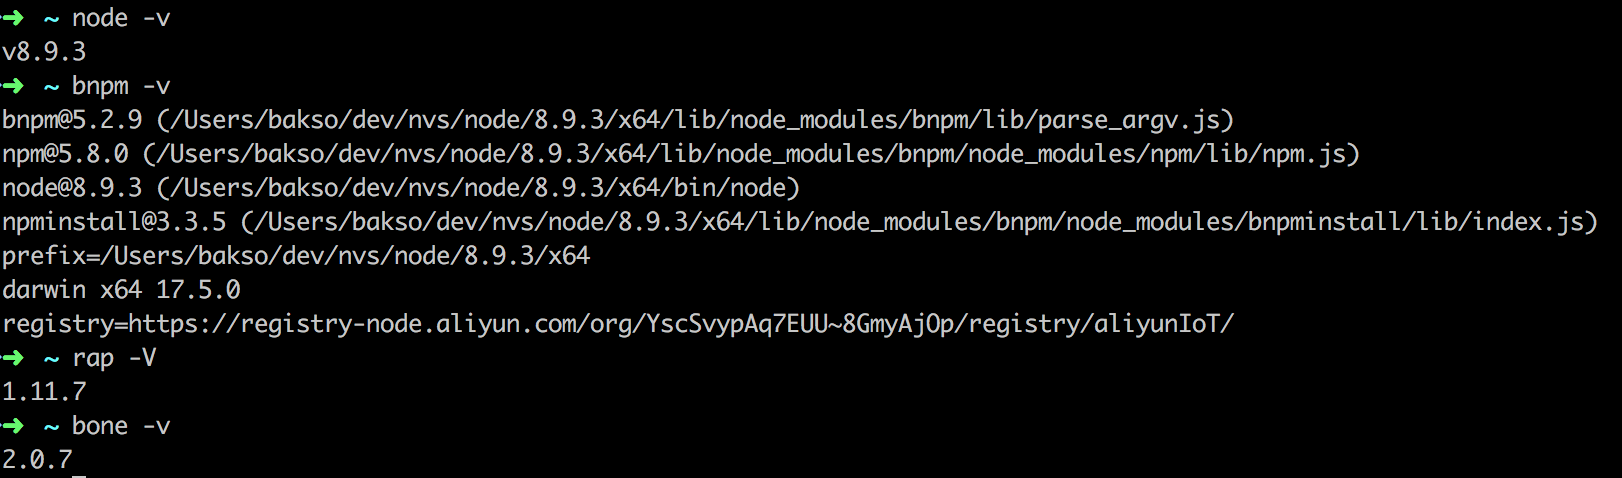
软件版本检查:
node -v
bnpm -v
rap -V
bone -v
请确认高于或者等于以下版本:
应用开发
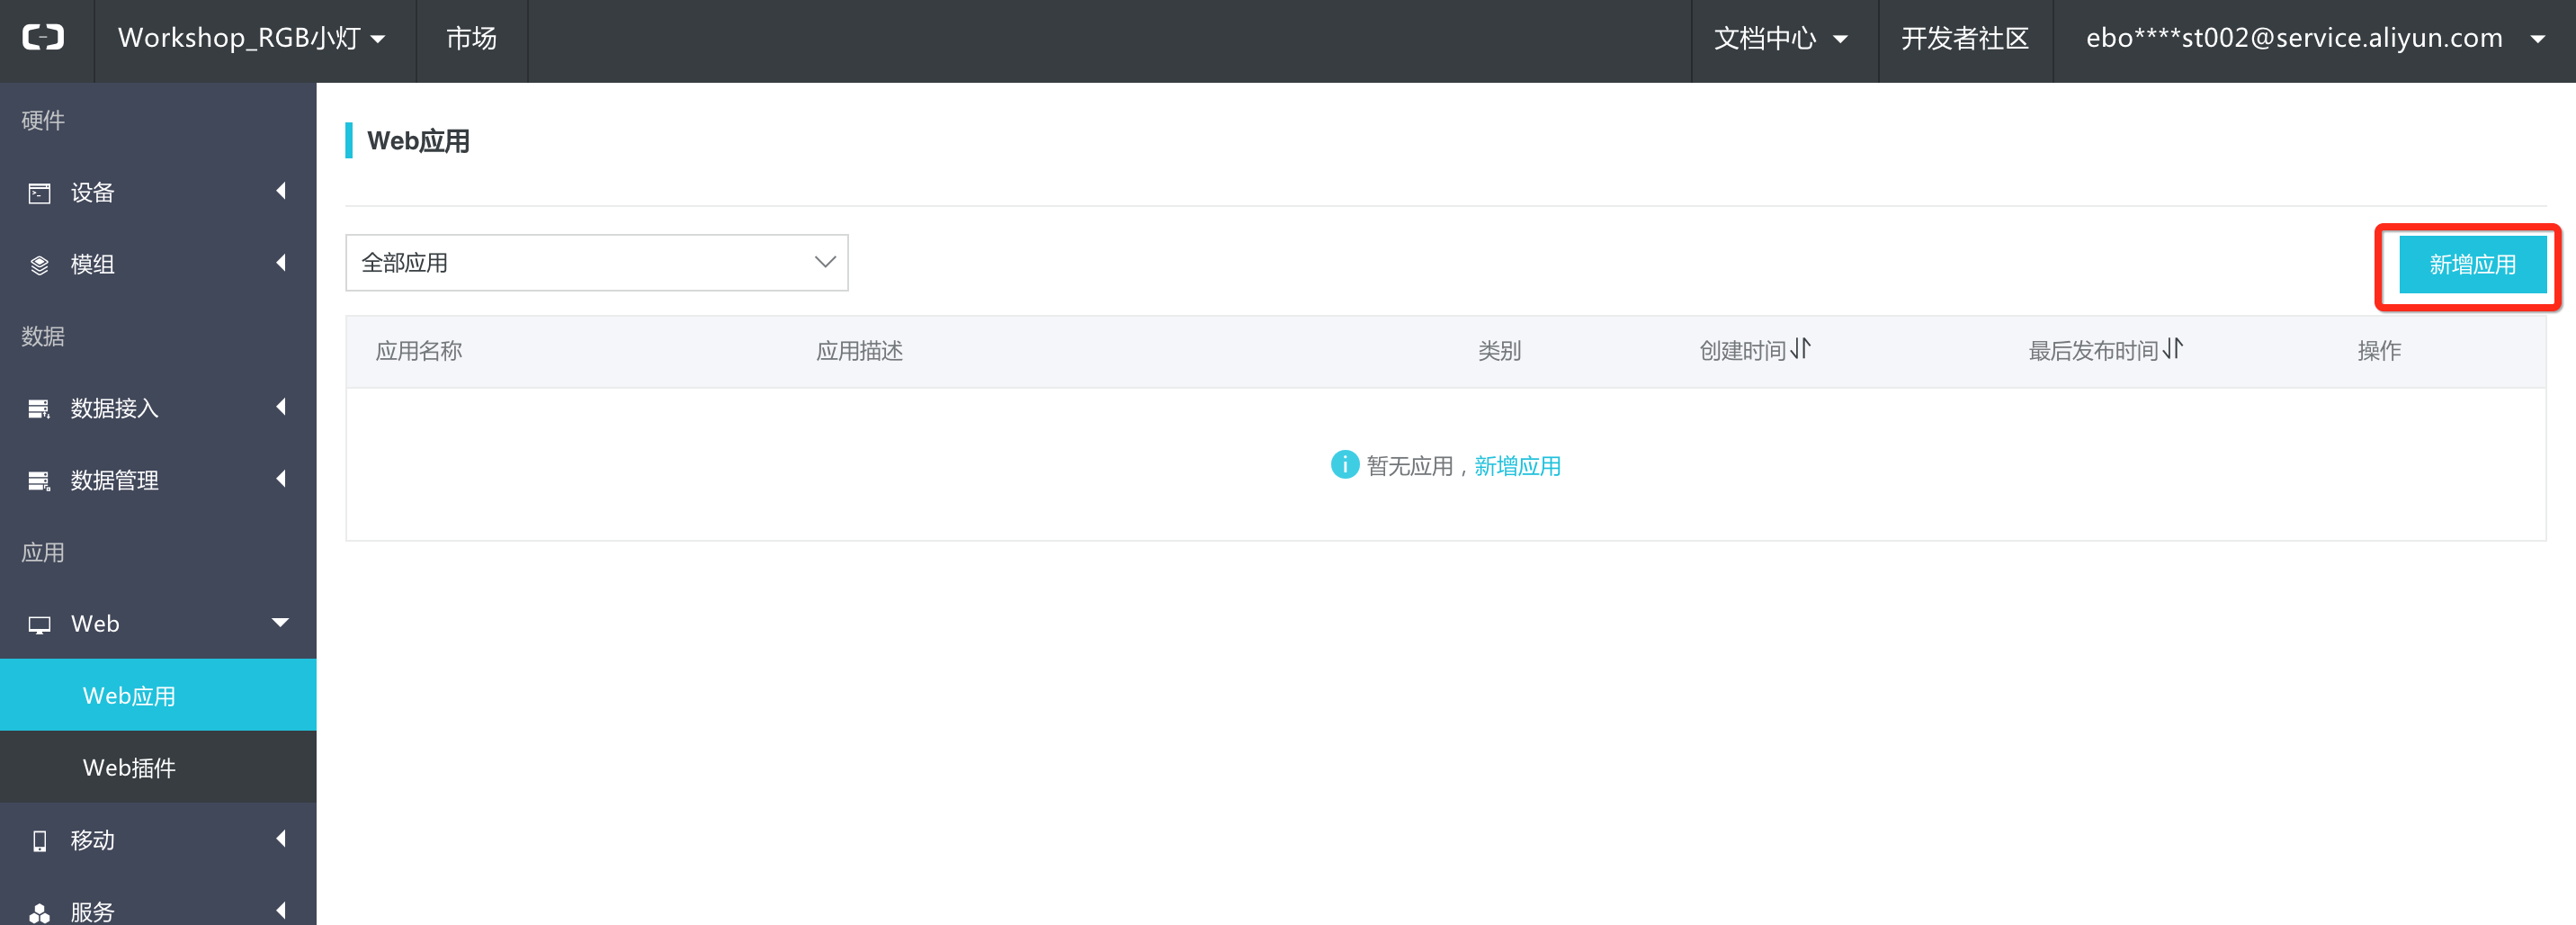
一、创建应用
从项目控制台左侧菜单进入“应用-Web 应用”,点击右上角的“新增应用”按钮。
如图所示填写表单,新建一个托管应用,点击提交进入下一步。
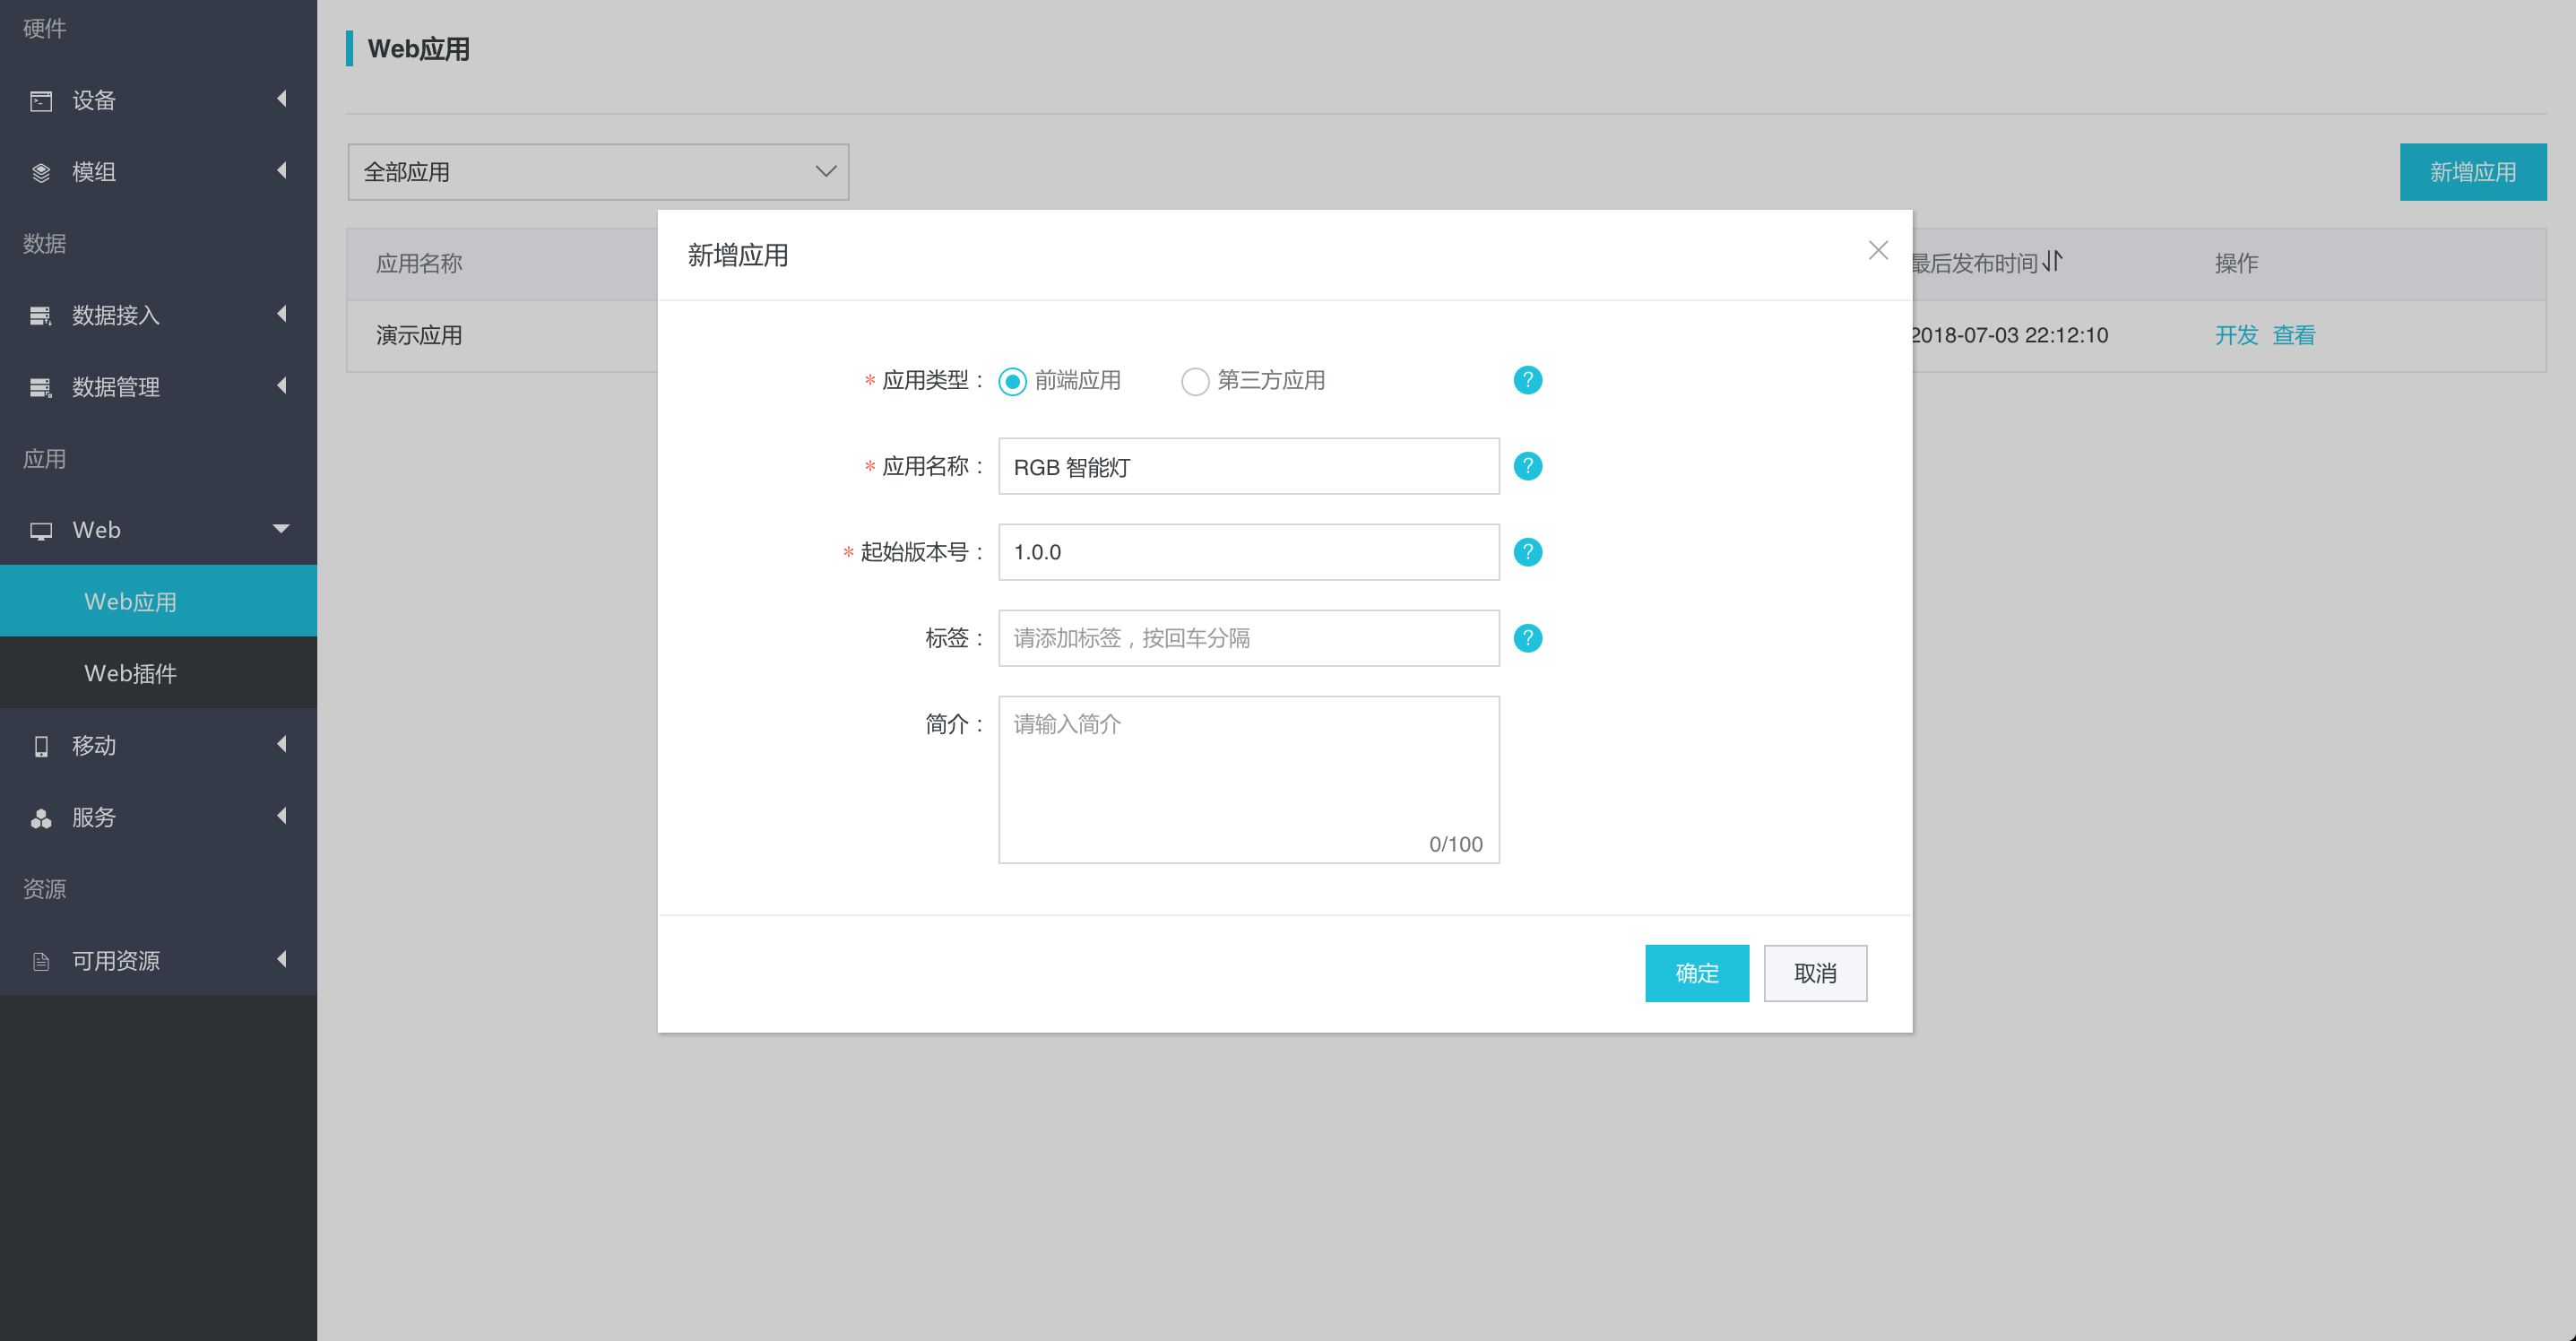
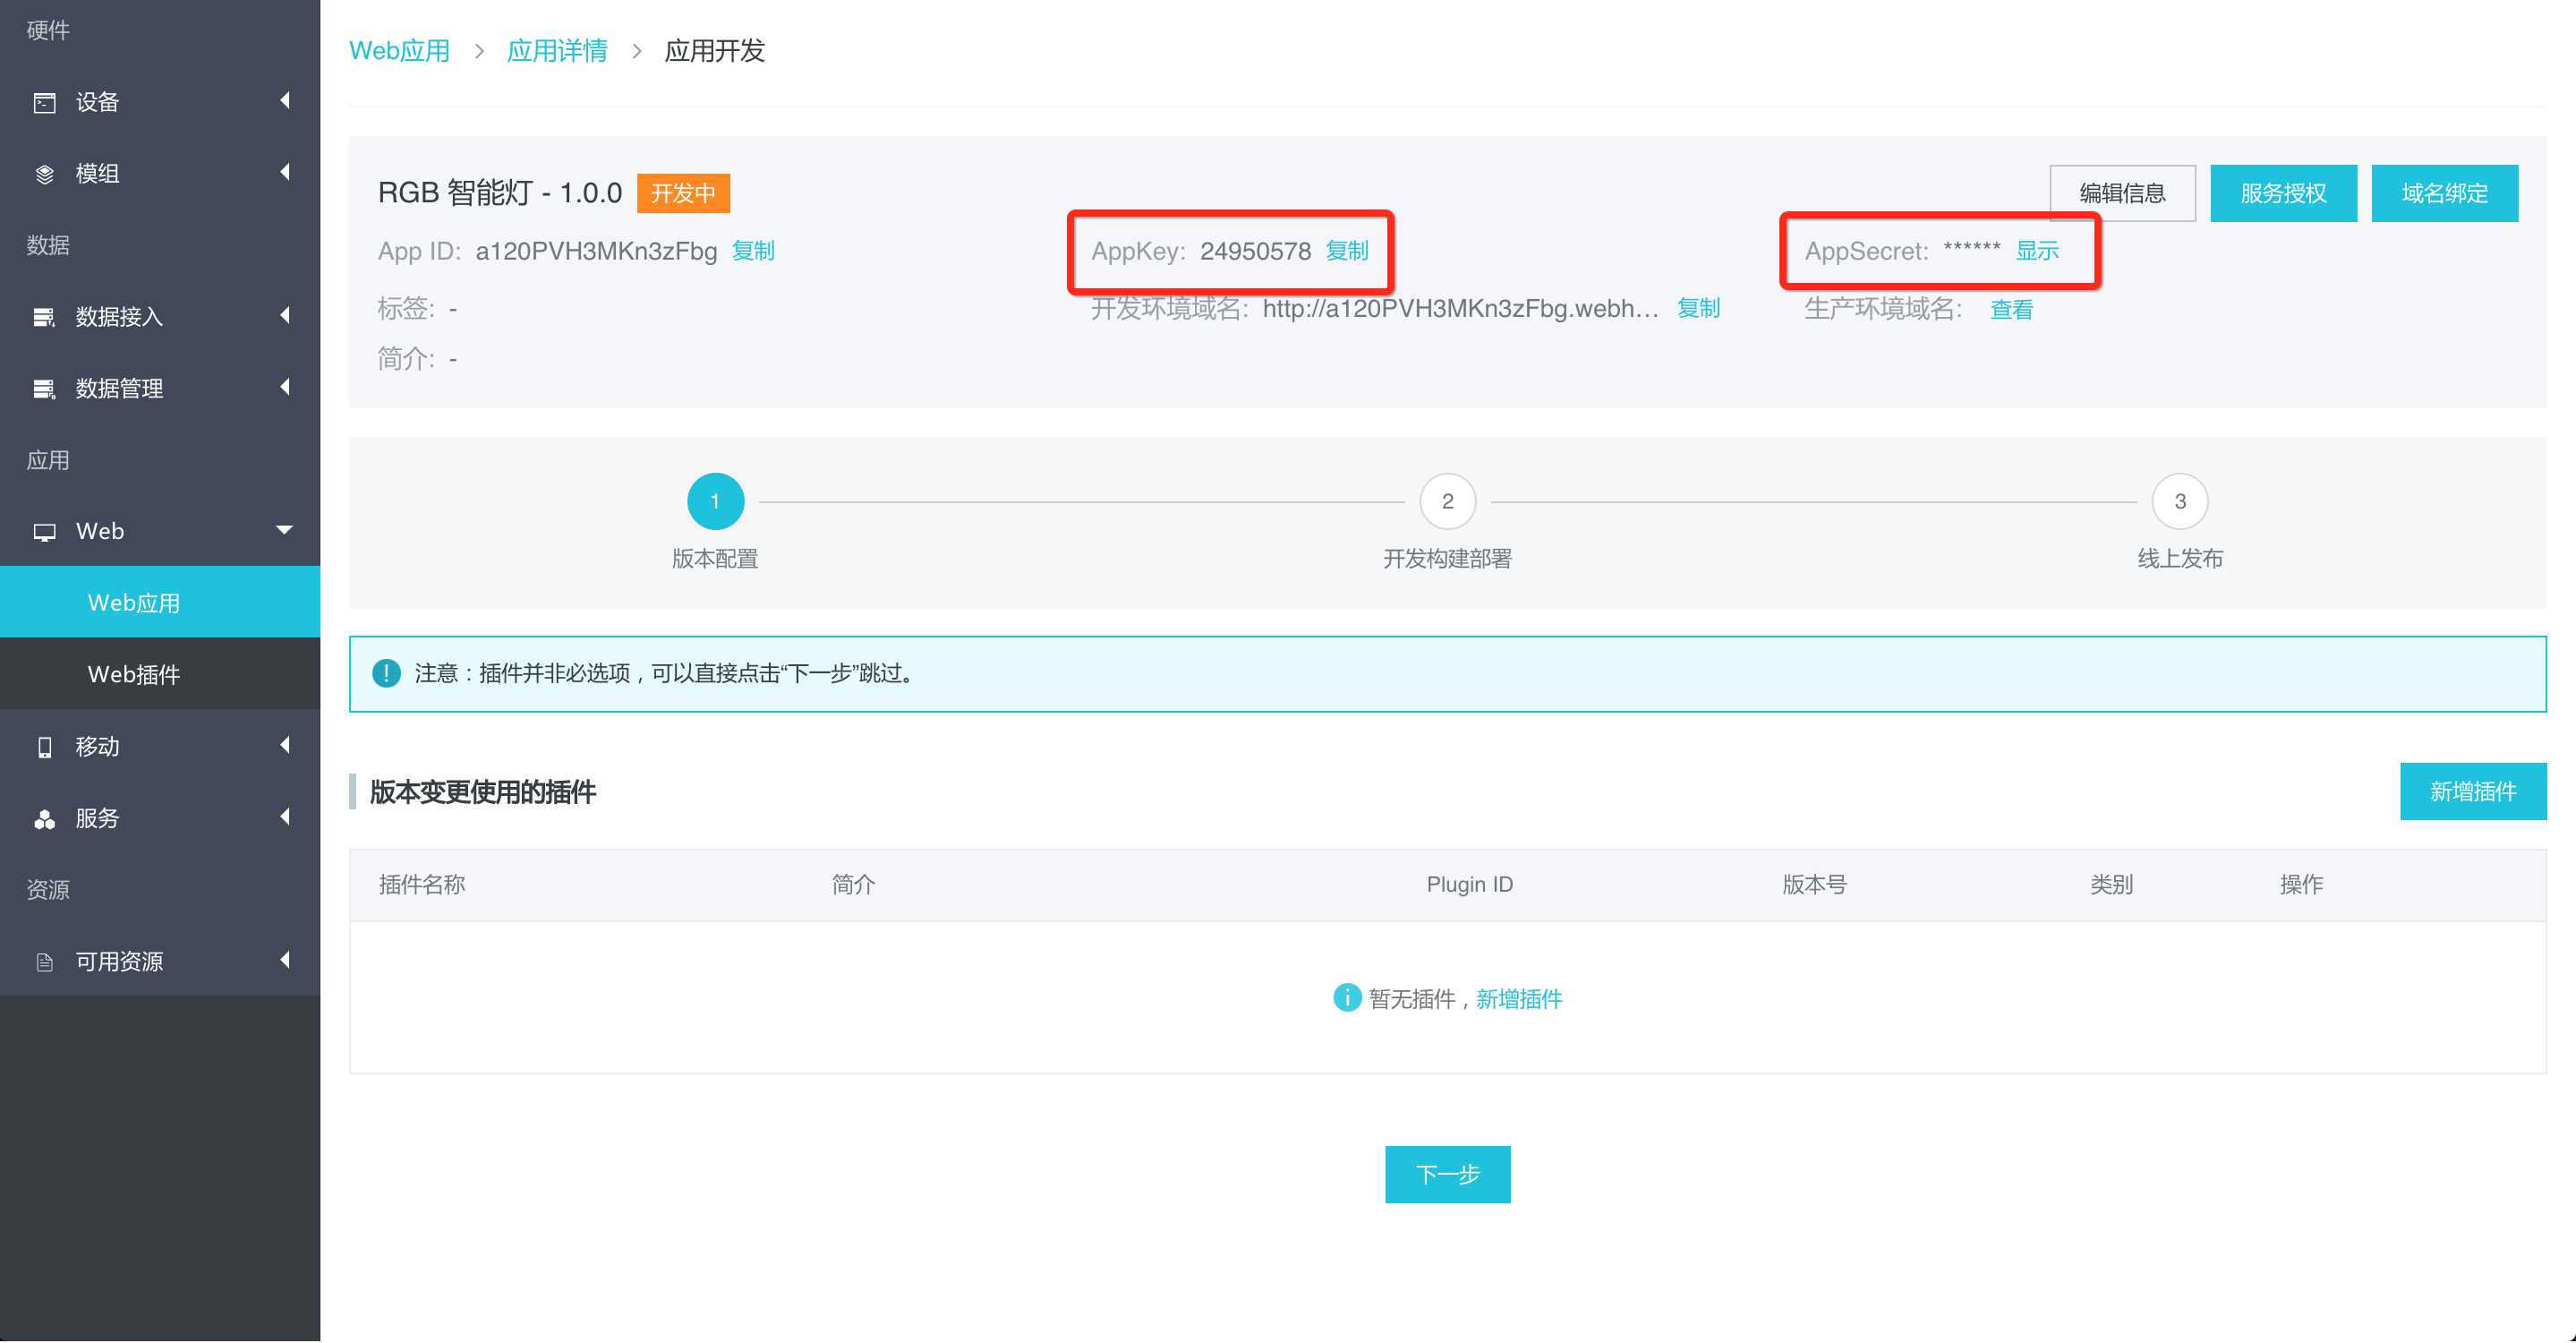
在应用“创建成功”的页面上点击“进入开发”按钮。
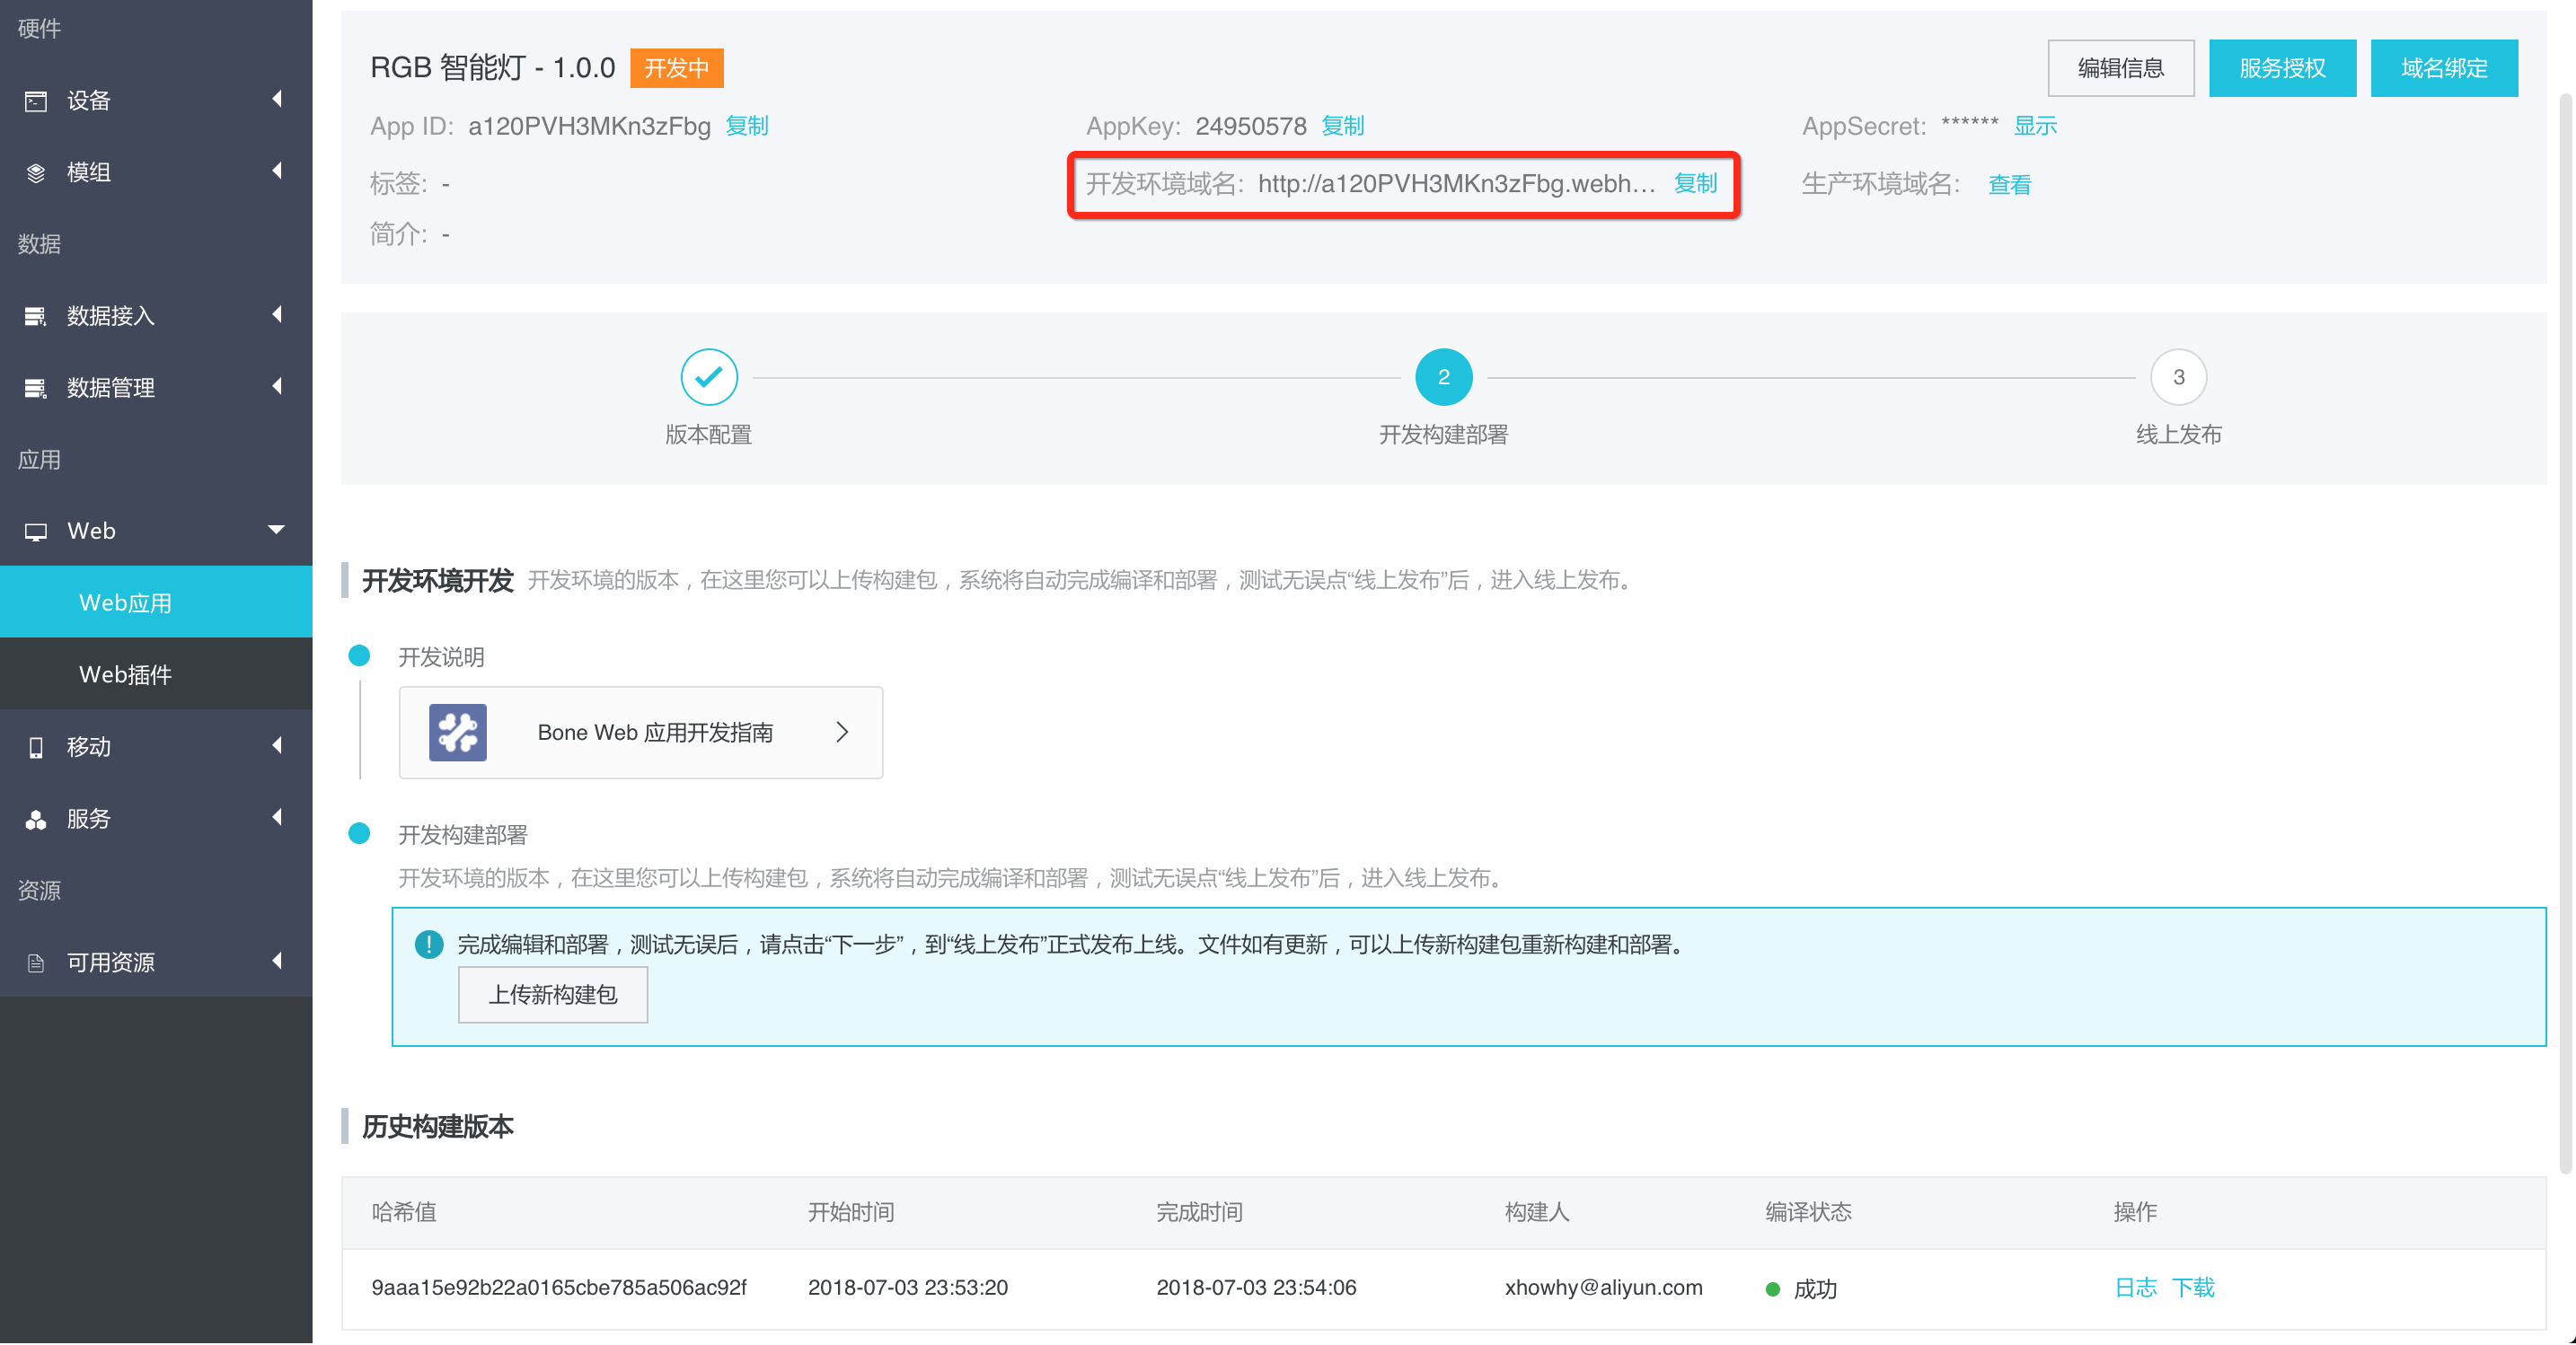
我们得到了一个 AppKey ,一个 AppSecret 和一个用来访问应用的三级域名。有了 AppKey 和 AppSecret,就能进行应用开发了。
二、Web 应用编码
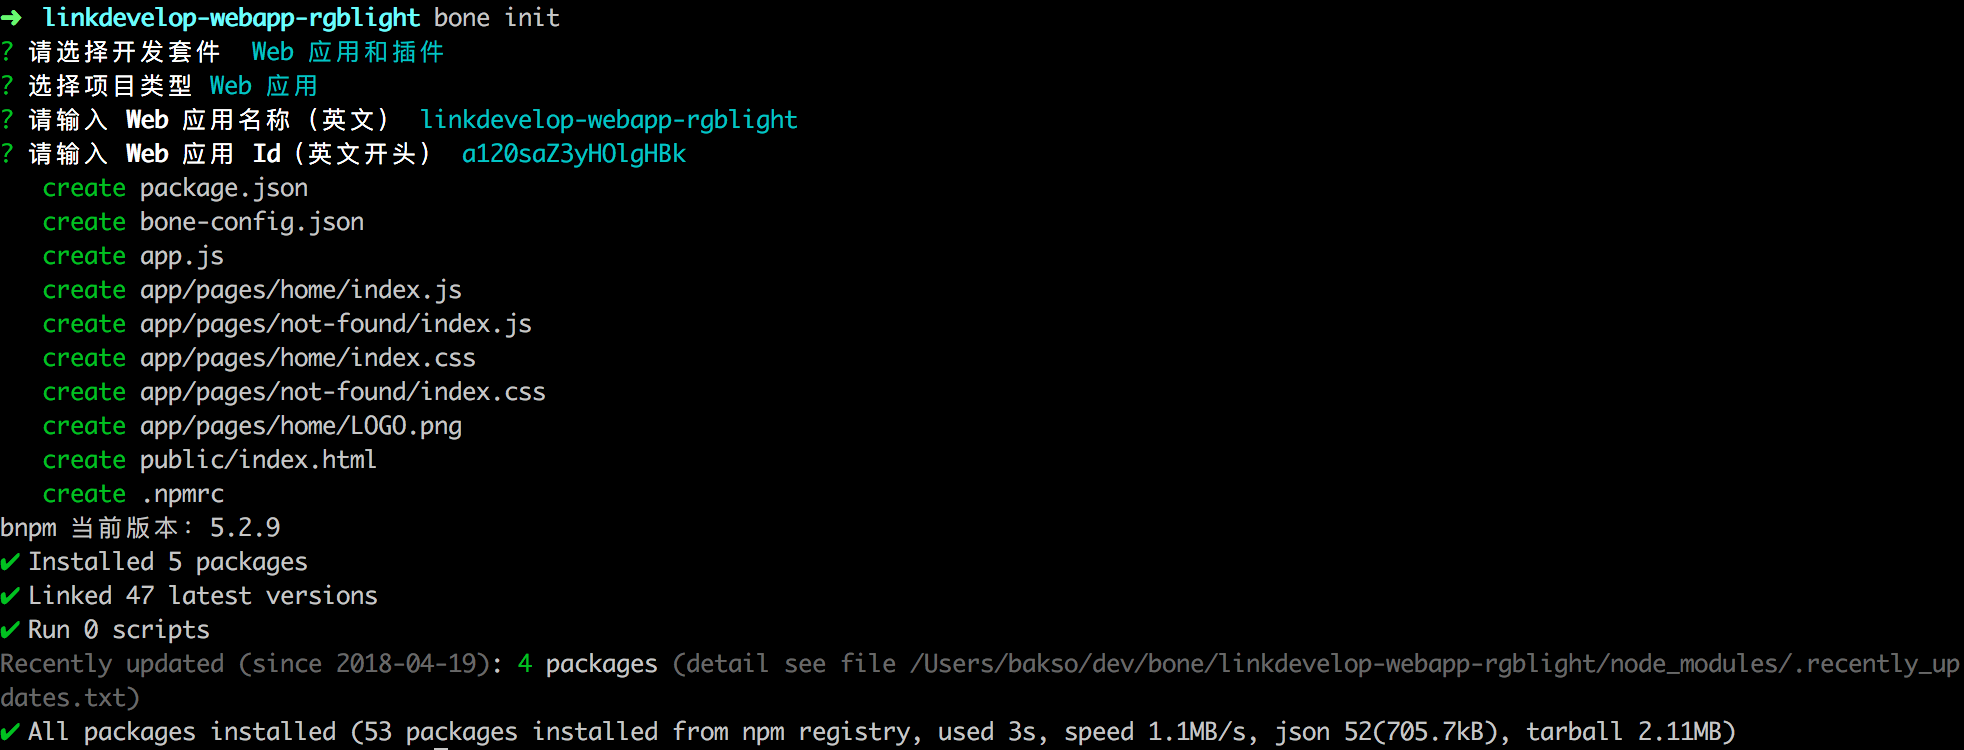
新建目录,进行项目初始化:
mkdir linkdevelop-webapp-rgblight
cd linkdevelop-webapp-rgblight
bone init
安装 @bone/iot-gateway 和 react-color 颜色选择组件:
bnpm i --save @bone/iot-gateway react-color

修改 app/pages/home/index.js 代码,内容如下:
import React, { Component } from 'react';
import { Button, Switch, Form, Grid, Input, Dialog } from '@bone/bone-web-ui';
import IotGateway from '@bone/iot-gateway';
import { HuePicker } from 'react-color';
const Row = Grid.Row;
const Col = Grid.Col;
const FormItem = Form.Item;
const formItemLayout = {
labelCol: {
fixedSpan: 12
},
wrapperCol: {
span: 12
}
};
const insetLayout = {
labelCol: { fixedSpan: 4 }
};
export default class App extends React.Component {
constructor(props) {
super(props);
this.state = {
switch: false,
color: '',
// 刷新页面不用重复输入
productKey: localStorage.getItem('productKey') || '',
deviceName: localStorage.getItem('deviceName') || ''
};
// 获取初始数据
this.getProps(props => {
this.setState({
switch: props.LightSwitch === 1,
color: rgbToHex(
props.RGBColor.Red,
props.RGBColor.Green,
props.RGBColor.Blue
)
});
});
}
getProps(cb) {
IotGateway.post({
url: 'https://api.link.aliyun.com/thing/device/status/query',
apiVer: '1.0.1',
params: {
ProductKey: this.state.productKey,
DeviceName: this.state.deviceName
}
}).then(res => {
if (res.code !== 200) {
throw new Error(res.localizedMsg || res.message);
}
let props = {};
res.data.forEach(item => {
props[item.attribute] = item.value;
});
if (cb) {
cb(props);
}
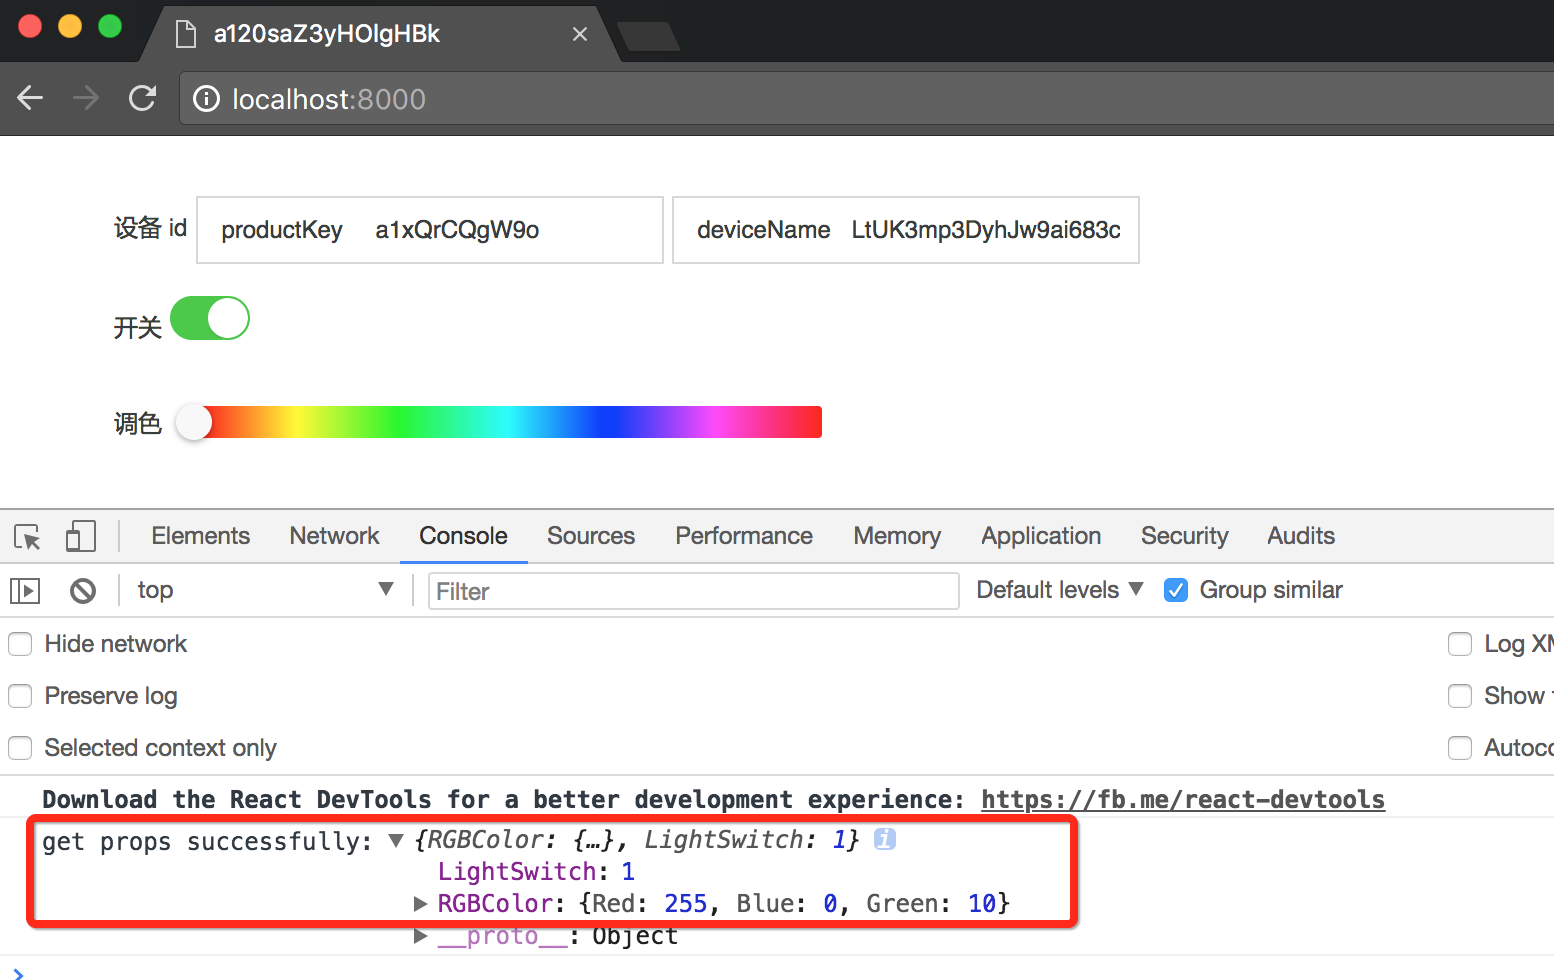
console.log('get props successfully:', props);
});
}
setProps(props) {
IotGateway.post({
url: 'https://api.link.aliyun.com/thing/device/properties/set',
apiVer: '1.0.1',
params: {
ThingId: {
productKey: this.state.productKey,
deviceName: this.state.deviceName
},
Items: props
}
}).then(res => {
if (res.code !== 200) {
throw new Error(res.localizedMsg || res.message);
}
console.log(res);
});
}
showValidationText() {
Dialog.alert({
title: '提示',
content: '请输入设备的 productKey 和 deviceName 才能控制设备哦'
});
}
onChange = checked => {
if (!this.state.productKey || !this.state.deviceName) {
this.showValidationText();
return;
}
this.setState({
switch: checked
});
this.setProps({
LightSwitch: checked ? 1 : 0
});
};
onInput = (field, value) => {
this.state[field] = value;
localStorage.setItem(field, value);
this.setState({
[field]: value
});
};
onColorChange = color => {
if (!this.state.productKey || !this.state.deviceName) {
this.showValidationText();
return;
}
this.setState({
color: color.hex
});
this.setProps({
RGBColor: hexToRgb(color.hex)
});
};
render() {
return (
<div style={{ padding: '30px 0 0 30px' }}>
<Form style={{ margin: '0 0 0 30px' }} {...formItemLayout}>
<FormItem label="设备 id">
<Row>
<Col>
<FormItem
label="productKey"
required={false}
labelAlign="inset"
{...insetLayout}
>
<Input
placeholder="请输入"
value={this.state.productKey}
onChange={value => this.onInput('productKey', value)}
/>
</FormItem>
</Col>
<Col>
<FormItem
label="deviceName"
required={false}
labelAlign="inset"
{...insetLayout}
>
<Input
placeholder="请输入"
value={this.state.deviceName}
onChange={value => this.onInput('deviceName', value)}
/>
</FormItem>
</Col>
</Row>
</FormItem>
<FormItem label="开关">
<Switch onChange={this.onChange} checked={this.state.switch} />
</FormItem>
<FormItem label="调色">
<div style={{ padding: '7px 0 0 10px' }}>
<HuePicker
onChangeComplete={this.onColorChange}
color={this.state.color}
/>
</div>
</FormItem>
</Form>
</div>
);
}
}
function rgbToHex(r, g, b) {
return '#' + ((1 << 24) + (r << 16) + (g << 8) + b).toString(16).slice(1);
}
function hexToRgb(hex) {
var result = /^#?([a-f\d]{2})([a-f\d]{2})([a-f\d]{2})$/i.exec(hex);
return result
? {
Red: parseInt(result[1], 16),
Green: parseInt(result[2], 16),
Blue: parseInt(result[3], 16)
}
: null;
}
三、运行调试
启动项目
bone start

使用 Chrome 浏览器访问:
http://localhost:8000/
这时候页面会提示输入应用的 appKey 和 appSecret,从平台上复制过来填好,点击“确认”按钮。
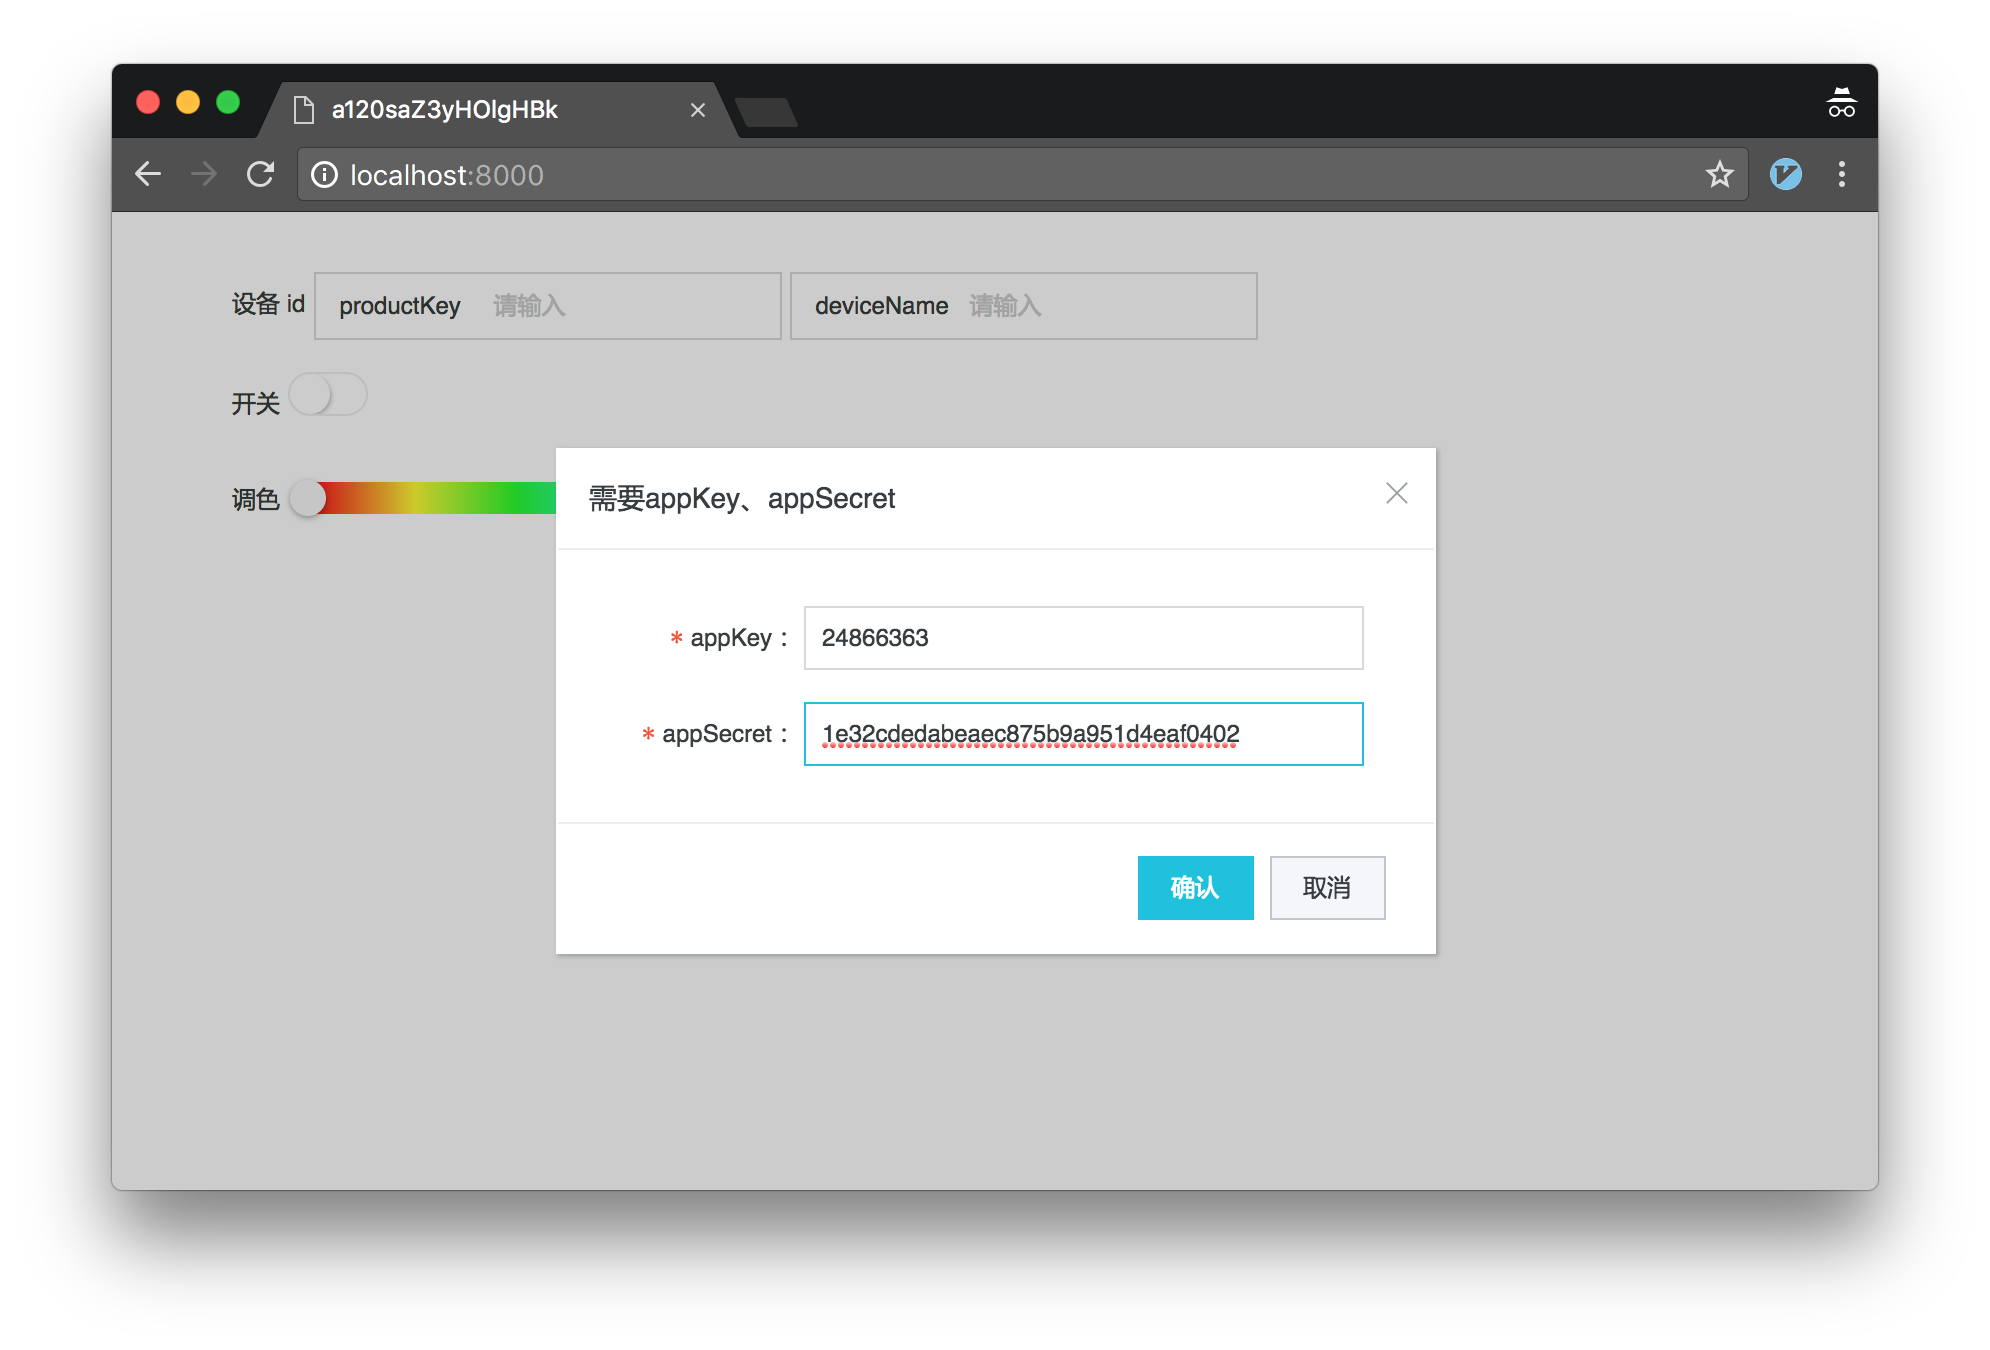
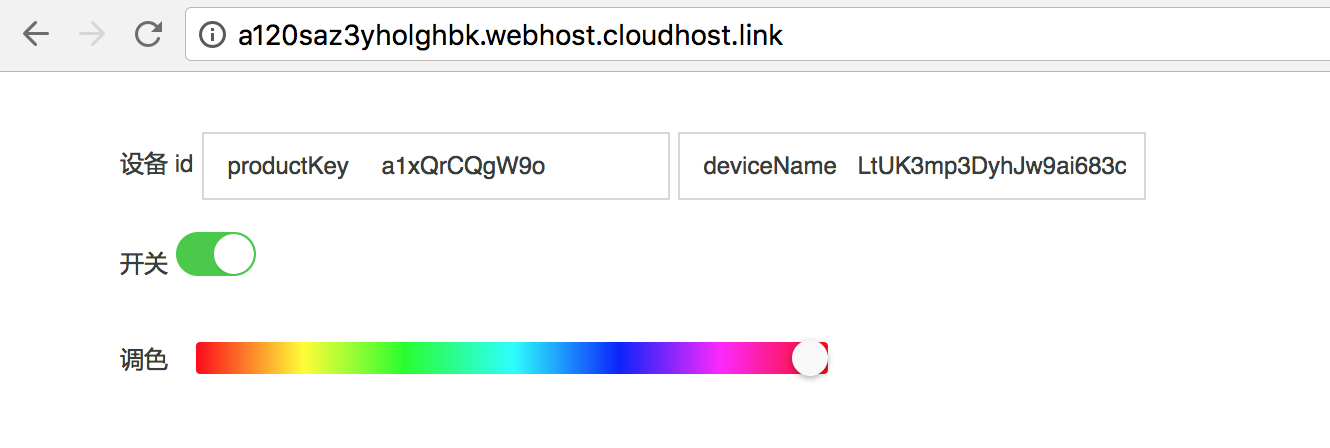
我们要在 Web 应用上控制一台设备,得知道它的唯一标识(设备id),云端才能找到对应的设备进行操作。
设备的唯一标识就是刚才创建的测试设备激活凭证中的 productKey 和 deviceName 两个字段。有了这两个字段,云端就可以找到我们的刚才开发的那台设备。
将测试设备激活凭证中的 productKey + deviceName 填入 Web 界面输入框中:

接着我们刷新一下页面,查看一下 Chrome 浏览器控制台(按 F12 或者 Ctrl+Shift+i),发现设备的属性已经能正常获取了。
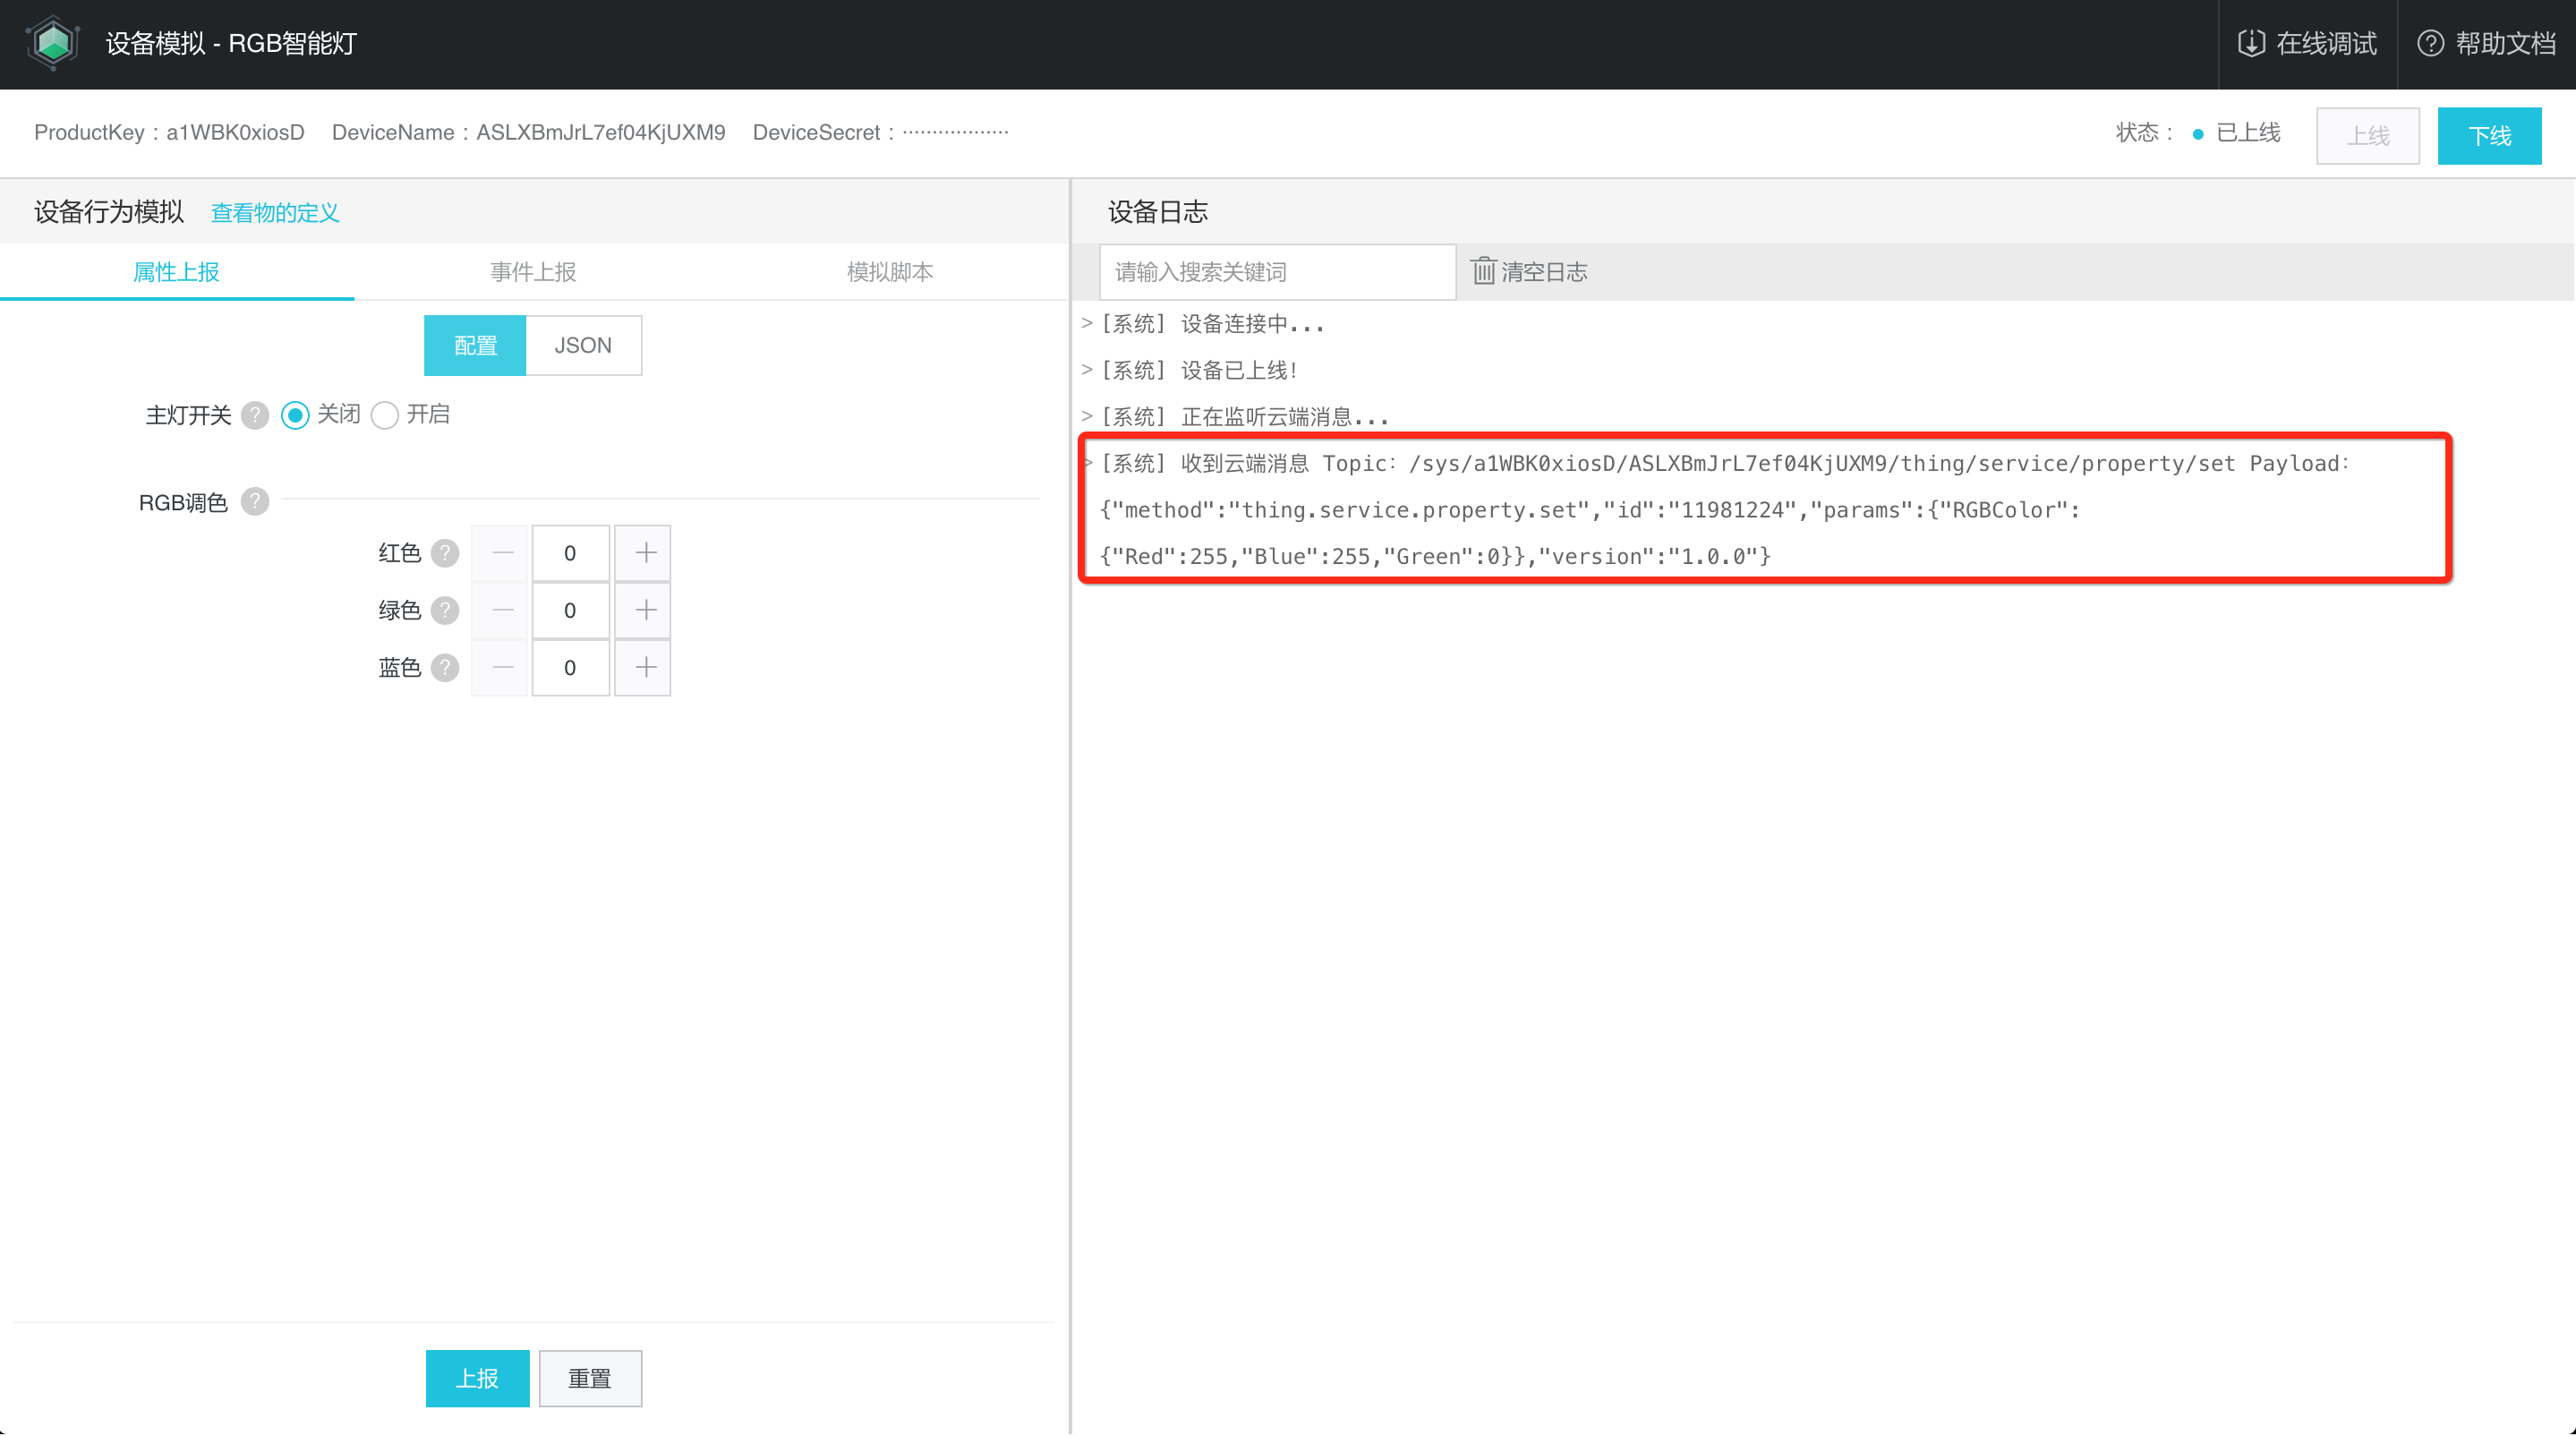
点击“设置属性”按钮,待页面刷新后,观察测试设备的日志接收情况,这里以 Web Device 模拟设备为例,可以看到 Web Device 模拟设备成功接收到到云端设置属性的消息:
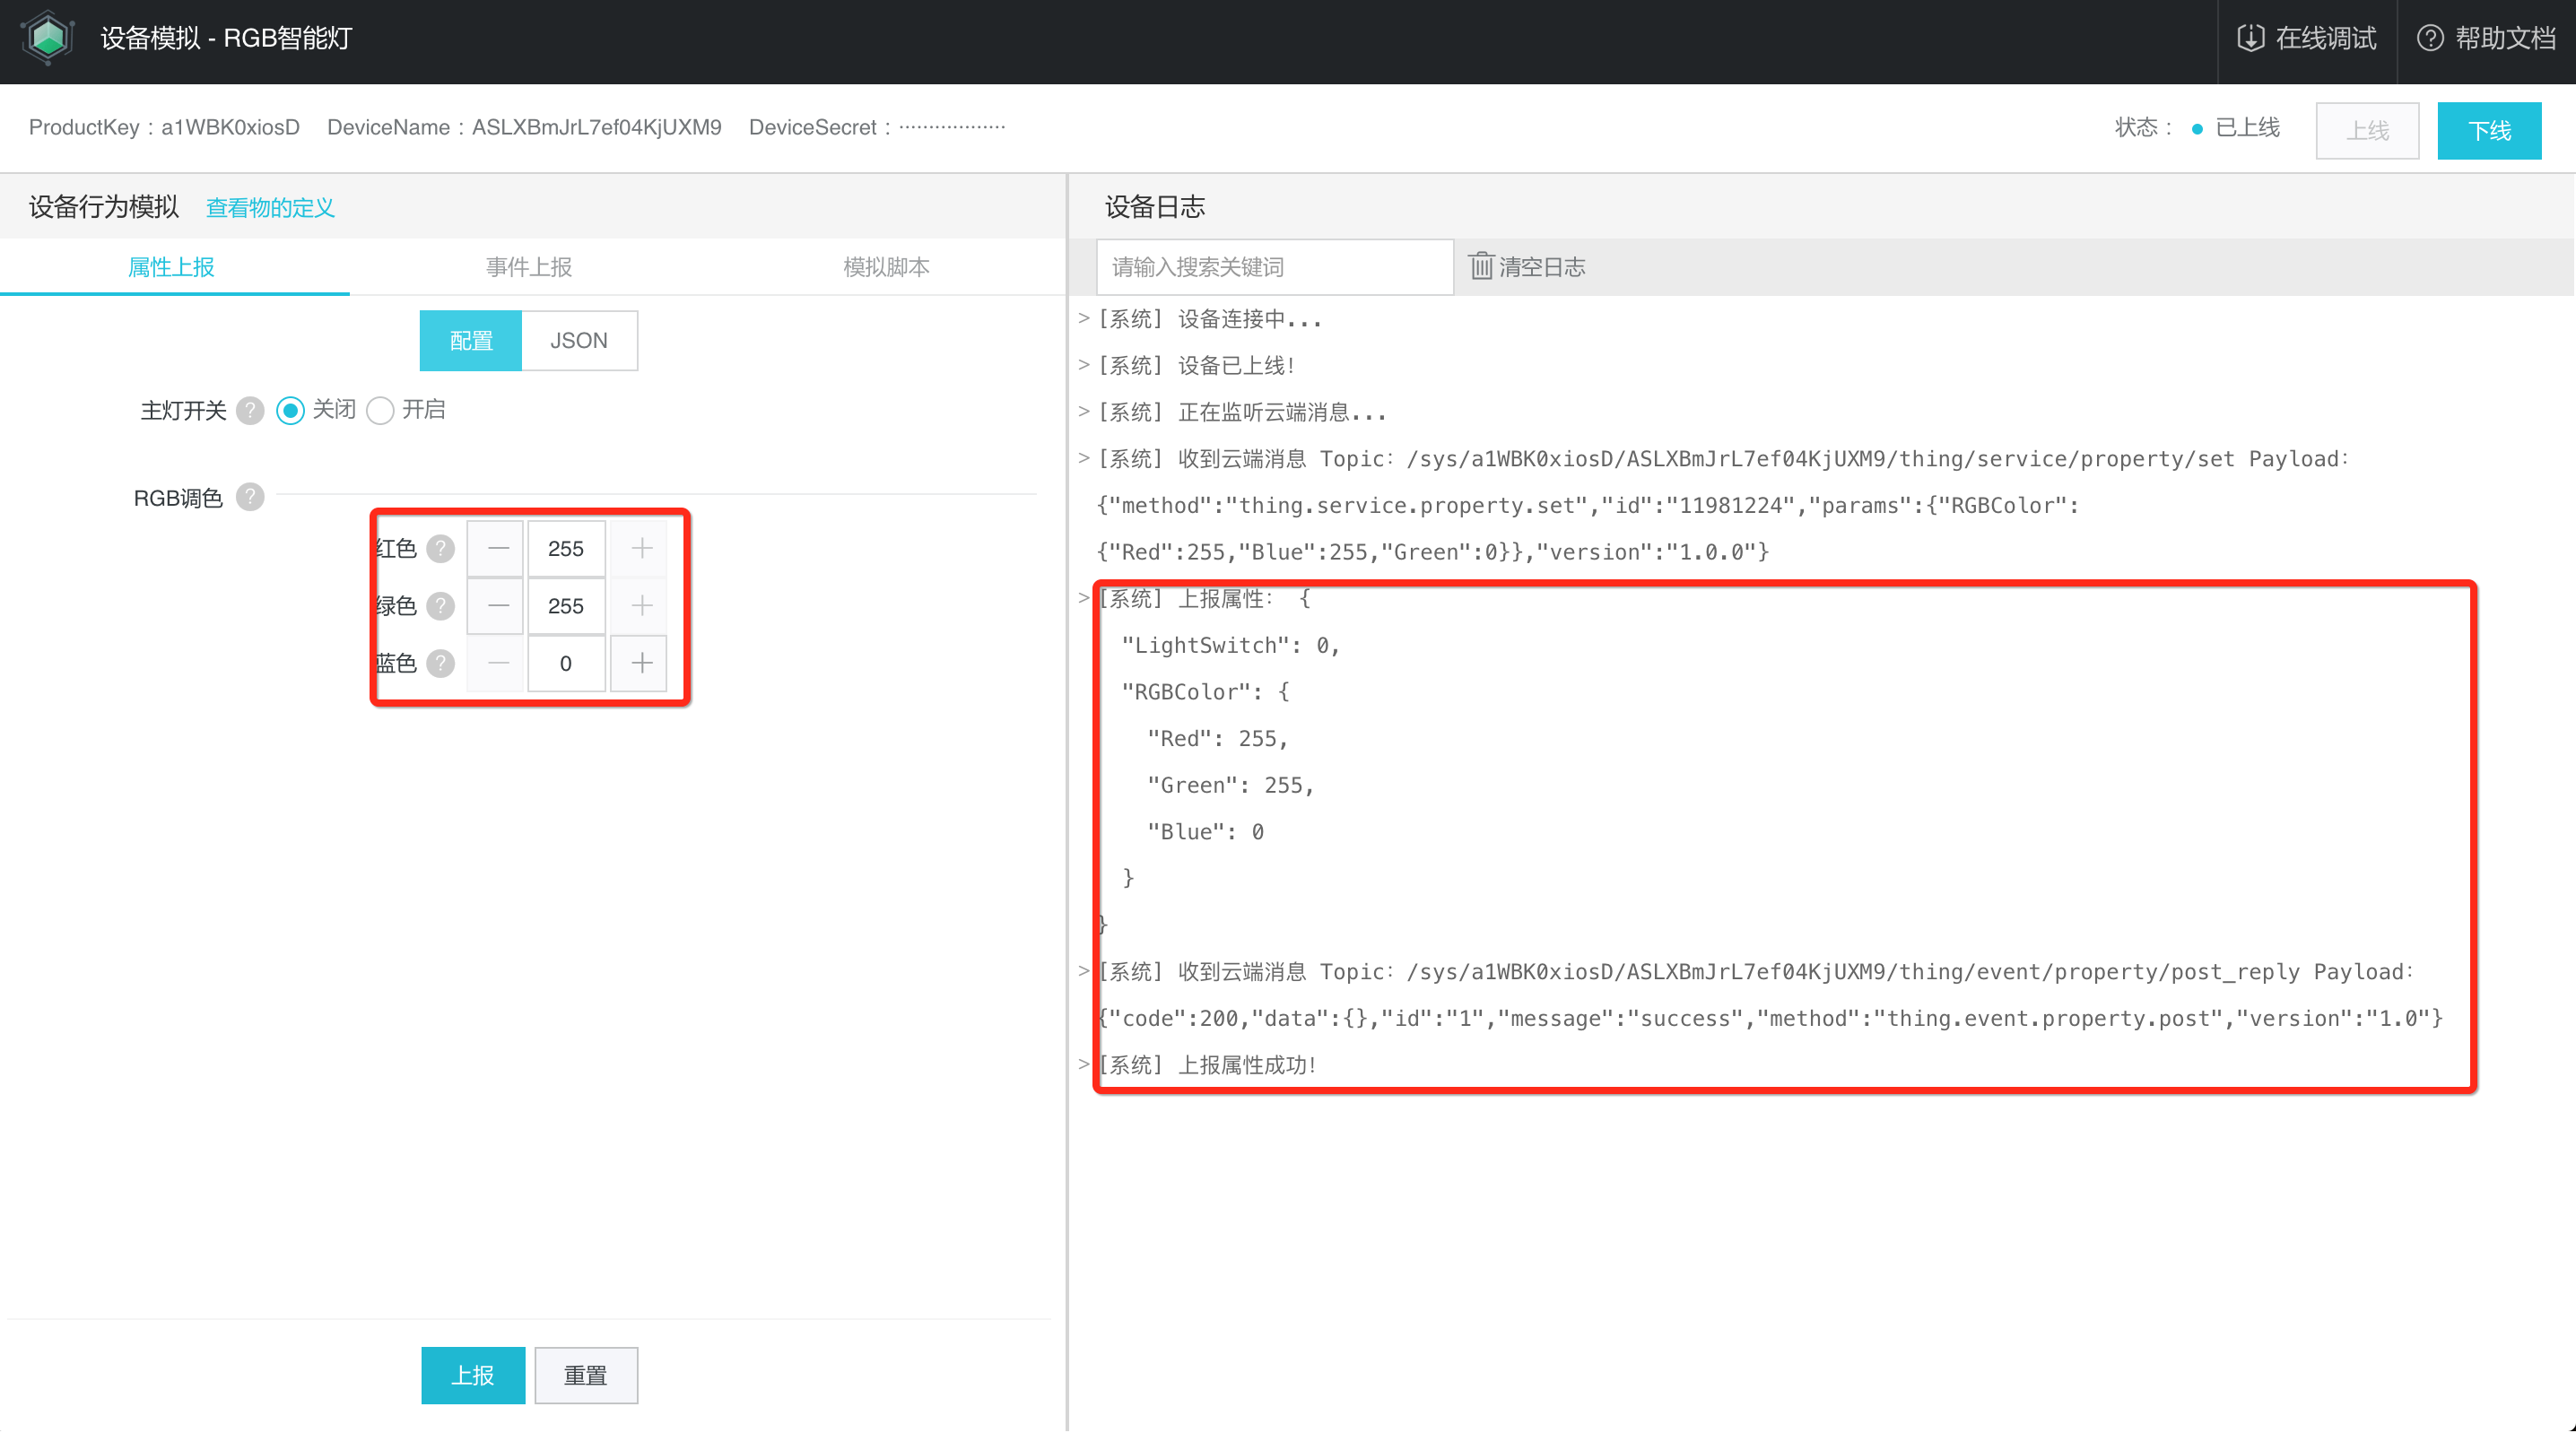
将模拟设备的 RGBColor 属性值改成(255,255,0),点击“上报”,在右侧可以看到设备上报属性成功的消息:
这时候我们再刷新应用页面,发现页面也加载到了最新上报的属性值。
至此,RGB 全彩智能灯的 Web 应用也完毕!
四、应用发布
应用的本地开发完成后,我们可以将应用发布上线,让应用可以通过外网域名访问。
在 Web 项目下执行 bone pack 命令,进行打包。

在开发部署界面上点击“上传构建包”按钮,上传上一步生成的 zip 包文件。
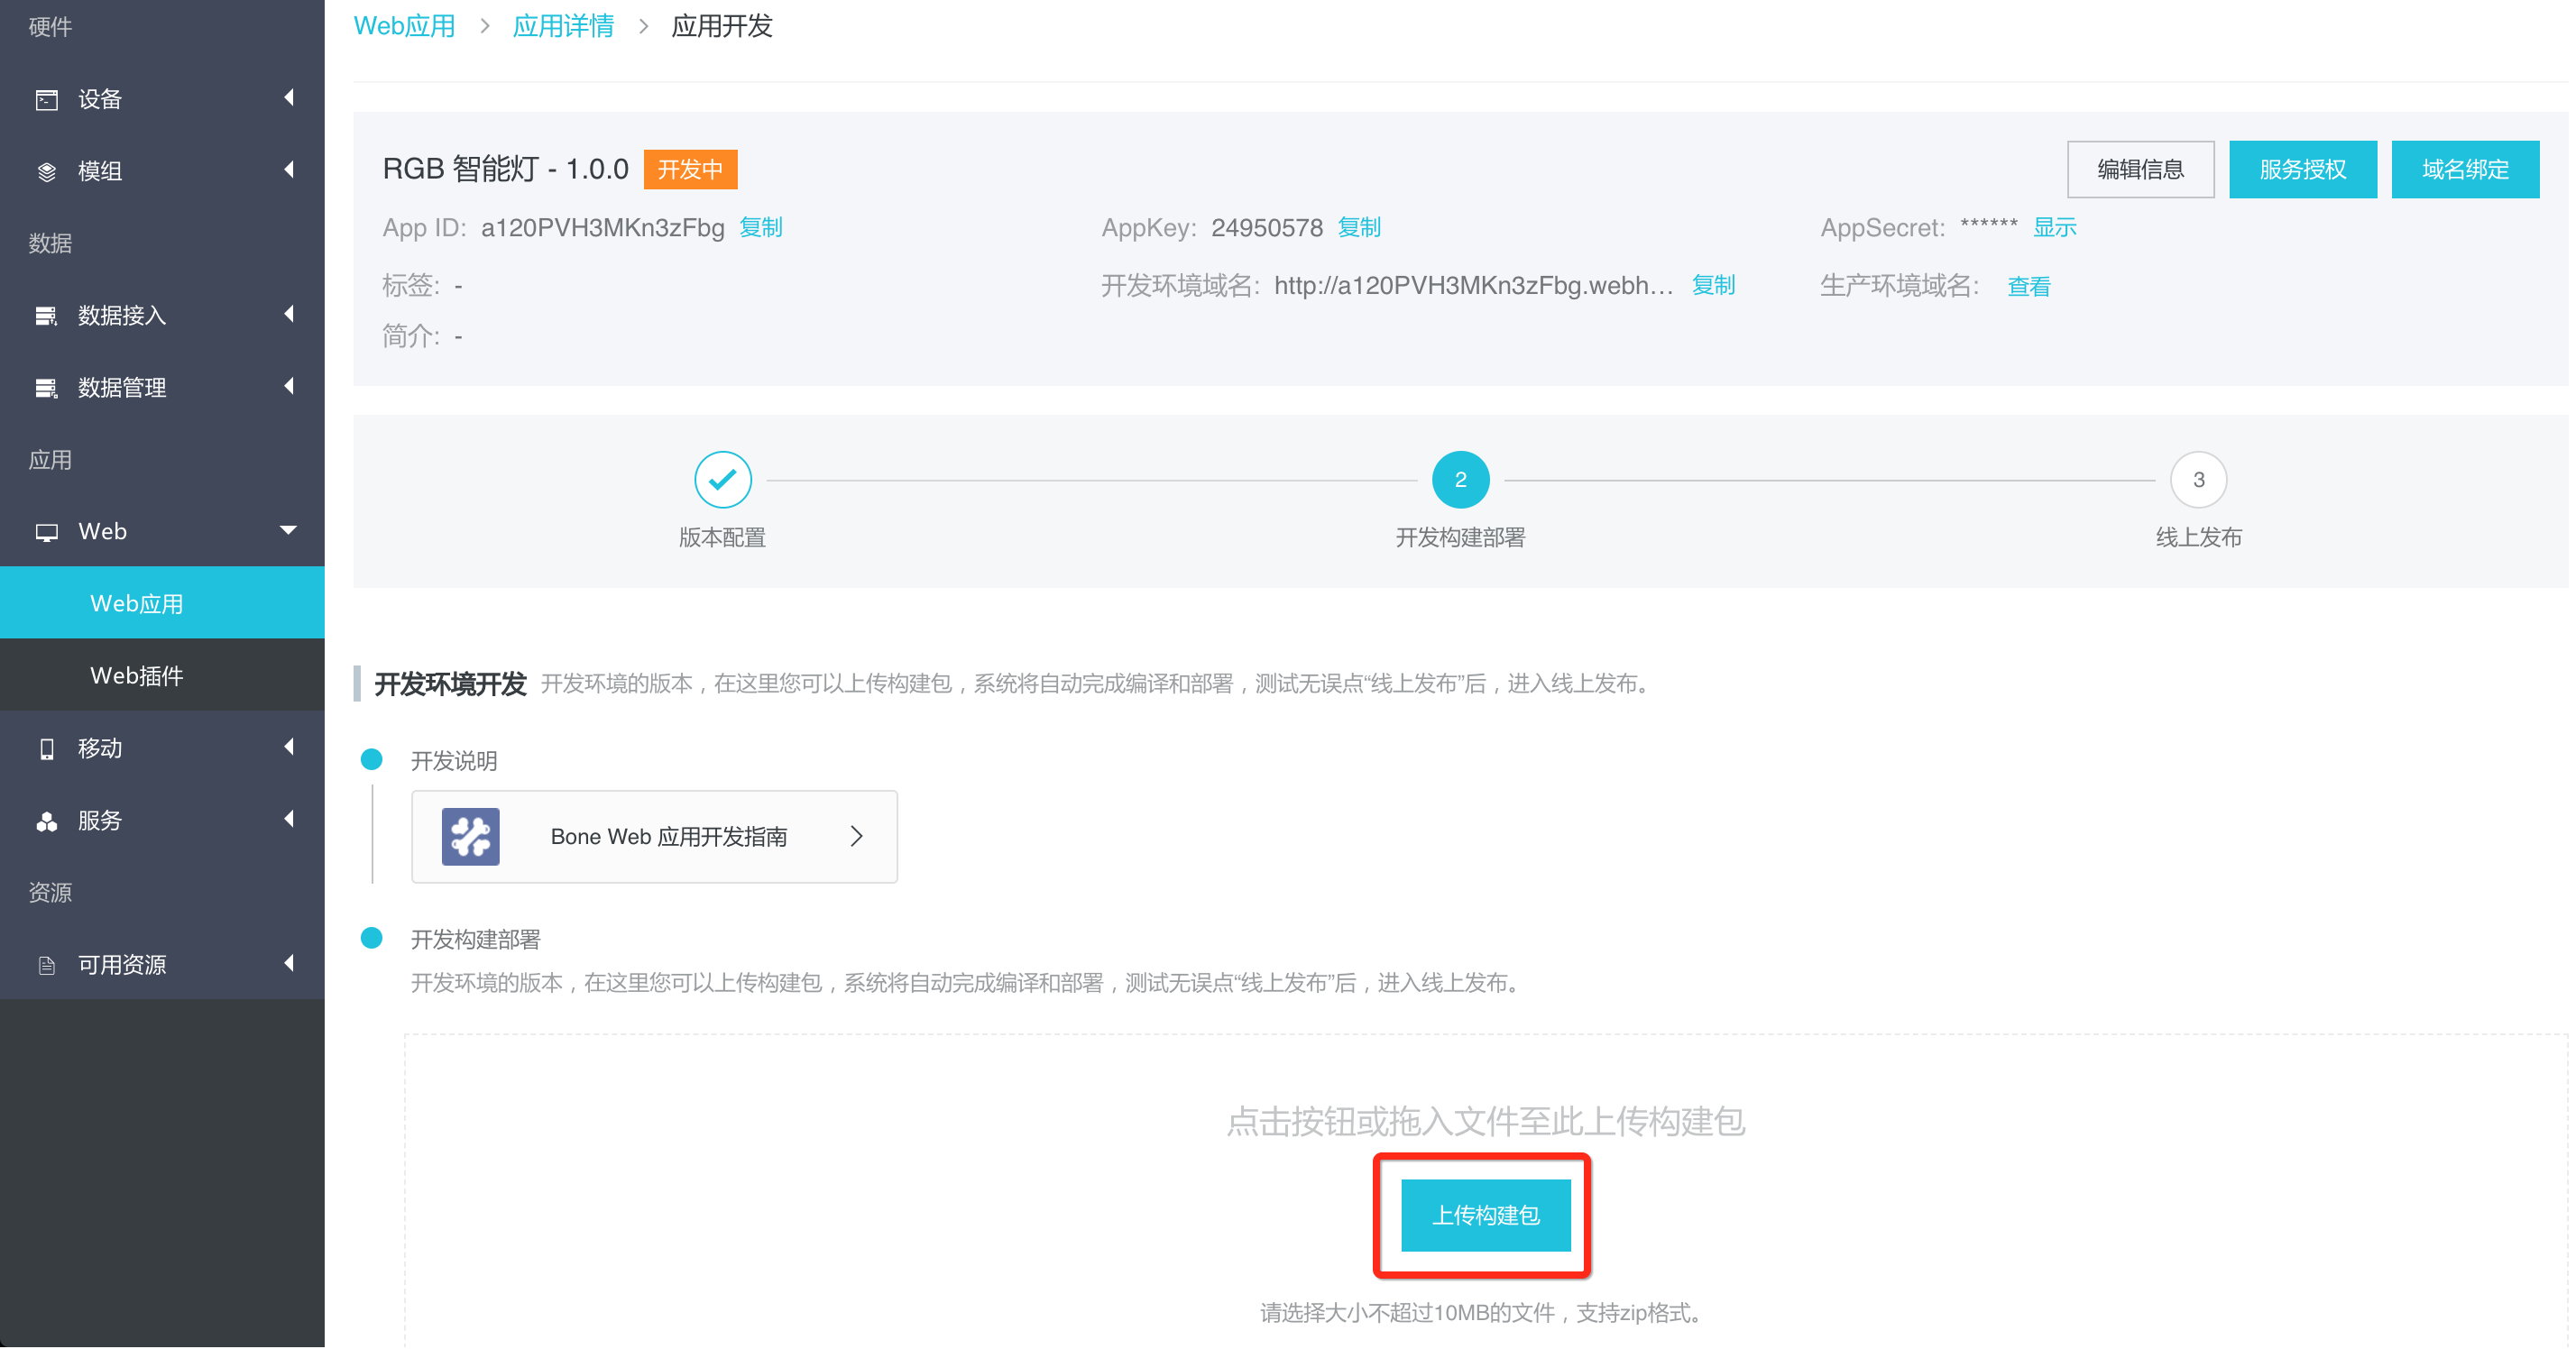
等待构建完成后,就可以通过开发环境域名访问部署好的 Web 应用了: