BoneMobile 容器 SDK
更新时间:2018-03-23 17:13:00
概述
BoneMobile 容器 SDK 为可选模块,提供加载插件的功能。如果您需要开发或者使用插件,则需要在 App 中集成 BoneMobile 容器 SDK。
| 依赖 SDK | 概述 |
|---|---|
| 日志 | 基础依赖SDK,提供客户端统一日志打印,日志等级控制,分模块日志隔离等能力 |
| API 通道 | 提供 IoT 业务协议封装的 API 网关 https 请求能力,和集成无线保镖 SDK 进行请求报文安全加签的能力 |
| MJRefresh | github 上开源的下拉刷新控件, 版本:3.1.15 |
| ZipArchive | github 上开源的 zip 解压库, 版本:1.4.0 |
集成方式
如何集成 SDK,查看这里>
初始化
BoneMobile 容器 SDK 的初始化依赖 API 通道的初始化,请参见:API 通道 SDK - 初始化
在 API 通道初始化成功后,再参考下面的示例代码初始化 BoneMobile 容器 SDK:
#import <IMSBoneKit/IMSBoneConfiguration.h>

IMSBoneConfiguration *configuration = [IMSBoneConfiguration sharedInstance];
configuration.pluginEnvironment = IMSBonePluginEnvironmentRelease;
configuration.serverEnvironment = IMSBoneServerEnvironmentRelease;
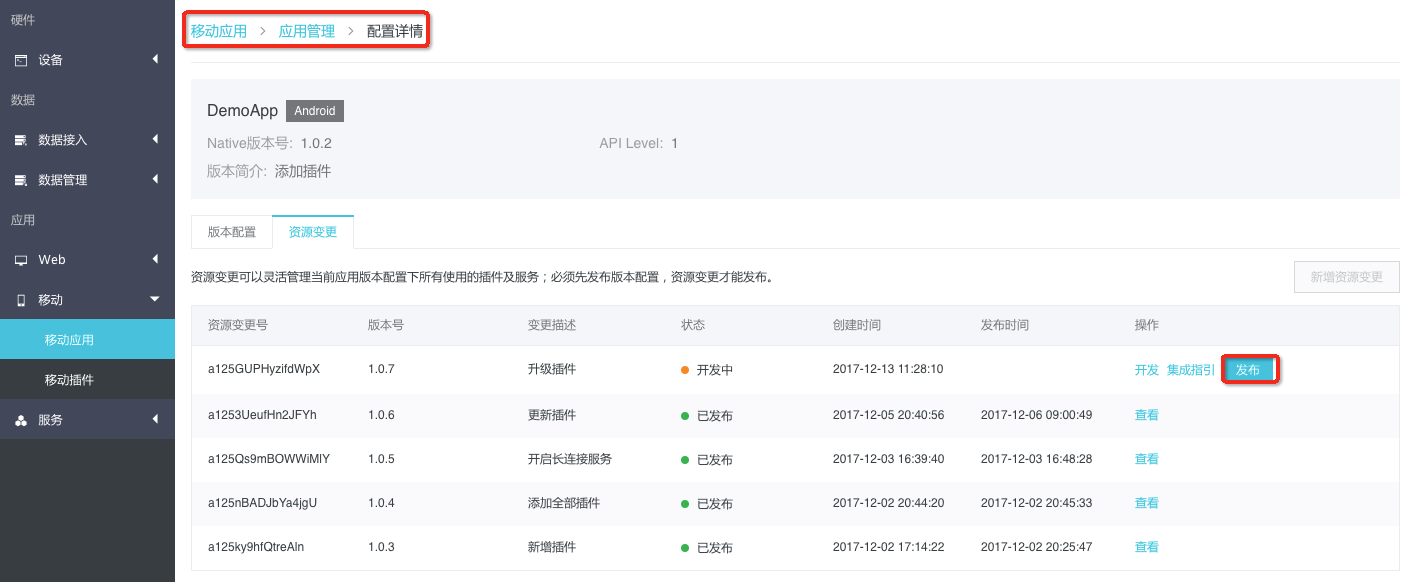
关于 pluginEnvironment 的概念, 需要联系控制台来理解:
在发布资源变更以前,可以把 pluginEnvironment 切换到开发环境来测试插件变更的效果。测试通过后,点击发布按钮后,插件的变更才会发布到生产环境。

使用方式
通过路由打开 UIViewController
#import <IMSRouter/IMSRouter.h>

NSURL *url = [NSURL URLWithString:@"link://插件ID#/"];
NSDictionary *para = @{@"key": @"value"};
[[IMSRouterService sharedService] openURL:url
                                  options:para
                        completionHandler:^(BOOL success) {
                                if (success) {
                                    NSLog(@"插件打开成功");
                                } else {
                                    NSLog(@"插件打开失败");
                                }
                            }];
直接打开 UIViewController
#import <IMSBoneKit/BoneRCTViewController.h>

NSURL *url = [NSURL URLWithString:@"{插件URL地址}"];
NSDictionary *para = @{@"key": @"value"};
BoneRCTViewController *controller = [BoneRCTViewController new];
[controller openUrl:newURL props:params];
[self.navigationController pushViewController:controller animated:YES];
本地 Debug 方式打开 UIViewController
注意:调试时需使用 Debug 的 ReactNative 库,这样才会出现调试菜单,请修改 Podfile 文件如下:
#pod 'AKReactNative', '0.41.2'
pod 'AKReactNative', '0.41.2-debug' #这是 Debug 版本,请勿使用该版本发上 appStore
示例代码如下:
__weak typeof(self) wSelf = self;
NSURLSession *session = [NSURLSession sharedSession];
NSString *host = @"/*启用Bone服务的电脑IP*/";
NSURL *url = [NSURL URLWithString:[NSString stringWithFormat:@"http://%@:8081/boneDebugUrl?platform=ios&ip=%@", host, host]];
NSURLRequest *request = [NSURLRequest requestWithURL:url];

NSURLSessionDataTask *task = [session dataTaskWithRequest:request
                                        completionHandler:^(NSData *data, NSURLResponse *response, NSError *error)
{
    dispatch_async(dispatch_get_main_queue(), ^{
        if (!error) {
            NSDictionary *responseJSON = [NSJSONSerialization JSONObjectWithData:data options:NSJSONReadingAllowFragments error:nil];
            int responseCode = [[responseJSON objectForKey:@"code"] intValue];
            if (responseCode == 200) {
                NSDictionary *responseData= [responseJSON objectForKey:@"data"];
                NSString *urlString = responseData[@"url"];
                BoneRCTViewController *controller = [BoneRCTViewController new];
                [controller openUrl:[NSURL URLWithString:urlString] props:[responseData mutableCopy]];
                controller.hidesBottomBarWhenPushed = YES;
                [self.navigationController pushViewController:controller animated:YES];
            }
        }
    });
}];
[task resume];
更多功能
集成账号能力
BoneKit支持账号插件,可以支持自定义账号接入,可以自行实现 IMSAccountProtocol,IMSAccountUIProtocol协议,然后设置 IMSAccountService 的sessionProvider,accountProvider 来完成;如账号使用OpenAccount对接的话,可以参考账号 Demo 下 IMSOpenAccount 的实现。
代码示例如下:
// 引入头文件
#import <IMSAccount/IMSAccountService.h>

IMSOpenAccount *openAccount = [IMSOpenAccount sharedInstance];
[IMSAccountService sharedService].sessionProvider = openAccount;
[IMSAccountService sharedService].accountProvider = openAccount;