【品牌App】接入天猫精灵教程
更新时间:2018-09-05 15:59:38
我们和天猫精灵深度合作,为平台用户提供了免费的天猫精灵快捷通道。
客户只要在平台上完成相应的配置,并在app上集成淘宝授权,即可实现自有品牌App控制的设备,被天猫精灵音箱控制。
平台遵循ICA数据标准,为了确保您的设备可以被天猫精灵准确识别和控制,请确保使用标准功能。
本文针对消费者在App端、开发者在控制台的使用步骤,分别做了介绍。
消费者使用
使用方式如下:
1、用户拥有一台支持天猫精灵语音控制的设备,下载厂家自有品牌App,配网绑定该设备。
2、用户拥有一台天猫精灵音箱,下载“天猫精灵”App并绑定该音箱。
3、在厂家自有品牌App中,用户授权淘宝账号,输入淘宝账号密码。
4、用户在“天猫精灵”App,我的-智能家居-添加智能设备-绑定平台账号,点击“阿里智能”-“绑定账号”,即可完成授权,可以看到自有品牌App中绑定的设备。
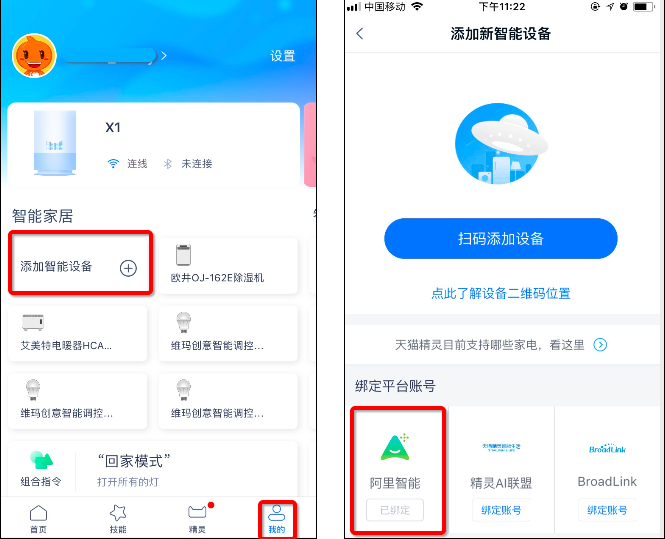
5、完成以上步骤后,您可以通过天猫精灵音箱控制您的设备了(针对平台支持天猫精灵的品类)
控制台开通(免费)
1. 确保自己产品在天猫精灵可控范围内
平台已支持品类:
在控制台-中国站-产品-人机交互-天猫精灵中,可以查看所有平台和天猫精灵完成对接的品类:
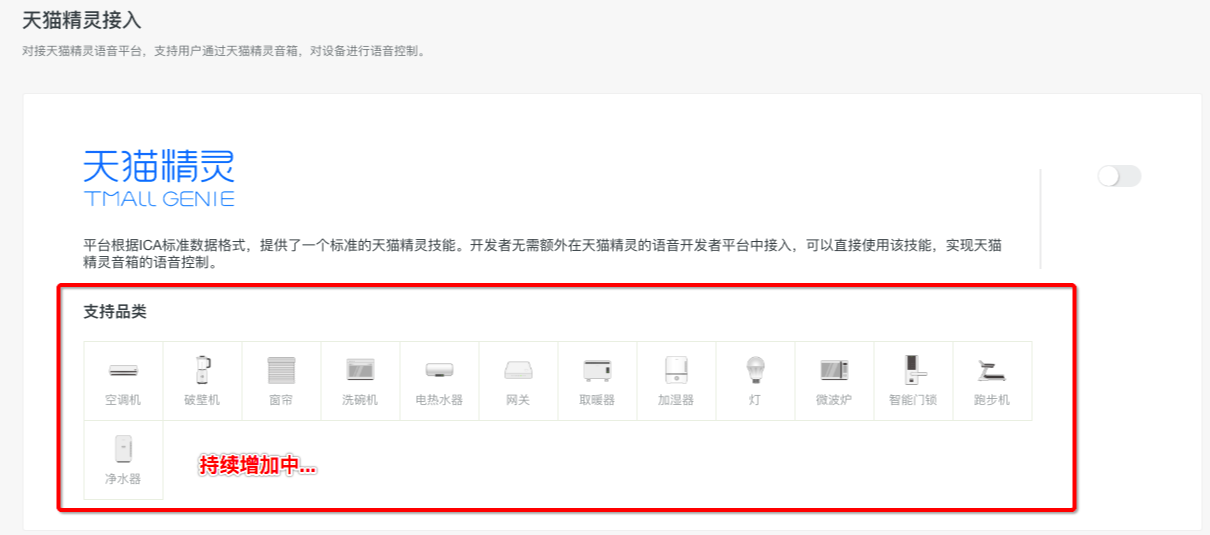
天猫精灵官方推荐品类:点击查看
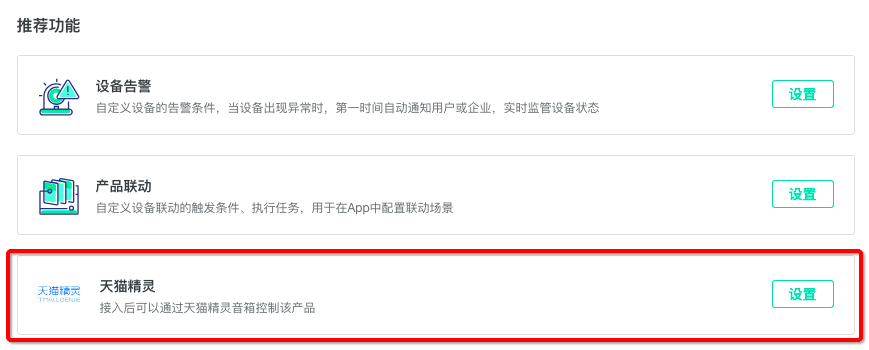
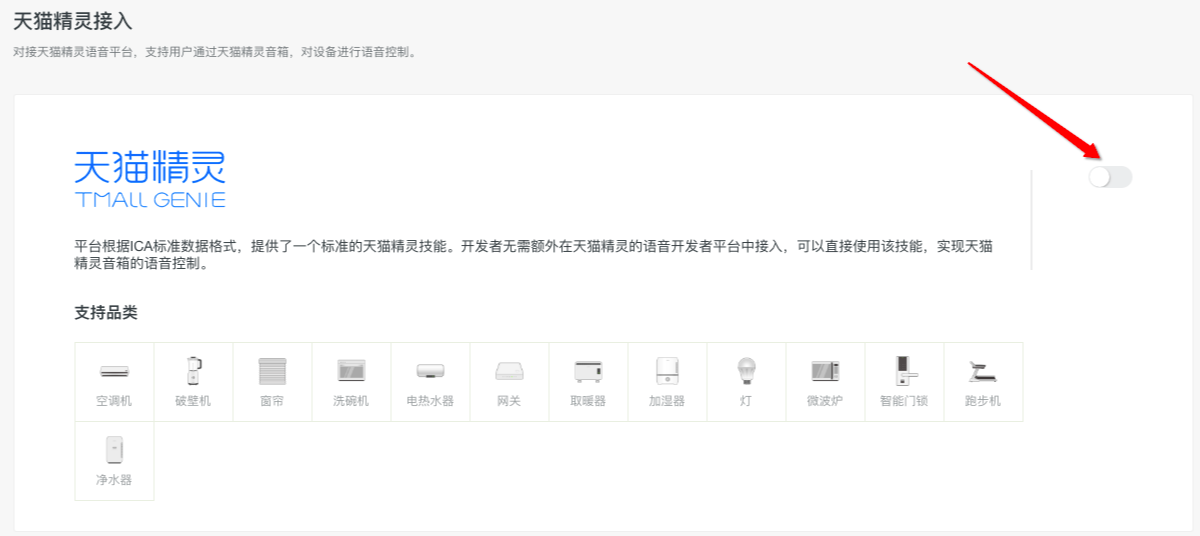
2. (免费)开通天猫精灵服务
2.1 如果确认您的品类可以支持天猫精灵,请在中国站-创建项目-创建产品-人机交互-天猫精灵设置,一键开通。
3. 设备调试
3.1 将测试设备三元组烧录到您的测试设备中,并调试设备;
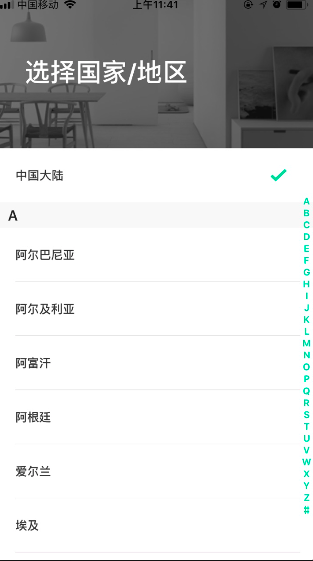
3.2 您也可以下载开发版的公版App,对设备进行调试。在首次注册账号时,【重要】注意选择中国地区:
3.3 根据文档,绑定天猫精灵App,实现音箱和设备控制的调试。
4. App开发
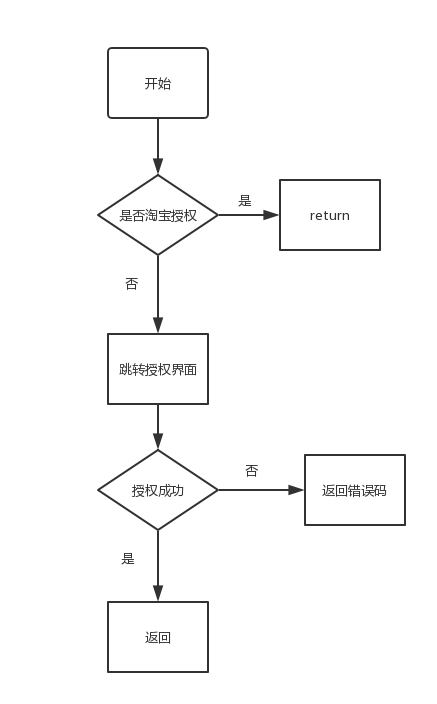
由于天猫精灵使用淘宝账号体系,厂家自有品牌App中,需要根据以下方式,集成淘宝的账号授权,实现和天猫精灵的对接:
淘宝登录授权页面的唤起,接口的调用开发步骤
如图:
Android示例代码:
1.点击跳转有webview的Activity,在webview中打开下面的Url 需要拼接appkey
String url = "https://oauth.taobao.com/authorize?response_type=code&client_id=" + appKey + "&redirect_uri=(此处填入控制台定义的回调地址)&view=wap";
2.在shouldOverrideUrlLoading中判断地址是否包含code,取到code 并传到上一界面。
mWebView.setWebViewClient(new WebViewClient() {
            //设置结束加载函数
            @Override
            public void onPageFinished(WebView view, String url) {
                topbar.setTitle(view.getTitle());
            }
            @Override
            public boolean shouldOverrideUrlLoading(WebView view, String url) {
                if (isTokenUrl(url)) {
                    Intent intent = new Intent();
                    intent.putExtra("AuthCode", mAuthCode);
                    setResult(RESULT_CODE, intent);
                    finish();
                    return true;
                }
                view.loadUrl(url);
                return false;
            }
        });

  private boolean isTokenUrl(String url) {
        if (!TextUtils.isEmpty(url)) {
            if ( url.contains("code=")) {
                String[] urlArray = url.split("code=");
                if (urlArray.length > 1) {
                    String[] paramArray = urlArray[1].split("&");
                    if (paramArray.length > 1) {
                        mAuthCode = paramArray[0];
                        return true;
                    }
                }
            }
        }
        return false;
    }
3.根据code绑定账户代码如下:
 public void bindAccount(String authCode) {
        if (null == mIoTAPIClient) {
            return;
        }

        JSONObject params = new JSONObject();
        if (null != authCode) {
            params.put("authCode", authCode);
        }
        Map<String, Object> requestMap = params.getInnerMap();

        IoTRequest ioTRequest = getBaseIoTRequestBuilder(MineConstants.APICLIENT_VERSION105)
                .setPath(MineConstants.APICLIENT_PATH_BIND_ACCOUNT)
                .setParams(requestMap)
                .setScheme(Scheme.HTTPS)
                .build();
        mIoTAPIClient.send(ioTRequest, mListener);

    }
iOS示例代码:
1、点击授权按钮,进入授权界面,加载webView:
授权网址url = "https://oauth.taobao.com/authorize?response_type=code&client_id=项目appKey&redirect_uri=此处填入控制台定义的回调地址&view=wap"
参考案例:
初始化一个webView,设置代理加载

- (void)viewDidLoad {
    [super viewDidLoad];
    [super viewDidLoad];
    WKWebView *webView = [[WKWebView alloc]init];
    [self.view addSubview:webView];
    [webView mas_makeConstraints:^(MASConstraintMaker *make) {
            make.left.equalTo(self.view);
            make.right.equalTo(self.view);
            make.top.equalTo(self.view);
            make.bottom.equalTo(self.view);
        }];
    webView.navigationDelegate = self;//代理:WKNavigationDelegate
    [webView loadRequest:[NSURLRequest requestWithURL:[NSURL URLWithString:[NSString stringWithFormat:@"https://oauth.taobao.com/authorize?response_type=code&client_id=%@&redirect_uri=控制台定义的回调地址&view=wap", 项目的appkey]]]];
}
2、加载页面成功,进行真实的淘宝账号登录
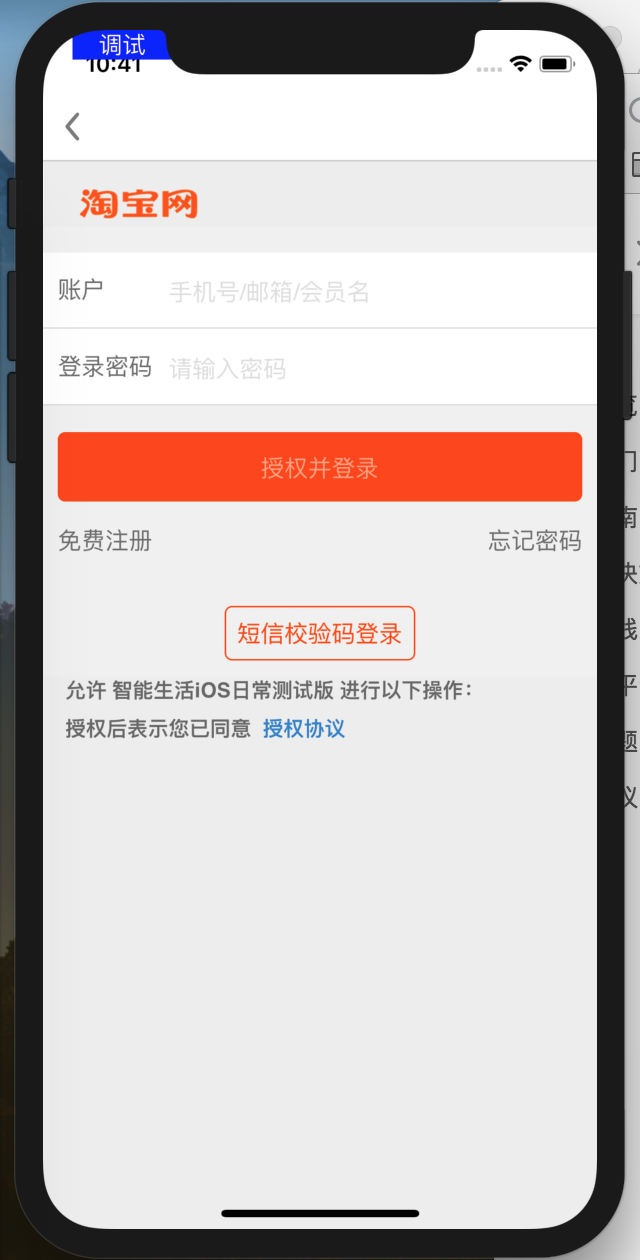
3、登录成功后,处理回调:
- (void)webView:(WKWebView *)webView decidePolicyForNavigationAction:(WKNavigationAction *)navigationAction decisionHandler:(void (^)(WKNavigationActionPolicy))decisionHandler {

    NSRange range = [navigationAction.request.URL.absoluteString rangeOfString:@"控制台定义的回调地址"];
    if (range.location){
        //允许跳转
        decisionHandler(WKNavigationActionPolicyAllow);
    } else {
        //不允许跳转
        decisionHandler(WKNavigationActionPolicyCancel);
        NSURLComponents *components = [NSURLComponents componentsWithString:navigationAction.request.URL.absoluteString];

        for (NSURLQueryItem *item in components.queryItems){
            if ([item.name isEqualToString:@"code"]){
                //用户绑定淘宝ID请求
                [IMSTmallSpeakerApi bindTaobaoIdWithParams:@{@"authCode":item.value} completion:^(NSError *err, NSDictionary *result) {

                    if (self.completion){
                        self.completion(err, result);
                    }
                    [self.navigationController popViewControllerAnimated:YES];
                }];
                break;
            }
        }
    }
}
注释:涉及接口及封装
// 用户绑定淘宝Id
+ (void)bindTaobaoIdWithParams:(NSDictionary *)para
                    completion:(void (^)(NSError *, NSDictionary *))completion{
    [self requestTmallSpeakerApi:@"/account/taobao/bind" version:@"1.0.5" params:para completion:completion];
}
此处para = @{@"authCode":@"xxxx"},其中xxxx为网页回调的code,具体查看【步骤3、登录成功后,处理回调:】
// 封装的请求类,依赖请求类#import <IMSApiClient/IMSApiClient.h>

+ (void)requestTmallSpeakerApi:(NSString *)api
                       version:(NSString *)ver
                        params:(NSDictionary *)para
                    completion:(void (^)(NSError *, id))completion {

    IMSIoTRequestBuilder *builder = [[IMSIoTRequestBuilder alloc] initWithPath:api
                                                                    apiVersion:ver
                                                                        params:para];
    [builder setScheme:@"https"];

    IMSRequest *request = [[builder setAuthenticationType:IMSAuthenticationTypeIoT] build];
    [IMSRequestClient asyncSendRequest:request responseHandler:^(NSError * _Nullable error, IMSResponse * _Nullable response) {
        if (completion) {
            //返回请求过期后,需要重新登录;重新登录后重新初始化主框架,不需要重新请求
            if (response.code == 401) {
                if (NSClassFromString(@"IMSAccountService") != nil) {
                    // 先退出登录
                    if ([[IMSAccountService sharedService] isLogin]) {
                        [[IMSAccountService sharedService] logout];
                    }
                    return;
                }
            }

            if (!error && response.code == 200) {
                completion(error, response.data);
                return ;
            }

            NSError *bError = [NSError errorWithDomain:NSURLErrorDomain
                                                  code:response.code
                                              userInfo:@{NSLocalizedDescriptionKey: response.localizedMsg ? : @"服务器应答错误"}];
            completion(bError, nil);
            return;
        }
    }];
}
4、处理回调,code200,授权成功,刷新页面
5、解绑操作:调用接口解除绑定(参考)
// 用户解绑淘宝Id
+ (void)unbindTaobaoIdWithParams:(NSDictionary *)para
                      completion:(void (^)(NSError *, NSDictionary *))completion{
    [self requestTmallSpeakerApi:@"/account/thirdparty/unbind" version:@"1.0.5" params:para completion:completion];
}

此处para = @{@"accountType":@"TAOBAO"}
6、判断是否已绑定
 // 查询用户绑定的淘宝Id

+ (void)getTaobaoIdWithParams:(NSDictionary *)para
                   completion:(void (^)(NSError *, NSDictionary *))completion{
    [self requestTmallSpeakerApi:@"/account/thirdparty/get" version:@"1.0.5" params:para completion:completion];
}
此处para = @{@"accountType":@"TAOBAO"}

返回数据存在以下内容代表已绑定;
{
    accountId = 90xxx335;
    accountType = TAOBAO;
    linkIndentityId = 50ebop9xxxxxxxxxxxxxx8dbc58643423092968;
}